Written By: Dean Shali
Fact Checked By: Sabré Cook
Reviewed By: Tamara Warren
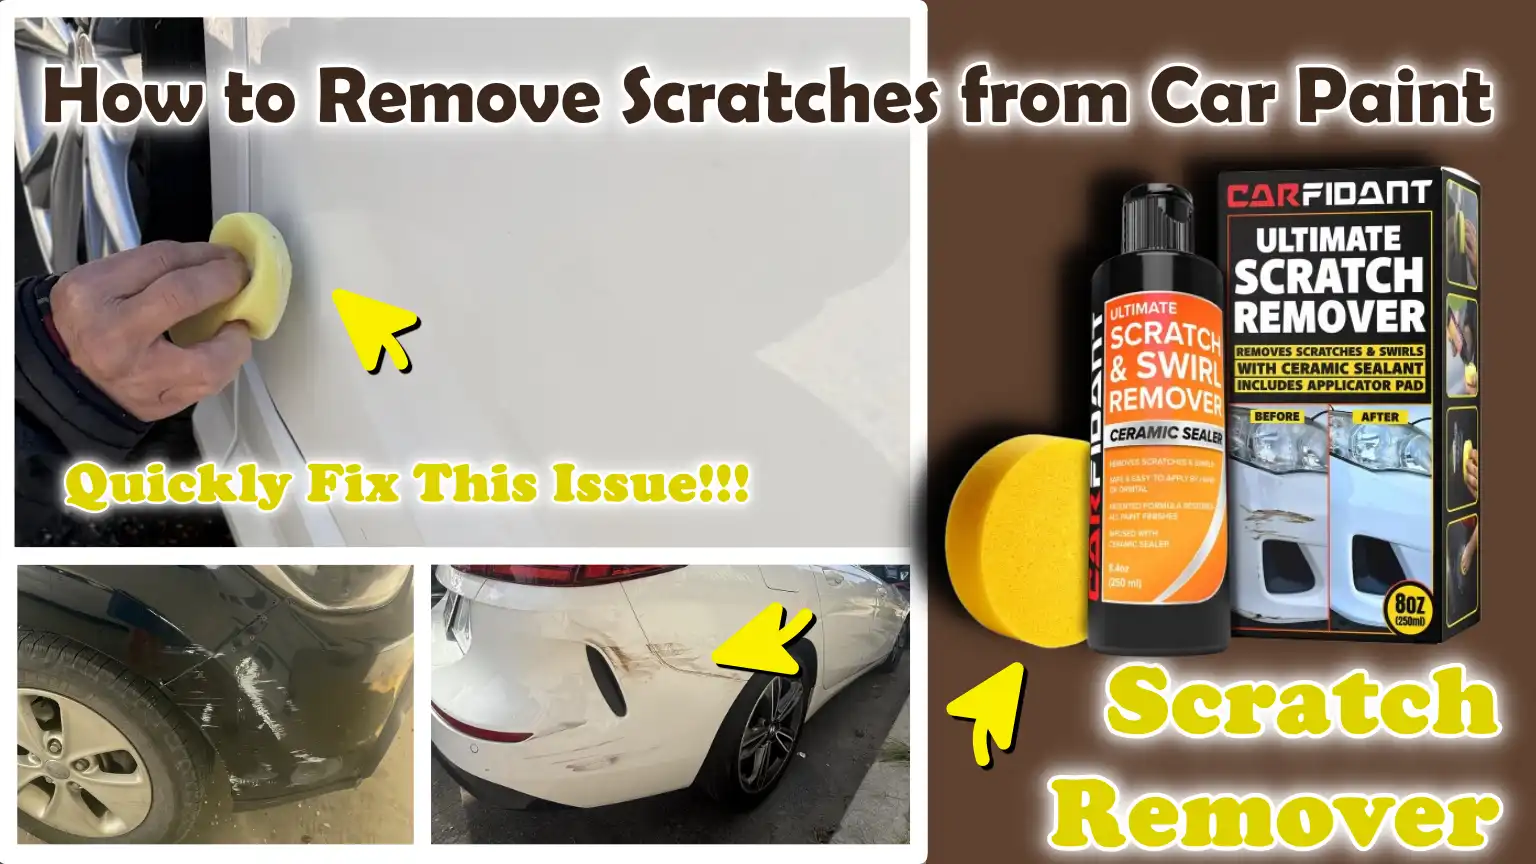
Without a doubt, car paint scratches are one of the most common and annoying issue that all the vehicle owners has to face one day, but they can be fixed much more easily than most people think of it.
Literally, even with the simple actions you can get “HELL” lot of scratches such as: using improper washing methods, using a dirty cloth or brushing the dust and debris that can create the fine scratches which is also known as Swirl Marks.
Additionally, modern car paint is made up of multiple layers such as: clear coat that literally protects the color underneath, but you need to understand that this top layer is only a few microns thick and that can actually wear down over the period of time.
So, whenever these scratches go more deeper and deeper as the day passes, then they can reach the paint layer or even expose the primer, which literally increases the risk of fading, oxidation and eventually rust if you left it untreated.
That’s why, we have come up with this proper guide about How to Remove Scratches from Car Paint, so that you can identify the different types of scratches, what is causing them and safest method to remove or repair them in effective way.
Now, Let’s Understand the Different Types of Car Scratches
Car paint is not merely a single layer; rather, it consists of multiple layers that work together to protect your vehicle and provide it with a glossy finish.
The outermost layer is known as the ‘clear coat,’ which acts as a transparent shield, guarding against sunlight, dust and minor wear and tear.
Beneath this lies the ‘base coat,’ which gives your car its actual color; situated beneath that are the ‘primer’ and the vehicle’s ‘metal body.’
When a scratch occurs, its depth determines the severity of the damage and the specific repair method required to fix it.
Many people make the mistake of treating all scratches as identical; however, employing the wrong approach may either fail to resolve the issue or, worse still, exacerbate the situation by stripping away even more layers of paint.
Identifying the specific type of scratch is the first and most crucial step, as it enables you to select the safest and most effective repair method without causing any further damage.
1. Clear Coat Scratches
Scratches on the clear coat represent the most common and least severe form of damage a car can sustain.
These scratches affect only the uppermost protective layer and do not penetrate through to the colored layer beneath.
They typically manifest as faint swirl marks, hazy streaks, or dull patches, imperfections that become clearly visible under direct sunlight or bright lighting.
In many instances, these scratches are caused by improper car washing techniques, the use of coarse or dirty cloths, or visits to automated car washes.
As this damage is confined solely to the top layer, it can often be remedied using simple methods such as polishing or applying a ‘scratch-removal compound’; These methods work by gradually leveling the clear coat surrounding the scratch.
As the clear coat is extremely thin, typically only a few microns thick, it is crucial to avoid excessive polishing; doing so can strip away too much of the protective layer, negatively impacting the car’s long-term durability and protection.
2. Scratches on the Paint – Base Coat
Scratches that penetrate through to the paint, or base coat, are more serious, as they extend deeper than the clear coat and damage the car’s actual colored layer.
These scratches are often more visually distinct; they appear as deep streaks that may be white, gray, or a color starkly different from the surrounding paint.
You may also notice that these scratches do not disappear even when wet, a common indication that the damage has penetrated beneath the ‘clear coat’ (the upper protective layer).
Such scratches are typically caused by a sharp object such as: keys, tree branches, or other surfaces, lightly scraping against the vehicle.
Repairing them requires more than just polishing, as the underlying colored paint layer has been compromised.
In most cases, restoring the vehicle’s original luster requires light compounding, careful polishing and sometimes the application of ‘touch-up paint.’
If executed correctly, many scratches on the ‘base coat’ (the main paint layer) can be largely repaired at home, thereby avoiding the need to repaint the entire vehicle.
3. Deep Scratches – Reaching the Primer or Metal
Deep scratches represent the most severe form of damage; These occur when a scratch penetrates both the ‘clear coat’ and the ‘base coat,’ reaching the underlying ‘primer’ or even the bare metal beneath it.
Such scratches are usually easy to identify, as they appear quite distinct and deep; you can often clearly feel them with your fingernail.
In some cases, you may even see the layer of brown primer or the sheen of the bare metal itself, indicating that the paint’s protective barrier has been completely breached.
This type of damage is far more serious than a mere cosmetic issue, as it renders the vehicle’s surface vulnerable to moisture, oxidation and over time it becomes rust.
Unlike minor surface scratches, these cannot be repaired simply by polishing; instead, they require more advanced repair techniques, such as sanding, applying ‘touch-up paint,’ and sealing the area with a ‘clear coat.’
If not repaired correctly, deep scratches can spread and lead to more extensive, and costly, damage; therefore, timely and proper treatment is absolutely essential.
How to Determine the Depth of a Scratch? – Easy Method
Before attempting to repair any scratch on your car, it is crucial to understand its depth, as the method of repair depends entirely on this factor.
Car paint consists of multiple layers and each layer requires a different repair approach.
If you attempt to treat a deep scratch as if it were a minor surface scratch, you may simply waste your time or, worse, exacerbate the damage; conversely, if you apply excessive force while repairing a minor scratch, you risk stripping away the protective “clear coat”, the outermost layer.
Fortunately, you do not need any specialized tools to determine the depth of a scratch.
There are several simple and reliable methods that anyone can use at home to determine whether a scratch is merely superficial or has penetrated deeper into the paint layers.
1. The Fingernail Test
The fingernail test is one of the quickest and most effective ways to assess the depth of a scratch.
Without applying any pressure, gently run your fingernail over the scratch and observe how it feels.
If your fingernail glides smoothly across the surface without catching anywhere, it is highly likely that the scratch is limited to the “clear coat” and can typically be repaired using polish or a scratch remover.
If your fingernail catches even slightly, it indicates that the scratch has penetrated deeper into the paint layers and may require “compounding” or “touch-up” (paint filling) work to repair.
If your fingernail catches significantly or gets deeply lodged within the groove of the scratch, it indicates that the scratch is quite deep, it may have penetrated down to the “primer” layer or even reached the car’s bare metal.
Repairing such scratches requires more extensive and specialized repair work.
This method works because your fingernail can easily detect minute variations in the surface depth, variations that are often invisible to the naked eye.
2. Visual Inspection – Viewing in Sunlight
Examining a scratch directly under sunlight or a strong light source allows you to spot subtle details that remain invisible under ordinary lighting conditions.
Sunlight reveals how light interacts with and reflects off the painted surface, making it easier to distinguish whether a scratch is shallow or deep.
Shallow scratches often appear as fine lines or swirl marks that seem to shift or fade depending on the angle of the light.
Deeper scratches appear more distinct and pronounced; they have sharp edges and resemble straight lines that do not change significantly regardless of the viewing angle.
In some instances, you may even observe a different color inside the scratch such as: white, gray, or a lighter shade, indicating that the damage has penetrated beyond the “clear coat.”
This careful visual inspection helps corroborate the findings obtained during the fingernail test.
3. The Water Test
The water test is a simple yet highly effective method for determining the depth of a scratch.
Apply a small amount of clean water to the scratched area and observe the result.
If the scratch becomes less visible, or disappears entirely, when wet, it indicates that the damage is confined solely to the “clear coat.”
This happens because water temporarily fills the tiny crevices, making the surface smooth and allowing light to reflect evenly once again.
If the scratch remains clearly visible even when wet, it indicates that the scratch has penetrated deep into the paint layer, or even beyond it.
This test is useful because it immediately reveals the extent of improvement you can expect from polishing or minor repair methods.
Tools
| Tool / Material | Why It Is Needed | How to Use It Properly |
|---|---|---|
| Microfiber Cloths | Microfiber cloths are extremely soft and are designed to remove dust and dirt from painted surfaces without leaving any scratches. Ordinary cloths carry a higher risk of scratching because they trap dust particles and drag them across the surface. | Always use a clean microfiber cloth. Fold it into sections and wipe the surface gently, avoiding excessive pressure. Use separate cloths for cleaning, polishing and drying to prevent cross-contamination from dirt or residual particles. |
| Car Wash Soap | Car wash soaps are formulated to safely remove dust, grease and road grime without damaging the paint or stripping away its protective layers. Household soaps are often too harsh and can weaken the ‘clear coat.’ | Dilute the soap in water according to the instructions and wash the car using a soft sponge or a microfiber wash mitt. Before beginning any scratch repair work, wash the car thoroughly to ensure all dust and dirt are removed. |
| Scratch Remover Compound | This product is used to repair minor scratches by leveling the ‘clear coat.’ It works by gently removing a very thin layer of paint surrounding the scratch, thereby restoring a smooth and uniform surface finish. | Apply a small amount to a microfiber cloth or applicator pad and rub gently in a circular or linear motion. Avoid excessive use, as vigorous rubbing can thin out the ‘clear coat.’ Wipe the surface clean after application. |
| Polishing Compound | After removing scratches, a ‘polishing compound’ is used to restore the paint’s shine and smoothness. It eliminates very fine swirl marks and enhances the visual appeal of the paint finish. | Apply a small amount and spread it evenly over the affected area. Apply light pressure and work in small sections. Rub the surface until it becomes smooth and glossy, then wipe away any excess residue. |
| Sandpaper – 2000–3000 Grit | For deep scratches, fine-grit sandpaper is used to smooth out rough edges before applying paint. Coarse-grit sandpaper is too abrasive and can cause further damage to the surface. | Always soak the sandpaper in water and perform ‘wet sanding.’ Sand gently, applying very light pressure to the scratched area. Keep the surface wet at all times to prevent further damage. |
| Touch-Up Paint | When a scratch penetrates through to the colored layer of the paint, ‘touch-up paint’ is required. This helps restore the original color and fill in the damaged area. | First, clean the area, then use a fine brush or applicator tool to apply a very small amount of paint. If necessary, allow it to dry completely before applying additional layers. |
| Clear Coat | A ‘clear coat’ protects the paint and enhances its gloss. After using touch-up paint, it is essential to seal and protect the repaired area. | Once the paint has dried, apply a thin layer over the repaired section. Allow it to set thoroughly, then polish it lightly to blend it seamlessly with the surrounding surface. |
| Wax or Sealant | Wax or sealant adds a protective layer that helps guard against future scratches, damage caused by UV rays and color fading. It also enhances shine and smoothness. | Apply this after all repairs have been completed. Spread a thin, even layer over the surface, allow it to haze slightly, then wipe and buff it with a clean microfiber cloth to achieve a smooth finish. |
What to Do Before You Removing Scratches from Car Paint?
Properly preparing your car before attempting to fix any scratches is one of the most crucial steps; yet, many people overlook it, a mistake that ultimately exacerbates the damage.
Car paint is quite delicate, particularly the clear coat, which is thin and highly susceptible to scratching if dirt or dust is present during the repair process.
Even tiny particles remaining on the surface can act like sandpaper once you begin rubbing or polishing.
Proper preparation allows you to clearly identify the scratch, prevent further damage and ensure that any products you use perform effectively.
Spending a few extra minutes preparing the surface and the surrounding environment can make a significant difference in the final outcome, helping you achieve a smoother and safer repair.
1. Thoroughly Wash and Dry the Car
Before working on any scratches, it is essential that the car is completely clean, ensuring that no dirt, dust, or debris remains on the surface.
Washing removes impurities such as: road grime, sand and oil, that can interfere with the performance of repair products and potentially cause additional scratches during the rubbing or polishing process.
Use a suitable car wash soap and clean water to gently wash the affected area, then rinse it thoroughly to remove all traces of dirt.
After washing, dry the car using a soft microfiber cloth rather than allowing it to air-dry, as water spots and residual minerals can dull the paint’s shine.
A clean and dry surface helps you accurately assess the true condition of the scratch and ensures that your repair work is flawless and safe.
2. Work in the Shade
Working in a shaded area is crucial, as heat and direct sunlight can adversely affect both the painted surface and the products you are using.
When the surface is hot, compounds and polishes can dry out very quickly, making them difficult to spread and rendering them less effective.
This can lead to inconsistent results, streaking, or even further damage to the clear coat.
Working in the shade also helps you control your working time and prevents products from drying out or evaporating too rapidly.
In a cool and controlled environment, you can work with greater precision and achieve superior results with less effort.
3. Test on a Small Area
Before applying any product to the entire scratched area, it is always a safe practice to test it on a small, inconspicuous section first.
This helps you understand how the product reacts with your car’s paint and whether it delivers the results you desire.
Different cars and paint conditions can react in varying ways; therefore, testing helps prevent unwanted issues such as paint discoloration, color shifting, or unevenness in the finish.
If the tested area shows significant improvement without any adverse effects, you can proceed with greater confidence.
This step minimizes risk and ensures that you are employing the correct method for your specific situation.
4. Use a Clean Microfiber Cloth to Avoid Scratches
Using a clean microfiber cloth is crucial, as even a tiny speck of dust trapped in the fabric can create new scratches while you are attempting to remove existing ones.
Microfiber is designed to be soft and safe for painted surfaces, but only when it is clean and free of debris.
Always use new or thoroughly washed cloths and avoid reusing cloths that have fallen on the ground or have been used for dirty tasks.
It is also a good idea to use separate cloths for different tasks such as: cleaning, polishing and buffing, to ensure that dirt from one surface is not transferred to another.
Keeping your tools clean ensures that your repair process remains safe and that no further damage is inflicted upon the painted surface.
How to Remove Light Scratches – Clear Coat
Light scratches that affect only the clear coat are the easiest to repair because they do not damage the underlying layer of paint.
These scratches typically appear as faint lines, swirl marks, or hazy patches, which become more visible in direct sunlight.
The clear coat is a very thin protective layer applied over the paint, designed to absorb minor abrasions rather than allowing them to damage the actual color layer.
The method for removing these scratches involves gently leveling the surface so that light reflects evenly once again, thereby making the scratch disappear.
The key is to employ gentle techniques and controlled pressure, as removing too much of the clear coat can compromise its long-term protective capabilities.
With the right technique, most light scratches can be safely repaired, or completely removed, right at home.
1. Using a Scratch Removal Compound
A scratch removal compound is one of the most effective and widely used methods for repairing light scratches.
This product contains very fine abrasive particles that gently smooth out the clear coat surrounding the scratch, making the scratch less visible.
To begin, apply a small amount of the compound onto a clean microfiber cloth or applicator pad.
Using light to moderate pressure, gently rub the product over the scratched area; use small circular motions or straight-line strokes for this step.
It is crucial to work slowly and avoid rushing the process, as vigorous rubbing can result in the removal of excessive clear coat material.
After a short while, wipe the area clean with a fresh microfiber cloth and inspect the results.
If necessary, this process can be repeated until the scratch becomes less visible or disappears completely.
This method works best for surface-level scratches and swirl marks.
2. The Toothpaste Trick – Temporary Fix
Occasionally, toothpaste is used as a quick and temporary remedy for very minor scratches, as it contains mild abrasive particles similar to those found in light polishing compounds.
This method is best suited for very shallow marks that affect only the surface and are barely visible.
Apply a small amount of plain white toothpaste to a soft cloth and, using light pressure, gently rub it over the scratch.
The mild abrasive action helps to slightly smooth the surface, making the scratch less noticeable.
After rubbing for a short while, wipe the area clean with a damp cloth and dry it off.
Although this method may offer a temporary improvement, it is neither as effective nor as long-lasting as proper automotive products.
It should be used merely as a “quick fix” rather than as a permanent solution.
3. Polishing
Polishing is used to refine the surface after removing scratches and to restore the paint’s original luster.
It works by eliminating minor imperfections and smoothing out the clear coat, thereby allowing light to reflect evenly.
Apply a small amount of polishing compound to a clean applicator pad or microfiber cloth and spread it evenly over the affected area.
Apply light pressure and continue working in a steady, controlled manner until the surface appears significantly cleaner and shinier.
Polishing is particularly effective at removing swirl marks, haziness and minor imperfections left behind after using scratch-removal products.
Once this process is complete, wipe away any remaining residue and carefully inspect the finish.
This step not only improves the visual appearance but also helps blend the repaired area with the surrounding paintwork, resulting in a more uniform look.
How to Repair Medium Scratches – Paint-Deep
Medium scratches are more serious than light surface marks because they penetrate through the clear coat and reach the paint layer, the very layer responsible for your car’s color.
These scratches are often more clearly visible; they may appear lighter or discolored and typically, they do not disappear when wet.
As the damage has penetrated deeper into the paint system, simple polishing alone will not be sufficient to repair it.
The goal of this type of repair is to make the scratch less visible, smooth the surrounding surface and restore the original appearance as closely as possible without causing further damage.
This process requires a careful combination of cleaning, controlled abrasion and surface protection.
Although medium scratches can often be repaired at home, patience and proper technique are essential to avoid removing excessive amounts of paint.
1. Clean and Prepare the Surface
Before beginning any repair, it is crucial that the surface is thoroughly clean and free of any dirt, dust, or oil.
Any contaminants remaining on the paint could create additional scratches during the repair process or prevent the products from working effectively.
Thoroughly wash the affected area using a high-quality car wash soap and clean water, then dry it completely with a soft microfiber cloth.
Once dry, carefully inspect the scratch under good lighting to accurately assess its depth and length.
A clean and prepared surface ensures that the rubbing compound works uniformly and minimizes the risk of causing further damage.
2. Apply Rubbing Compound
Rubbing compound is used to level the paint surrounding the scratch by removing a very thin layer of the surface material.
This helps reduce the depth of the scratch, making it less visible.
Apply a small amount of the compound to a clean microfiber cloth or applicator pad and, using controlled pressure, gently rub it over the scratched area.
Work in small circular or linear motions, focusing specifically on the affected spot rather than spreading the compound too widely.
It is important to apply moderate pressure, but avoid pressing too hard; excessive pressure can remove too much paint and potentially worsen the damage.
After applying the compound to the area for a short while, clean the spot and assess the results.
You may need to carefully repeat this step until the scratch is significantly less visible.
3. Polish the Area
After using the rubbing compound, the surface may appear slightly dull or hazy due to the light abrasion.
Polishing helps restore the paint’s smoothness and shine by refining the surface and removing any remaining minor marks or swirl patterns.
Take a small amount of polishing compound and spread it evenly over the repaired area.
Continue applying the compound with light pressure and consistent motions until the surface appears clear and sufficiently glossy.
This step is crucial because it seamlessly blends the repaired section with the surrounding paint, further minimizing the visibility of the scratch and enhancing the overall finish.
Wipe away any remaining residue and inspect the area under proper lighting.
4. Apply Wax for Protection
Once the scratch has diminished and the surface appears smooth, it is essential to protect the repaired area.
Applying wax or a sealant creates a thin protective layer over the paint, helping to guard against damage caused by moisture, dust and UV rays.
Apply a small, even amount of wax to the area and allow it to dry according to the product’s instructions.
Once it becomes slightly hazy, gently wipe and buff it with a clean microfiber cloth to reveal a smooth, glossy finish.
This final step not only enhances the appearance but also helps maintain the repaired area and reduces the likelihood of new scratches forming in the same spot.
How to Repair Deep Scratches – Primer or Metal
Deep scratches represent the most severe form of damage to paint, as they penetrate through the clear coat and color layer, exposing the underlying primer or even the bare metal beneath.
These scratches are easy to identify because they appear sharp and deep and often reveal a distinct color such as: gray primer or shiny metal.
When the protective layers of paint are compromised, the surface becomes vulnerable to moisture, air and dirt, which can lead to oxidation and rust over time.
Unlike light or moderate scratches, these cannot be fixed merely by polishing, as the paint has been physically removed from the damaged area.
The goal of repairing deep scratches is to reconstruct the damaged layers step-by-step, restoring the surface to a smooth finish and reinstating its protective integrity.
This process requires patience and meticulous attention to detail; however, if executed correctly, it can significantly improve the car’s appearance and prevent further damage.
1. Sand the Area – Wet Sanding
The first step in repairing deep scratches is to smooth out the damaged edges so that the new paint can adhere properly and blend seamlessly with the surrounding surface.
Wet sanding is used for this purpose, as it minimizes friction and prevents further damage.
Use very fine-grit sandpaper, typically between 2000 and 3000 grit, and soak it in clean water before use.
Gently sand the scratched area using light pressure, ensuring that the surface remains wet throughout the entire process.
The objective here is not to remove a large amount of material, but rather to smooth out rough edges and prepare a smooth foundation for subsequent steps.
If sanding is performed too vigorously, it may remove an excessive amount of the surrounding paint; therefore, it is crucial to work gently and frequently inspect the surface.
2. Apply Touch-Up Paint
Once the area is smooth and clean, touch-up paint is applied to restore the missing layer of color.
To achieve the best results, the color of this paint should match your car’s original color code.
Using a fine brush or applicator, apply a very small amount of paint directly into the scratch.
It is preferable to apply thin layers rather than a single thick coat, as this ensures the paint dries evenly and minimizes the likelihood of uneven paint buildup.
If necessary, allow each layer to dry thoroughly before applying the next.
The goal is to fill the scratch to the level of the surrounding paint without creating a raised surface.
Applying touch-up paint correctly is essential for both the vehicle’s aesthetic appearance and its long-term durability.
3. Apply Clear Coat
Once the touch-up paint has dried completely, a clear coat is applied to the repaired area to provide protection and restore its glossy finish.
The clear coat acts as a protective shield against sunlight, moisture and minor scratches, much like the original factory finish on the vehicle.
Apply a thin, even layer to the repaired spot, extending it slightly beyond the edges so that it blends seamlessly with the surrounding paint.
Allow the clear coat to dry completely, adhering to the recommended drying time.
This step is critical; without it, the new paint will remain exposed and may quickly fade or deteriorate.
4. Polish and Blend
Once the clear coat has completely dried, the final step is to polish and blend the repaired area so that it matches the rest of the vehicle’s surface.
Light polishing smooths out any minor surface irregularities and restores the paint’s luster, as it allows light to reflect more effectively off the paintwork.
Apply a small amount of polishing compound to the affected area using gentle, uniform strokes.
This process ensures that the edges of the repaired spot blend seamlessly with the surrounding paint, making the scratch less visible.
After polishing, wipe the surface with a clean cloth and inspect the results under good lighting.
This final step unifies the vehicle’s surface finish and ensures that the repaired area looks as close to its original condition as possible.
Know If, Other DIY Methods – Do They Work?
Many people seek quick and inexpensive ways to remove car scratches, often utilizing common household items or simple tools to do so.
While some of these methods may temporarily improve a car’s appearance, they often function by merely abrading the surface or temporarily hides the scratch, rather than genuinely repairing it.
Car paint systems are designed with thin protective layers; employing improper methods can result in excessive removal of the clear coat or create new damage that becomes difficult to rectify later.
It is crucial to understand the underlying principle behind each method and to know where it can be safely applied, as not all DIY remedies are suitable for every type of scratch.
Recognizing their limitations helps you avoid causing further damage and enables you to select the appropriate method for achieving long-lasting results.
1. Baking Soda Paste
Baking soda is sometimes mixed with water to form a paste, which is then utilized as a mild abrasive agent.
The rationale behind this method is that its fine particles can gently smooth out microscopic scratches present within the clear coat.
When applied with a soft cloth and rubbed gently, it can render very minor imperfections less visible.
However, baking soda is not formulated for use on car paint and does not consistently yield uniform or controlled results.
Its abrasive intensity can vary and if applied with excessive pressure, it may create even finer scratches or dull the paint’s natural luster.
While this method may offer some degree of improvement for very minor imperfections, it does not constitute a reliable or long-term solution compared to specialized scratch-removal products.
2. Magic Erasers
Magic Erasers are made from a foam-like material that acts much like very fine sandpaper; this means they can remove the top layer of a surface by scrubbing, or abrading, away imperfections.
While this can sometimes make light scratches or stains less visible, it also implies that they are removing a portion of the clear coat.
For this reason, using them on car paint can be risky, specially without proper control.
If used too vigorously, they can leave a dull or hazy mark that requires polishing to correct.
Magic Erasers are better suited for cleaning hard surfaces and their use on car paint should be approached with extreme caution, only when absolutely necessary and strictly for very minor issues.
3. Scratch Pens
Scratch pens are specifically designed for automotive use and offer a more controlled option compared to DIY home remedies.
These pens typically contain a clear resin or paint that fills the scratch, thereby improving the way light reflects off the surface and making the scratch less conspicuous.
They are easy to use and can yield immediate results for small, fine scratches, particularly in cases where the clear coat has been damaged.
However, they do not actually remove the scratch, nor do they repair the underlying paint layer.
Instead, they serve as a temporary filler; over time, their effectiveness may diminish, or the repair may become visible under certain lighting conditions.
While often more effective than many home remedies, they still have their limitations and work best only on minor damage.
4. When Not to Use These Methods
These alternative methods should not be employed when scratches are deep enough to have penetrated through the paint layer or primer, reaching the bare metal underneath.
As these techniques cannot replenish lost material, using them in such instances may actually exacerbate the damage.
They are also unsuitable for areas with extensive scratching, as any resulting unevenness will be far more conspicuous.
Using these methods without proper knowledge can lead to issues such as excessive abrasion, an unsightly surface appearance, or inconsistencies in the finish, problems that may subsequently require further corrective work.
If a scratch is clearly visible, appears deep, or is distinctly palpable to the touch (for instance, when you run your fingernail over it), it is best to utilize specialized automotive products or opt for a more advanced repair technique.
Selecting the appropriate technique based on the depth of the scratch is always a safer and more effective approach than relying solely on quick-fix remedies.
Know, Common Mistakes to Avoid During Scratch Removal Process
Repairing car scratches may seem simple, but many people inadvertently make mistakes that can exacerbate the damage or undermine the effectiveness of their efforts.
Understanding these common errors, and knowing why they occur, helps you avoid unnecessary complications and ensures a flawless, long-lasting finish.
Car paint is delicate, particularly the clear coat, and improper handling can lead to issues such as new scratches, a loss of shine, or an uneven surface texture.
Even minor slip-ups during cleaning, sanding, or polishing can result in significant damage.
Being aware of these pitfalls allows you to proceed with greater caution, thereby safeguarding both the paintwork and your overall investment in your vehicle.
1. Using Dirty Cloth
One of the most common mistakes is using coarse or dirty cloths to clean or polish a car.
Ordinary towels, paper products, or even soiled microfiber cloths can trap tiny particles of dust or grit, which act like sandpaper when rubbed against the painted surface.
This can result in swirl marks or additional scratches, leaving the surface looking even worse than before.
Always use soft, clean microfiber cloths specifically designed for automotive use.
Using the right type of cloth ensures gentle contact with the paint while effectively removing products or contaminants without inflicting any new damage.
2. Skipping the Cleaning Step
Attempting to repair scratches without thoroughly cleaning the surface is another common mistake.
Any residual dust, dirt, or layers of oil remaining on the paint can interfere with the application of compounds, polishes, or touch-up paint, preventing them from adhering properly to the surface.
During the repair process, rubbing against these dirt particles can actually inflict additional scratches on the paintwork.
Before commencing any scratch-repair work, washing the car with an appropriate automotive soap and drying it thoroughly ensures that the surface is free of contaminants and ready for effective treatment.
A clean surface also enables you to accurately assess the depth and severity of the scratches.
3. Over-polishing
Polishing is essential for restoring shine, but polishing too vigorously or excessively is a common mistake that can result in the removal of too much of the clear coat.
The clear coat is very thin and over-polishing can permanently compromise its protective capabilities, leaving the paintwork more vulnerable to future scratches, fading and oxidation.
Apply only a small amount of polish at a time, exert light pressure and focus on small sections.
This controlled approach ensures a smooth, glossy finish without causing any unnecessary damage.
4. Using Sandpaper with the Wrong Grit
When sanding is required, particularly for deep scratches, using sandpaper with an incorrect grit can lead to severe damage.
Coarse-grit sandpaper abrades the surface too aggressively and rapidly, creating new scratches and uneven textures that are difficult to repair.
Fine-grit sandpaper is a safer alternative, as it allows you to gradually level the damaged area and smooth out the edges without removing an excessive amount of paint.
Always choose sandpaper specifically designed for automotive use and employ wet-sanding techniques to minimize abrasion and prevent further damage.
5. Ignoring Deep Scratches
Finally, ignoring deep scratches, or attempting to repair them using methods intended for minor surface imperfections, is a major mistake.
Deep scratches expose the underlying primer or bare metal and they cannot be effectively repaired using mere polishing or DIY methods.
Failing to repair them properly increases the risk of rust, oxidation and further damage to the paintwork.
Repairing deep scratches requires proper sanding, the application of touch-up paint and a clear coat and careful blending.
Recognizing when a scratch is too deep to be fixed superficially ensures that you adopt the correct repair approach and prevent your car’s finish from deteriorating further.
Difference Between DIY vs Professional Repair – Estimated Cost Comparison
Deciding whether to fix car scratches yourself or hire a professional depends on the severity of the damage, your skill level and your budget.
Understanding the cost differences and practical advantages of each method helps you make an informed decision while preserving your car’s appearance and resale value.
DIY repairs are often significantly cheaper and can be effective for light to moderate scratches; however, achieving a satisfactory finish requires careful preparation, the right tools and patience.
Professional repairs yield more precise results specially for deep or large scratches, but come at a higher cost.
By comparing both options, you can weigh convenience, quality and safety before initiating the repair process.
1. Breakdown of DIY Costs
The cost of DIY scratch repair is generally low, as you only need to invest in basic supplies and tools.
Essential items include microfiber cloths, car wash soap, scratch remover or rubbing compound, polishing compound, touch-up paint, clear coat and wax or sealant.
For light scratches, the total cost may range from $20 to $50, while repairing moderate scratches could cost between $50 and $100, depending on the quality of the products used.
DIY repair also saves on labor costs, although achieving excellent results requires time, careful technique and sometimes multiple attempts.
While the initial outlay is low, the process also involves a learning curve; mistakes can sometimes lead to inconsistent results or necessitate reapplying products.
2. Body Shop Cost Estimates
Professional repairs at an automotive body shop are more expensive because the cost includes labor, specialized tools and precise paint matching.
For light scratches on the clear coat, costs can range from approximately $100 to $300, whereas repairing moderate scratches on the paint layer may cost anywhere from $300 to $700, depending on the vehicle and the location of the damage.
Deep scratches, which require sanding, touch-up paint, the application of a clear coat and blending with adjacent panels, as it can cost anywhere from $500 to well over $1,000, particularly on luxury vehicles.
Body shops deliver high-quality results, including a smooth finish, precise color matching and long-lasting protection, that are difficult to achieve using DIY methods.
They also typically guarantee their work, offering you peace of mind in the event of more severe damage.
3. When Should You Seek Professional Help?
Professional repair is recommended when scratches are deep, extensive, or located in highly visible areas that require a high degree of precision.
If a scratch has penetrated down to the primer layer, or if the underlying metal has become exposed, attempting a DIY repair can be risky.
Such attempts may exacerbate the damage and could potentially lead to rust formation or permanent discoloration of the paint.
For high-value vehicles, where preserving the resale value is crucial, or where achieving a precise color match is particularly challenging, opting for professional service is a prudent decision.
Conversely, superficial scratches confined solely to the clear coat or the uppermost layer of paint can often be successfully repaired at home with the right preparation, tools and techniques.
Assessing the depth of the scratch, your own confidence in performing a DIY repair and the estimated cost of professional services will help you determine the safest and most appropriate course of action for your specific situation.
How to Prevent Scratches in the Future
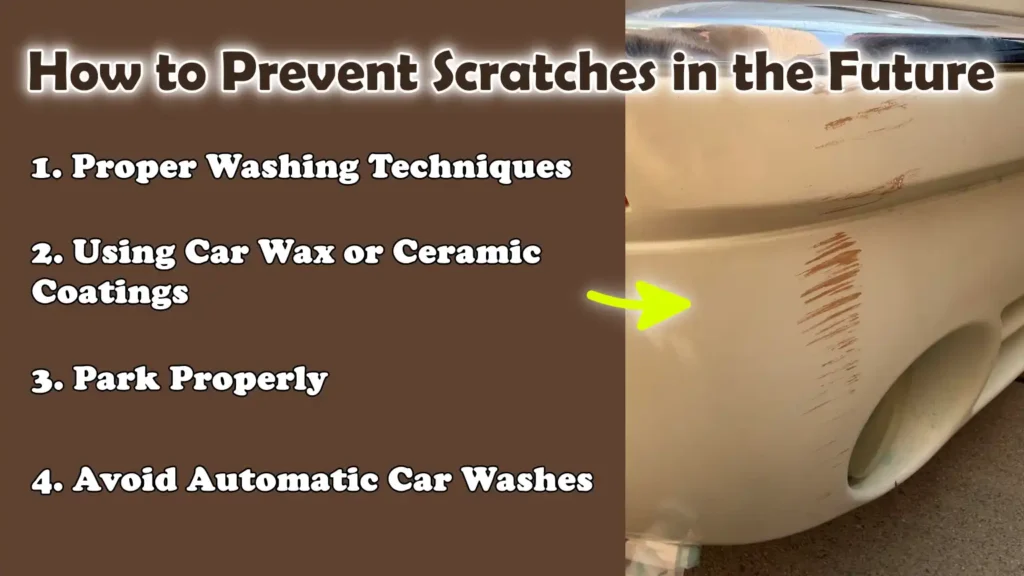
Preventing scratches is just as important as repairing them, as it safeguards your car’s paintwork, preserves its luster and helps maintain its resale value over time.
Most scratches occur during everyday activities such as: washing the car, parking, or minor accidental bumps, so exercising caution and adopting protective measures significantly reduces the risk of damage.
Proper washing techniques, protective coatings and careful parking ensure that the car’s surface remains smooth, glossy and scratch-resistant.
Prevention not only saves on repair costs but also extends the lifespan of the paint and clear coat, ensuring your car looks its best for years to come.
Plus, it is true that automotive paint systems actually relies heavily on a clear coat in terms of providing protection to the color layer beneath it, but if this layer is breached as it is only a few micrometers thick only then color will be exposed, also research shows that even small abrasive contacts such as: car wash brushes or debris that can literally create the visible scratch marks, that’s why it is really important to have careful paint care and usage of appropriate scratch removal techniques is necessary.[¹]
1. Proper Washing Techniques
One of the primary causes of scratches is improper car washing.
Dirt and dust left on the surface can act like sandpaper when rubbed, leading to swirl marks and fine scratches.
Employing proper washing techniques is crucial for protecting the paintwork.
Always rinse the car thoroughly before touching it; use a soft microfiber mitt or sponge and wash using straight-line or gentle circular motions without applying excessive pressure.
It is also essential to use a high-quality car wash soap rather than household detergents, as household detergents can strip away the protective layer.
Frequent rinsing during the washing process removes loose particles, thereby preventing scratches on the paint during the cleaning procedure.
2. Using Car Wax or Ceramic Coatings
Applying car wax or ceramic coatings creates an additional protective layer over the clear coat, thereby reducing the likelihood of scratches caused by minor bumps or environmental factors.
Wax provides a temporary protective layer and enhances shine, whereas a ceramic coating creates a robust, long-lasting protective shield that repels dirt, water and contaminants.
Regularly maintaining this protective layer keeps the surface smooth and makes it easier to clean, thereby guarding against scratches caused by daily washing or exposure to road debris.
The protective coating also enhances light reflectivity, making minor imperfections less visible and preserving the overall aesthetic appeal of the paintwork.
3. Park Properly
Where and how you park your car can significantly impact the risk of scratches.
Avoid parking too close to other vehicles, walls, or bushes, as accidental bumps or contact with hard or abrasive surfaces can leave marks on the paint.
Whenever possible, park in a shaded or covered area to protect against falling debris, tree branches, or harsh sunlight, all of which can degrade the clear coat over time.
Being mindful of your surroundings and maintaining a safe distance between your vehicle and potential hazards significantly reduces the likelihood of minor mishaps, such as scratches.
4. Avoid Automatic Car Washes
Automatic car washes, particularly older or poorly maintained facilities, as it can cause scratches and swirl marks on the paint due to abrasive brushes or dirty rollers.
These brushes often trap dust, sand and other particles that can damage the paint surface.
Touchless car washes are safer alternatives, although they may not always effectively remove all dirt and grime.
Whenever possible, washing your vehicle by hand, using proper techniques and tools, remains the safest method for cleaning your car while minimizing the risk of scratches.
Avoiding harsh mechanical contact helps maintain the integrity of the clear coat and minimizes long-term damage.
Read More:
Conclusion – How to Remove Scratches from Car Paint
Now, you have understood the fact that you should always prevent the scratches before even they happen, as this is as important as fixing them later on and in this guide you have learned about the proper method as well.
Understanding the different types of scratches, ranging from superficial marks on the clear coat to deep gouges that damage the primer or expose the underlying metal, helps you select the appropriate repair method and avoid causing further damage to the paintwork.
Proper preparation, cleaning and protective measures are just as crucial as the repair work itself; they ensure that your efforts endure over time and that your car’s finish remains safeguarded.
While DIY methods can be cost-effective for minor scratches, seeking professional assistance is often advisable for deeper damage to prevent rust formation and permanent staining.
Regular maintenance, careful washing, the application of protective coatings and prudent parking habits are the most effective ways to keep your car looking like new and to preserve its resale value over time.
Now, if you still have questions regarding this guide on How to Remove Scratches from Car Paint, just comment down below.
Frequently Asked Questions
FAQ 1: What types of scratches can appear on a car?
Car scratches generally fall into three categories: light scratches, medium scratches and deep scratches. Light scratches affect only the clear coat, as the outermost protective layer and can often be easily repaired using polishing or a scratch remover. Medium scratches penetrate slightly deeper into the paint layer, often revealing a different color or a hazy line; repairing these typically requires the use of a rubbing compound or touch-up paint. Deep scratches reach down to the primer or bare metal, exposing the underlying surface; fully repairing such areas requires careful sanding, touch-up painting, clear coat application and polishing. Identifying the specific type of scratch is crucial, as the correct repair method depends entirely on the severity of the damage.
FAQ 2: How can I determine whether a scratch is light, medium, or deep?
Some of the easiest methods for assessing the depth of a scratch include the fingernail test, visual inspection in sunlight and the water test. Gently run your fingernail over the scratch: if your nail catches on it barely at all, the scratch is likely light; if it catches slightly, it is medium; and if it catches firmly or gets stuck in a groove, it is deep. Viewing the scratch in sunlight reveals how light reflects off the surface, helping to distinguish between a light scratch and a deep one. Applying water to the scratch can also be helpful: if the scratch disappears or becomes nearly invisible when wet, it is typically limited to the clear coat.
FAQ 3: Can I remove scratches myself at home?
Yes, by using the right tools and techniques, many light and medium scratches can be repaired right at home. Light scratches can often be removed using simple household methods such as: scratch-removal compounds, polishing, or, for very minor marks, even toothpaste. Repairing medium scratches requires a more intensive approach, typically involving the use of rubbing compounds and touch-up paint. Scratches deep enough to reach the primer or bare metal can also be fixed at home, but this requires careful sanding, painting and the application of a clear-coat finish; attempting this without prior experience can be somewhat risky. For very deep or extensive scratches, it is generally safer and yields better results and to have the repairs performed by a professional.
FAQ 4: What tools and supplies will I need to remove scratches?
To remove scratches, you will need clean microfiber cloths, car wash soap, a scratch remover or rubbing compound, a polishing compound, fine-grit sandpaper (2000–3000 grit for deeper scratches), touch-up paint, a clear coat and a wax or sealant. Microfiber cloths assist with cleaning and polishing while preventing the creation of new scratches. Car wash soap removes dirt and grime without damaging the paintwork. Scratch removers and rubbing compounds help repair minor surface scratches. Polishing restores the paint’s shine. Sandpaper smooths out the rough edges of deeper scratches. Touch-up paint and a clear coat help rebuild the missing layers, while a wax or sealant protects the repaired area from future damage.
FAQ 5: Are DIY methods such as: using toothpaste, baking soda, or a “magic eraser” truly effective?
These methods may offer temporary improvement for very minor scratches, but they are not long-term solutions. Toothpaste acts as a mild abrasive for light surface scratches; a baking soda paste can slightly smooth out very small marks; and “magic erasers” can remove superficial imperfections. However, if applied too vigorously, these methods can strip away parts of the clear coat, potentially leading to further scratching or a loss of shine. For consistent and safe results, it is recommended to use proper automotive products, such as scratch removers, rubbing compounds and polishes.
FAQ 6: How can I prevent scratches in the future?
Preventing scratches requires proper washing techniques, protective coatings and cautious habits. Always wash your car using a soft microfiber mitt, clean water and a proper car wash soap, rinsing frequently to remove dirt and debris. Applying wax or a ceramic coating creates a protective layer that repels dirt and reduces the likelihood of scratches. Parking carefully away from walls, bushes, or other vehicles that minimizes the risk of accidental contact. Avoid automatic car washes that use stiff brushes, as these can cause swirl marks or scratches. Regular maintenance and exercising caution are the most effective ways to keep your car’s paint smooth and glossy.
References:
[1] An Overview of the Scratch Resistance of Automotive Coatings: Exterior Clearcoats and Polycarbonate Hardcoats
https://www.mdpi.com/2079-6412/2/4/221

Hello Folks, Dean Shali here to help you out to solve the problems with your lovely vehicle, as i have lots of experience and knowledge about automotive industry as i woks directly with the customers and repair vehicles and i love to help the people to keep their cars safe and running smoothly.