Written By: Dean Shali
Fact Checked By: Sabré Cook
Reviewed By: Tamara Warren
Literally, just think like this: “Fuses” are the tiny protectors of your car’s electrical system, that silently guards circuits from being overloads until their last breath.
Don’t ignore if you are facing problems such as: flickering of lights, unresponsive power accessories or sudden electrical failures as well, as this tiny looking fuses can disrupt many electrical components such as: headlights, interior lights, radios, power windows and dashboard system as well.
Basically, Fuses: acts as a protective devices that prevents the electrical overloads and short circuits, that’s how it keeps your vehicle safe from any major damage and potential fire hazards as well.
Now-a-days, modern cars have different kinds of fuses which is located under the dashboard or in the engine compartment, so each one controls specific kind of circuits, that’s why you need to first recognize them first so that you can solve the problem as soon as possible.
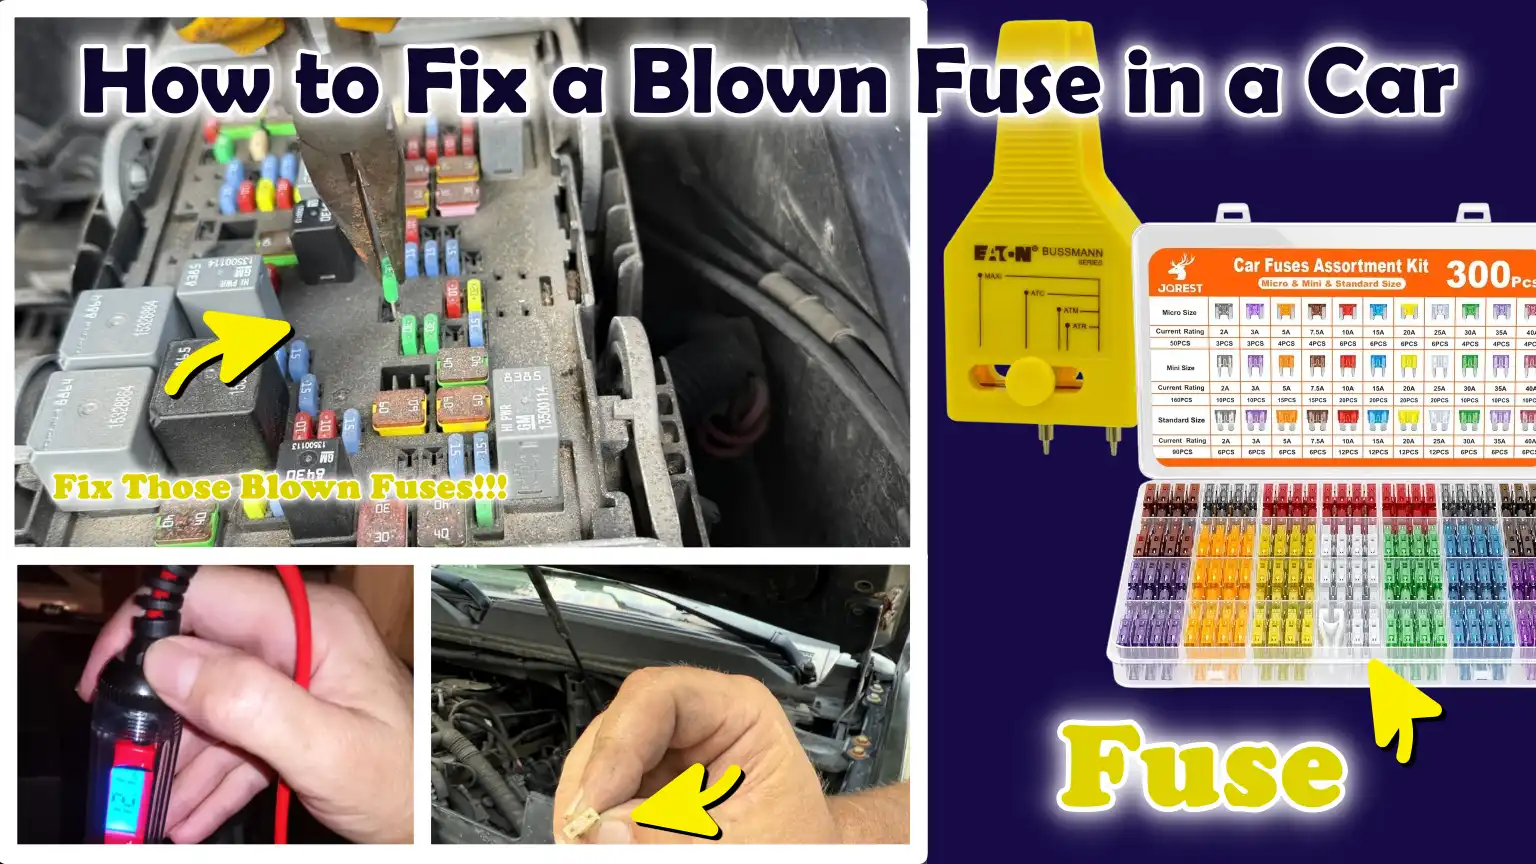
Now, in this guide you’ll learn How to Fix a Blown Fuse in a Car, so that you can easily identify, remove and replace a blown out fuse in safe way and there’s tips to avoid repeated issues as well.
Know, Common Signs of Having a Blown Fuse
A blown fuse is one of the most common causes of sudden electrical problems in a car; recognizing its signs allows you to detect and resolve the issue quickly before it escalates into a serious problem.
Fuses are designed to interrupt an electrical circuit whenever excessive current flows through it, thereby preventing wires and components from overheating or sustaining damage.
When a fuse blows, the flow of electricity ceases immediately and the component connected to that circuit stops functioning.
This is why many electrical malfunctions in cars occur suddenly and without any prior warning.
Learning to identify these signs in a timely manner saves time, eliminates confusion and helps you avoid unnecessary repairs.
1. Non-Functional Headlights, Interior Lights or Radio
The clearest indication of a blown fuse is when specific electrical components such as: headlights, interior lights, or the radio, completely cease to function.
For instance, if your headlights suddenly go out or fail to turn on at all, it does not necessarily mean that the bulb has burnt out; it is possible that the fuse controlling that specific circuit has blown.
Similarly, if your cabin lights or dashboard lights stop working, or if your radio fails to turn on despite the car having electrical power, the culprit is often a blown fuse.
These components rely on a continuous flow of electricity and when a fuse blows, that supply is instantly cut off.
2. Malfunctioning Power Windows, Mirrors or Other Electrical Components
Modern cars rely heavily on electrical systems to control various features, such as power windows, side mirrors, central locking and even seat adjustments.
If you notice that your power windows are failing to go up or down, your mirrors are not adjusting, or other electronic features suddenly cease to function, the culprit may be a blown fuse.
In many instances, only a single specific feature stops working while the rest of the vehicle continues to operate normally; this is a clear indication that, rather than a major electrical fault, a specific fuse associated with that particular system has failed.
3. How to Distinguish Between a Blown Fuse and Other Electrical Problems
To avoid replacing parts unnecessarily, it is crucial to understand the distinction between a blown fuse and other electrical issues.
A blown fuse typically results in the complete loss of functionality for a specific component and this failure usually occurs abruptly.
Conversely, symptoms of problems such as a weak battery, faulty wiring, or a defective switch often manifest gradually, for instance, dimming lights, intermittent operation, or sluggish performance.
If a single specific feature stops working while all others continue to function normally, there is a very high probability that the problem lies with the fuse.
Checking the fuse first is always a prudent step, as it is faster, easier and less expensive than diagnosing a complex electrical fault.
4. Safety Precautions Before Checking Fuses
Before checking or replacing any fuse, it is absolutely essential that you completely shut down the vehicle and remove the key from the ignition.
This step ensures that no electrical current is flowing through the system, thereby minimizing the risk of short circuits or sudden electric shocks.
In some cases, it is also advisable to disconnect the battery, particularly if you are working within the fuse box located in the engine compartment.
Handling fuses with care and adhering to basic safety measures protects you and your car’s electrical system from future damage.
Tools
| Tool | What It Is | How to Use It |
|---|---|---|
| Fuse Puller or Needle-Nose Pliers | A small plastic tool or thin metal pliers used to safely grip and remove a fuse. | Gently grasp the fuse from the top and pull it straight out, without twisting it or applying excessive force. |
| Multimeter – Optional | A simple device used to check for electrical flow and continuity (continuous current) within a fuse. | Set the device to continuity or resistance mode, touch the probes to both ends of the fuse and verify whether current is flowing through it. |
| Replacement Fuses – Matching Amperage | A new fuse with the same numerical rating as the old one; this rating is typically printed directly on the fuse itself. | Insert the new fuse into the exact slot from which the old fuse was removed, ensuring that it fits securely into place. |
| Gloves – Optional | Standard protective gloves made of rubber or fabric. | Put on these gloves before touching the fuse box or any electrical components. |
How to Locate the Fuse Box
The first and most crucial step in fixing a blown fuse is locating the fuse box, as every electrical system in your car is controlled through it.
Most cars feature more than one fuse box, with each box safeguarding different components of the vehicle such as: the lights, radio, engine systems and power accessories.
Knowing where to look and how to identify the correct fuse box will save you time and prevent any unnecessary confusion.
Car manufacturers typically design fuse boxes to be easily accessible, allowing drivers to inspect them without the need for specialized tools; however, their exact location may vary depending on the specific car model.
1. Common Fuse Box Locations
In most vehicles, fuse boxes are strategically placed to ensure easy access whenever needed.
One common location is beneath the dashboard, typically on the driver’s side; this box controls interior components such as: the radio, interior lights and power windows.
Another common location is within the engine compartment, often situated near the battery; this box manages larger systems, such as the headlights, cooling fans and engine-related electronics.
In some cars, a fuse box may also be found near or behind the glove box, particularly for interior electrical features.
These locations are chosen to protect the fuse boxes from heat, moisture and potential damage, while also facilitating quick inspection and repairs when necessary.
2. How to Identify the Correct Fuse Box for a Faulty Component
To properly resolve any issue, it is essential to locate the specific fuse box that controls the particular component that is currently malfunctioning.
For instance, if your headlights or engine-related components are malfunctioning, it is highly probable that the specific fuse responsible for them is located within the fuse box situated in the engine compartment.
If the issue pertains to interior features such as: the radio or power windows, it is generally advisable to inspect the fuse box located beneath the dashboard or near the glove compartment.
In many vehicles, fuse box covers feature labels, or the owner’s manual provides clear instructions; this information enables you to quickly identify the correct component.
By accurately correlating the problem with the appropriate fuse box, you eliminate the need to unnecessarily remove fuses, thereby making the troubleshooting and repair process both faster and safer.
3. Understanding the Fuse Diagram
Every fuse box is accompanied by a diagram that details the location and function of each individual fuse; understanding this diagram is crucial for effectively resolving electrical issues.
This diagram is typically printed on the inside of the fuse box cover or within the vehicle’s owner’s manual and it utilizes simple labels or symbols to indicate which specific fuse controls which particular component of the vehicle.
Each fuse also bears a number, known as its amperage rating, which specifies the maximum amount of electrical current that the fuse can safely handle.
Common ratings include 5, 10, 15, or 20 amps and this number is typically printed directly on the fuse itself.
It is absolutely essential to replace a blown fuse with a new one possessing the exact same amperage rating; Using a fuse with an amperage rating that is too high can allow excessive current to flow through the system, posing a risk of damaging the vehicle’s wiring; conversely, using a fuse with a rating that is too low may cause the fuse to fail prematurely.
By carefully consulting the diagram, cross-referencing both the fuse’s location and its amperage rating, you can confidently identify and replace the correct fuse, thereby safely restoring your vehicle’s electrical system to proper working order.
How to Check the Fuses
Checking the fuses is a simple yet crucial step that helps you pinpoint the exact cause of any electrical issue without wasting time or money.
Fuses are designed to break when an excessive amount of electrical current flows through them; this interrupts the circuit, thereby protecting the car’s wiring and components from damage.
By carefully inspecting the fuses before replacing any other parts, you can verify whether a fuse has truly blown or if it is still functional.
This process is very quick, requires only common tools and, if performed with patience and caution, as it can be easily executed even by beginners.
1. Visual Inspection of the Fuse
The easiest way to check a fuse is to remove it from the fuse box and examine it closely.
Most car fuses are made of transparent plastic, allowing you to see the thin metal strip housed inside.
This strip is the component through which the electrical current flows; if the fuse has blown, you will find this strip broken.
When performing a visual inspection, hold the fuse under good lighting and view it from various angles to clearly observe the condition of the internal metal element.
This method is highly effective for identifying most common fuse-related issues; it often requires no specialized tools and, in many cases, serves as the sole method for diagnosing the problem.
2. Look for a Broken Wire Inside the Fuse
Inside every fuse lies a small metal link that connects its two terminals and facilitates the flow of current.
When an excessive amount of current passes through, this metal link melts or breaks, thereby interrupting the circuit.
If you observe that the metal strip inside the fuse has broken into two pieces, or if a distinct gap is visible within it, it indicates that the fuse is defective and requires replacement.
This is the most direct and obvious sign of a blown fuse.
A fully functional fuse will always contain a complete, unbroken metal strip.
3. Look for Discoloration or Signs of Burning
Sometimes, internal damage to a fuse is not immediately apparent, particularly when the damage is minor or concealed.
In such instances, you should look for other indicators inside the fuse, such as dark spots, clouded plastic, or burn marks.
These signs develop when the fuse fails due to an excessive flow of current, which generates intense heat.
If the fuse appears slightly melted or discolored, it generally implies that it has been subjected to excessive stress and can no longer be relied upon.
Even if the metal strip appears largely intact, if there are clear signs of burning or discoloration, the most prudent course of action to prevent future issues is to replace the fuse.
4. How to Test a Fuse Using a Multimeter
If the fuse appears visually intact but you still suspect it may be defective, you can perform a more precise diagnostic test using a multimeter.
A multimeter checks whether electricity is able to flow through the fuse, a property known as “continuity.”
To use this device, set it to either continuity mode or resistance mode and then place its probes against the two metal terminals of the fuse, one on each side.
If the fuse is functioning correctly, the multimeter will display a reading or emit an audible tone; this indicates that current is able to flow through the fuse.
If you do not observe a reading or hear an audible signal, it indicates that the fuse has blown, even if it appears to be intact to the naked eye.
This method is highly effective for detecting hidden faults that are not visible to the naked eye.
5. Tips for Avoiding Unnecessary Fuse Removal
Removing every fuse one by one is not a very efficient approach, as it is time-consuming and can disrupt active electrical connections.
Instead, always begin by identifying the specific component that is malfunctioning and then consult the fuse diagram to locate the corresponding fuse.
By adopting this specific method, you limit your inspection to only those fuses that require testing, thereby minimizing the risk of errors.
Furthermore, handle each fuse with extreme care and avoid repeatedly pulling them out, as doing so can cause the internal connections within the fuse box to loosen.
By exercising caution and patience during the inspection process, you can ensure that the entire procedure is faster, safer and more efficient.
How to Remove and Replace a Blown Fuse – In Quick Way
Removing and replacing a blown fuse is a simple task, but it must be performed with care to avoid damaging the fuse box or creating further electrical issues.
A fuse acts as a safety link within an electrical circuit; when it fails, replacing it with the correct type of fuse is crucial to ensure the system can resume safe operation.
Proper technique and adherence to the correct procedure ensure that the new fuse seats securely in its slot, power is restored and the circuit remains protected against overloads and short circuits.
1. The Correct Method for Removing a Fuse Using a Fuse Puller or Pliers
To remove a fuse safely, it is best to use a fuse puller, which is often stored inside the fuse box itself, or, if a puller is unavailable, use a pair of needle-nose pliers.
Gently grasp the fuse from the top and pull it straight out; avoid twisting it or applying excessive force.
Twisting the fuse can damage the metal connectors located inside the fuse slot, potentially leading to poor electrical contact in the future.
Before removing a fuse, always ensure that the vehicle’s ignition is turned off to eliminate any risk of electric shock.
Removing the fuse slowly and carefully helps preserve the condition of both the fuse and the fuse box.
2. Ensuring the New Fuse Matches the Amperage Rating of the Old Fuse
Every fuse has a specific amperage rating, which indicates the maximum amount of electrical current it can safely handle; this value is typically printed directly on the fuse itself.
It is absolutely essential to replace a blown fuse with a new fuse that possesses an amperage rating that is exactly identical to the original.
Using a fuse with an amperage rating that is too high allows excessive current to flow through the circuit, which can cause the wiring to overheat and lead to serious damage, or even a fire.
Conversely, using a fuse with a rating that is too low increases the risk of premature failure, even if the system is operating under normal conditions.
Matching the correct rating ensures that the circuit remains safe and functions exactly as intended by the manufacturer.
3. Carefully Installing the New Fuse Without Force
Once you have the correct replacement fuse, place it into the empty slot and gently press it in until it seats firmly in place.
The fuse should slide in easily; it should not require any excessive force to insert.
If it feels too tight or does not go in smoothly, check to ensure that you are using the correct fuse size and that its alignment is proper.
Forcing a fuse into place can damage the connectors inside the fuse box, potentially leading to loose connections or future electrical issues.
A properly installed fuse will sit straight and securely in its slot, ensuring good contact with the terminals.
4. Double-Check Connections and Orientation
After installing the new fuse, it is essential to verify that it is inserted into the correct slot and is oriented properly.
Most automotive fuses are designed to fit easily; however, it is crucial to ensure that both metal prongs make full contact with the terminals to facilitate proper electrical flow.
Once everything is in place, start the car and test the component that was previously malfunctioning to confirm that the issue has been resolved.
Rechecking your work helps avoid recurring problems and ensures that the electrical system operates safely and reliably.
How to Do Testing After Replacement
When a fuse blows, testing it afterward is a crucial step.
This ensures that the root cause of the problem has been fully resolved and that the electrical system is functioning correctly.
Fuses do not blow without a reason; therefore, testing the system after replacing a fuse confirms that the issue was limited solely to the fuse itself and was not caused by a deeper underlying fault.
This step also verifies that the new fuse has been inserted into the correct slot and that the affected component is safely receiving power.
1. Start the Car and Check if the Affected Component is Working
Once the new fuse is properly installed, start the car, or turn the ignition key to the appropriate position, and check the component that was previously malfunctioning.
For example, if the issue involved the headlights, turn them on to see if they illuminate correctly.
If the problem lay with the power windows or the radio, operate them to verify that they are functioning properly.
If the fuse-related issue has been resolved, the component in question will immediately begin to function fully.
Pay close attention to how the component operates; if it works smoothly and consistently, it indicates that the problem has been completely fixed.
2. How to Diagnose the Problem if the New Fuse Blows Immediately
If the new fuse blows the very moment you attempt to use the component that was previously malfunctioning, it is a clear indication of a deeper electrical fault within the circuit.
Fuses are designed to blow only when subjected to an excessive electrical load; therefore, repeated fuse failures signify that the system is drawing more power than its rated capacity.
This can occur instantly in the event of a direct short circuit or if a faulty electrical component is connected to the system.
In such cases, simply replacing the fuse will not resolve the underlying issue and the fuse will continue to blow repeatedly.
3. Other Potential Issues in the Electrical System
There can be several common reasons why a fuse might blow again, even after being replaced.
Faulty or exposed wiring can cause current to flow through an unintended path, leading to a short circuit.
A defective electrical component such as: a motor, light, or accessory, may draw higher-than-normal current, thereby overloading the circuit.
Moisture or corrosion inside connectors can also disrupt the proper flow of electricity, potentially causing power interruptions or short circuits.
In some instances, installing accessories that are not properly connected can place an excessive load on the system.
Diagnosing these issues requires a thorough inspection and, at times, some basic electrical testing.
4. When to Consult a Professional Mechanic
If a fuse blows repeatedly, or if you are unable to identify the root cause of the problem, it is best to consult a professional mechanic.
Modern cars feature complex electrical systems comprising numerous interconnected circuits; accurately diagnosing hidden faults may require specialized tools and expertise.
A trained mechanic can inspect the wiring, test individual components and precisely pinpoint the underlying issue without causing further damage.
Seeking professional assistance in a timely manner can help you avoid major repairs, ensure safety and guarantee that your car’s electrical system continues to function reliably.
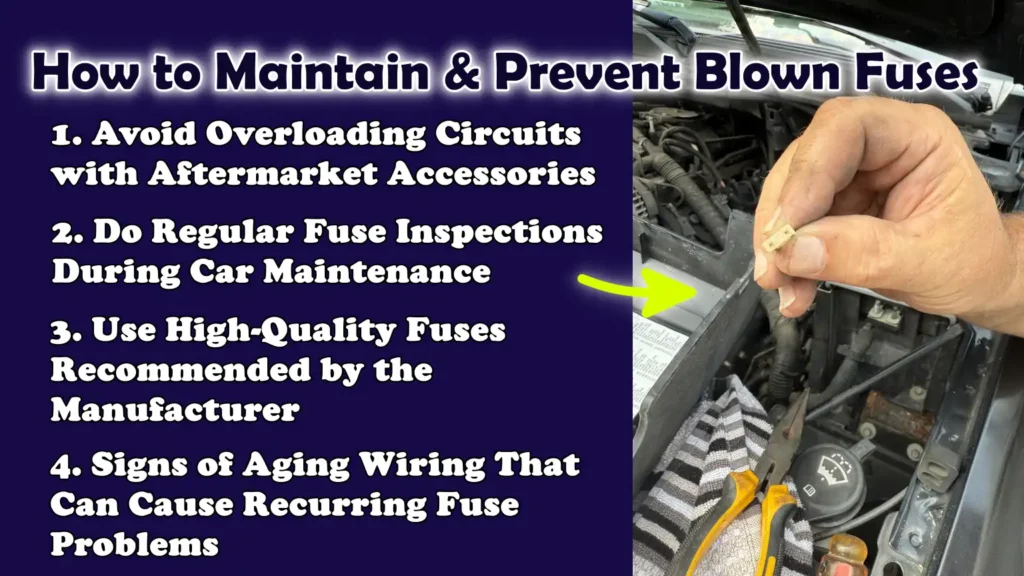
How to Maintain & Prevent Blown Fuses
It is better to prevent a fuse from blowing in the first place than to fix it after the fact, as frequent fuse failures can be an indication of excessive strain on your car’s electrical system.
Fuses are designed to protect wiring and components from excessive current; however, recurring blown fuses signify that the system is operating beyond its safe limits.
By adopting a few simple preventive measures and understanding how the electrical load functions within your vehicle, you can minimize the likelihood of fuse-related issues, enhance reliability and avoid costly repairs in the future.
Plus, there’s studies about modern vehicles actually relies on advanced electrical system, as research literally shows that the fuse technology is evolving rapidly to meet these demands, plus according to the IEEE studies: the newer electronic fuses actually provides much faster protection and better fault detection when we compare it with traditional fuses, that shows that why you need to understand and maintain your car’s fuse system, as it literally plays huge role in protection of vehicle’s complex electronics and ensures long-term vehicle reliability as well.[¹]
1. Avoid Overloading Circuits with Aftermarket Accessories
The most common cause of a blown fuse is the installation of additional electrical accessories that draw more power than the circuit is designed to handle.
High-wattage lights, audio systems, phone chargers, or other add-ons can significantly increase the electrical load on a single circuit.
When the total current exceeds the fuse’s rated capacity, the fuse blows to protect the rest of the system.
To prevent this, always check the power requirements of any accessory before installation and ensure it is connected to the appropriate circuit.
Using proper wiring, and, if necessary, installing a separate fused line for high-power devices, helps safeguard the vehicle’s original electrical system.
2. Do Regular Fuse Inspections During Car Maintenance
Regularly inspecting your car’s fuses is a simple habit that can prevent sudden electrical malfunctions.
During routine maintenance, take a few minutes to check the fuse box for any signs of wear, loose connections, or discoloration.
Even if all systems appear to be functioning correctly, early signs of heat-related damage or malfunction can indicate that a specific fuse is nearing the end of its lifespan and may fail soon.
Proactively replacing weak or damaged fuses ensures a stable electrical flow and helps prevent sudden malfunctions while driving.
Regular inspections also help you familiarize yourself with the fuse layout, making it quicker and easier to diagnose problems in the future.
3. Use High-Quality Fuses Recommended by the Manufacturer
Not all fuses are created equal; using low-quality or incorrect fuses can lead to unreliable performance.
High-quality fuses are designed to blow at the precise current level and provide consistent protection.
Always use fuses that match the specifications recommended by the car manufacturer, including the correct amperage and type.
Cheap or incorrect fuses may blow prematurely, or, in some cases, fail to blow when necessary, thereby endangering the vehicle’s wiring and components.
Choosing the right fuses ensures the long-term safety and proper functioning of the electrical system.
4. Signs of Aging Wiring That Can Cause Recurring Fuse Problems
Over time, a car’s wiring can deteriorate due to heat, vibration, moisture and general wear and tear.
The insulation on aging wires may crack, connections may loosen, or corrosion may form at contact points.
These issues can disrupt current flow, cause short circuits, or increase electrical resistance, all of which can lead to fuses blowing repeatedly.
Common warning signs include flickering lights, intermittent operation of electrical components, or a burning smell emanating from the vicinity of the wiring.
If you observe these symptoms in conjunction with frequent fuse failures, it is crucial to have the wiring system thoroughly inspected or to seek assistance from a professional.
Addressing issues related to aging wiring in a timely manner helps maintain a safe and stable electrical system, thereby preventing recurring problems associated with fuses.
Read More:
- How to Fix Car Electrical Problems
- How to Pass a Car Emissions Test
- How to Fix Rotten Egg Smell in Car
- How to Diagnose a Bad Catalytic Converter
- How to Replace a Muffler
- How to Fix an Exhaust Leak
How to Ensure Safety
Working on a car’s electrical system specially when dealing with fuses, may seem like a straightforward task; nevertheless, it requires strict adherence to safety protocols and proper procedures.
Fuses are designed to protect the vehicle from electrical overloads and their correct usage ensures that this protective function remains effective.
Even minor errors such as: installing the wrong fuse or working on a live circuit, as it can lead to significant complications, ranging from damaged wiring to the failure of critical components.
Adhering to basic safety guidelines not only safeguards the vehicle but also ensures your own personal safety during the repair process.
1. Always Disconnect the Battery for Major Electrical Work
Whenever you are undertaking work that extends beyond a simple fuse inspection, it is always a prudent step to disconnect the car’s battery.
This action completely interrupts the flow of electricity, thereby minimizing the risk of short circuits, sparks, or sudden damage to sensitive electronic systems.
While disconnecting the battery is not always strictly necessary for merely checking or replacing a single fuse, any extensive troubleshooting involving wiring or multiple components should be performed only after the battery has been disconnected.
This simple precaution adds an extra layer of safety and helps prevent unexpected electrical hazards during repairs.
2. Never Replace a Fuse with One That Has a Higher Amperage Rating Than Specified
Each fuse is engineered to handle a specific amount of electrical current, a value carefully selected by the manufacturer to ensure the integrity of the circuit.
Replacing a blown fuse with one that possesses a higher amperage rating can be dangerous, as it allows excessive current to flow through the vehicle’s wiring.
This could result in excessive heat generation, damage to electrical components, or even an increased risk of fire.
To maintain proper safety and ensure the system operates securely, always use a fuse with a rating that exactly matches that of the original fuse.
3. If Fuses Are Failing Repeatedly or Ceasing to Function Without Any Apparent Cause, Seek Assistance From a Specialist
If a fuse fails repeatedly, it typically signals an underlying internal issue within the electrical system that requires thorough investigation.
Continuously replacing fuses without addressing the root cause of the problem can lead to further damage and may make the issue even more difficult to resolve in the future.
Identifying problems such as faulty wiring, defective components, or hidden short circuits requires careful inspection, and, at times, specialized tools.
In such situations, it is best to consult a qualified mechanic who can accurately diagnose the source of the problem and repair it correctly.
Seeking professional assistance in a timely manner ensures long-term safety and keeps your vehicle running reliably.
Conclusion – How to Fix a Blown Fuse in a Car
So, when you actually understand that how you can quickly and effortlessly fix those blown out fuses then actually it puts you one step ahead of having unexpected car troubles on the road.
Although a fuse is small in size, it plays a crucial role in protecting the car’s entire electrical system from damage caused by overloads or short circuits.
By learning to identify symptoms, locate the correct fuse box, carefully inspect the fuse and replace it with one of the appropriate amperage, you can quickly restore power to vital components such as lights, windows and electronic systems.
This not only saves time and money but also helps you avoid unnecessary repairs or guesswork.
It is also important to remember that a blown fuse is often not merely a one-time occurrence, but rather a warning signal.
If the same fuse blows repeatedly, it indicates a deeper issue within the electrical system such as: faulty wiring, a defective component, or an overloaded circuit.
Addressing these warning signs in a timely manner can prevent major damage and ensure that your vehicle remains reliable for daily use.
Now, that’s it from this guide about How to Fix a Blown Fuse in a Car, still you can ask remaining questions in comment section below.
Frequently Asked Questions
FAQ 1: What happens when a car fuse blows?
When a car fuse blows, it breaks the electrical circuit to protect the system from excessive current. This means that the specific component connected to that fuse will suddenly stop working. For example, your headlights, radio, or power windows might stop functioning without any warning. This occurs because fuses are designed to fail themselves before any expensive parts or wiring get damaged. It acts like a safety guard; therefore, even though it may cause some minor inconvenience, it actually prevents larger and more costly problems from occurring.
FAQ 2: How can I tell if a fuse has blown without removing it?
In many cars, you can sometimes identify a blown fuse without actually removing it by observing which electrical component has stopped working. If only a single feature stops functioning while everything else continues to work correctly, it usually points to a specific fuse. Some fuse boxes also feature transparent covers or test points that allow for a quick visual inspection. However, for the most accurate results, the best and most reliable method is to remove the fuse and inspect the metal strip inside it, or to use a multimeter.
FAQ 3: Can I drive my car if a fuse has blown?
Yes, you can often still drive your car even if a fuse has blown, although this depends on which specific fuse has failed. If the fuse controls a feature that is not critical such as: the radio or interior lights, it may still be safe to drive the vehicle. However, if this affects critical systems such as: headlights, brake lights, or engine-related components, it can be dangerous and must be repaired immediately. Ignoring critical fuse-related issues can compromise safety while driving or even lead to legal complications.
FAQ 4: Why does the same fuse keep blowing?
If the same fuse blows repeatedly, it usually indicates a deeper electrical issue within the circuit. This could be caused by faulty wiring, a short circuit, or a defective component that is drawing excessive power. Fuses are designed to protect the system; therefore, a recurring blown fuse is a clear indication that something is amiss. Simply replacing the fuse will not resolve the problem; to prevent further damage, it is crucial to identify and fix the root cause of the issue.
FAQ 5: Is it safe to replace a car fuse yourself?
Yes, replacing a car fuse is generally safe, provided you follow a few basic precautions and use the correct fuse. Always turn off the vehicle before attempting to replace a fuse and ensure that the amperage rating of the replacement fuse exactly matches that of the original fuse. The process is straightforward and requires no specialized skills, making it easy even for beginners. However, if you have any doubts or if the problem persists, it is best to consult a knowledgeable professional.
FAQ 6: What happens if I use a fuse with the wrong amperage?
Using a fuse with the wrong amperage can lead to serious problems. If you use a fuse with a higher amperage rating than necessary, excessive current may flow through the circuit, potentially causing wires to overheat, damaging components, or even leading to a fire. Conversely, if you use a fuse with a lower amperage rating, it may blow prematurely, even under normal operating conditions. Therefore, to ensure complete safety and proper functionality, it is crucial that you always match the replacement fuse precisely to the correct rating specified on the original fuse.
FAQ 7: Where is the fuse box typically located in a car?
Most cars feature multiple fuse boxes, which are generally situated in easily accessible locations. Common locations include underneath the dashboard on the driver’s side, near the battery in the engine compartment, or behind the glove box. Each fuse box controls specific systems within the vehicle; therefore, knowing its exact location allows you to quickly identify the correct fuse. The precise location may vary depending on the car model, so consulting the owner’s manual can be helpful.
FAQ 8: Do I need special tools to inspect or replace a fuse?
Inspecting or replacing a fuse requires very few tools, making it a straightforward task. You can safely remove a fuse using a fuse puller or a pair of small pliers. If you wish to inspect the fuse more closely, a multimeter can be useful, though it is not always strictly necessary. In many cases, a visual inspection of the fuse is sufficient to identify the problem. This makes fuse replacement one of the simplest car maintenance tasks you can perform.
References:
[1] A Review of Electronic Fuses: Challenges and Opportunities for Future Vehicular Power Systems
https://www.researchgate.net/publication/389006811_A_Review_of_Electronic_Fuses_Challenges_and_Opportunities_for_Future_Vehicular_Power_Systems

Hello Folks, Dean Shali here to help you out to solve the problems with your lovely vehicle, as i have lots of experience and knowledge about automotive industry as i woks directly with the customers and repair vehicles and i love to help the people to keep their cars safe and running smoothly.