
Written By: Dean Shali
Fact Checked By: Sabré Cook
Reviewed By: Tamara Warren
Literally, your whole engine depends on one small fan in terms of tackling overheating problems every day, so you need to make sure it works every time.
So, whenever the road is crowded or when you idle the vehicle where natural airflow is very limited or shared with other vehicles, then your engine solely relies on the “Radiator Fan” to maintain safe operating temperature.
That’s how, modern vehicles actually relies heavily on the electric radiator fans as they literally controlled by the temperature sensors and the engine control unit as well, which is why they automatically turn on the fan whenever the engine starts to getting too hot.
But what if this fan goes malfunctioned, then it simply result into quick buildup of the heat and there’s studies in the automotive maintenance that shows that the overheating is one of the leading causes of having engine damage or other things can starts to malfunction such as: cylinder heads or head gaskets as well.
Yes, there are common signs to identify this radiator fan problem such as: rising temperature even at the idle, reduced air conditioning performance or you’ll see fan is not spinning at all: these are the clear indication of having a problem with the radiator fan.
Now, in this guide you’ll learn How to Replace a Radiator Fan, so that you can quickly restore proper cooling again and improve overall engine efficiency.
Know, How the Radiator Fan Actually Works?
1. Its Primary Function in Keeping the Engine Cool
The radiator fan helps regulate the engine’s temperature.
When the car is not moving fast enough to generate sufficient airflow on its own, the fan draws air through the radiator, or pushes air away from it.
As the engine runs, it generates a significant amount of heat; the coolant absorbs this heat and transports it to the radiator.
The radiator then dissipates this heat into the surrounding air; however, this process requires a continuous flow of air to function effectively.
The radiator fan ensures that a steady stream of air passes through the radiator, even when the vehicle is stuck in traffic or stationary (idling).
If the fan fails to operate correctly, heat cannot be dissipated effectively, which can cause the engine to overheat rapidly and sustain serious damage.
2. The Difference Between Mechanical and Electric Fans
Two main types of radiator fans are used in vehicles: mechanical fans and electric fans.
Mechanical fans are directly connected to the engine and are typically driven by a belt; this means that whenever the engine is running, the fan is also spinning.
These fans are simple and reliable, but they can consume more engine power and are less efficient, as they cannot adjust their operation based on actual cooling requirements.
Electric fans, on the other hand, are controlled by the vehicle’s electrical system and activate only when necessary.
These fans are more common in modern vehicles today, as they improve fuel efficiency, reduce unnecessary load on the engine and offer greater control over the cooling process.
3. When the Fan Turns On and Off
In most modern vehicles, the radiator fan does not run continuously.
It activates automatically when the engine temperature reaches a specific threshold, typically when the vehicle is stationary (idling) or moving slowly and requires additional cooling.
The fan may also switch on when the air conditioning system (AC) is active, as the AC system generates additional heat within the engine compartment.
As soon as the engine temperature returns to a safe level, the fan shuts off to conserve power and minimize wear and tear on its components.
This automated cycle of switching on and off helps maintain a consistent engine temperature without wasting energy.
4. The Role of Temperature Sensors and Relays
Temperature sensors and relays play a crucial role in controlling the radiator fan.
The temperature sensor continuously monitors the engine coolant temperature and transmits this data to the Engine Control Unit (ECU).
When the temperature exceeds a predetermined limit, the system sends a signal to a relay; this relay acts as a switch and activates the fan.
Conversely, when the temperature drops, the relay deactivates the fan.
If either of these components malfunctions such as: a fault developing in the sensor or the relay, the fan may fail to activate when needed, potentially leading to engine overheating.
Understanding this system aids in diagnosing issues and ensures that the cooling system is functioning correctly.
Know, The Symptoms of a Faulty Radiator Fan
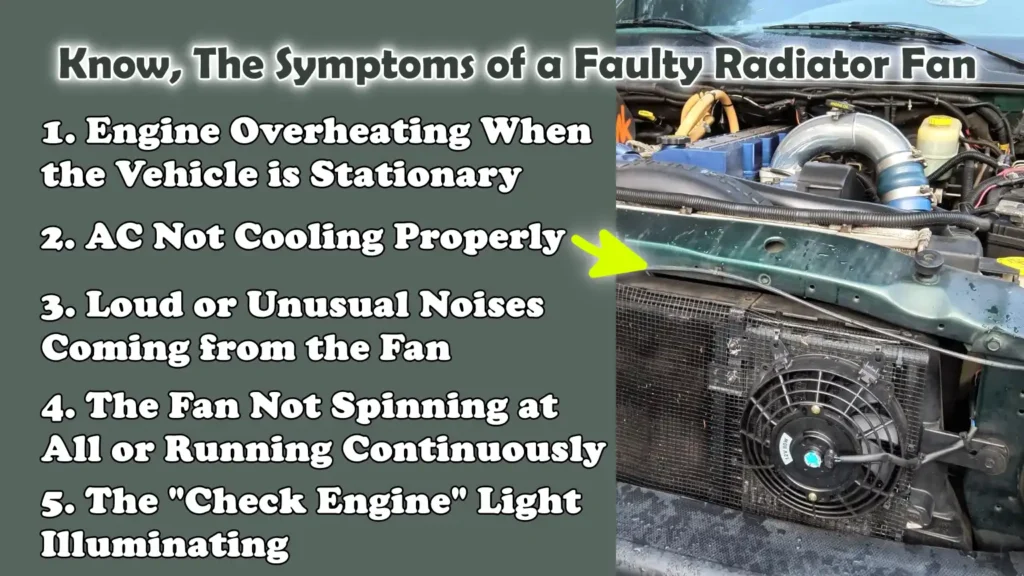
1. Engine Overheating When the Vehicle is Stationary
One of the most common and easily recognizable symptoms of a faulty radiator fan is that the engine overheats when the vehicle is stationary or moving at low speeds.
When your vehicle is traveling at higher speeds, airflow naturally passes through the radiator, helping to keep the engine cool.
However, when you are stuck in traffic or waiting at a traffic light, the radiator fan becomes the primary source of airflow.
If the fan is not functioning, heat builds up rapidly, causing the temperature gauge to rise.
In many cases, as soon as you resume driving, the engine temperature returns to normal; this clearly indicates that the fan is failing to perform its function precisely when it is needed most.
2. AC Not Cooling Properly
A faulty radiator fan can also impact the performance of your vehicle’s AC (air conditioning) system.
The cooling fan helps dissipate heat not only from the engine but also from the AC condenser, which is typically mounted right next to the radiator.
If the fan is not working, the AC system cannot effectively expel heat specially when the vehicle is stationary.
Consequently, when the vehicle is stopped, the AC blows warm air or fails to cool effectively; however, as soon as the vehicle begins to move, the AC starts cooling effectively again.
This is a sure sign that the fan is failing to generate the necessary airflow required for proper cooling.
3. Loud or Unusual Noises Coming from the Fan
Unusual noises emanating from the engine compartment can be an indication of a malfunction in the radiator fan.
A properly functioning fan typically operates silently; Therefore, if you hear any unusual noises coming from it such as: a loud buzzing, grinding, or rattling sound, you should not ignore them.
These sounds could be caused by worn-out bearings, loose blades, or debris trapped inside the fan assembly.
Over time, these issues can escalate and eventually cause the fan to stop functioning completely.
By addressing these noises early on, you can resolve the problem before it turns into a major and costly repair.
4. The Fan Not Spinning at All or Running Continuously
Another clear symptom is when the radiator fan either fails to spin at all or runs continuously without stopping.
If the fan never turns on, regardless of how hot the engine gets, the cause could be a faulty motor, a blown fuse, a defective relay, or a malfunctioning temperature sensor.
Conversely, if the fan runs continuously, even when the engine is cold, it may indicate a fault in a sensor or relay that is sending incorrect signals.
Both of these scenarios are abnormal and can negatively impact engine performance, fuel efficiency and the overall health of the cooling system.
5. The “Check Engine” Light Illuminating
In many modern vehicles, a malfunction within the radiator fan system can trigger the “Check Engine” light on the dashboard.
This occurs because the Engine Control Unit (ECU) monitors the cooling system to ensure that all its components are functioning correctly.
Faulty sensors, electrical issues, or a defective fan motor, all of these factors can disrupt the system and generate Diagnostic Trouble Codes.
However, while the illumination of the “Check Engine” light does not conclusively prove that the fan is the root cause of the problem, it should always be taken seriously and investigated using a diagnostic tool to identify the actual cause and prevent further damage.
Tools
| Tool / Material | Why It Is Needed | How to Use It |
|---|---|---|
| Replacement Radiator Fan Assembly | This is the primary component you are replacing. A faulty fan fails to cool the engine effectively; therefore, a new fan restores proper airflow and prevents the engine from overheating. | Ensure the new fan matches your specific car model. Install it in the exact location where the old fan was situated, align the mounting points and secure it with bolts before reconnecting the wiring. |
| Screwdrivers – Flathead and Phillips | These tools are used to remove screws from covers, fan shrouds, or clips that obstruct access to the radiator fan. | Select the appropriate tip type. Turn the tool anti-clockwise to loosen screws and turn it clockwise to tighten them during reassembly. |
| Socket Set and Ratchet | Most radiator fans are secured in place with bolts and a socket set facilitates their quick and safe removal and installation. | Select the correct socket size, attach it to a ratchet and turn it to loosen or tighten the bolts without causing any damage. |
| Pliers | Pliers assist in gripping, pulling, or releasing clips, clamps and connectors that are difficult to remove by hand. | Use them to gently squeeze or pull clips and hoses. Avoid applying excessive force to prevent plastic components from breaking. |
| Gloves and Safety Glasses | These items protect your hands from sharp edges while working in the engine bay and shield your eyes from dust, debris, or accidental spills. | Put on your gloves before beginning the work and keep your safety goggles on while removing parts or working near the radiator. |
| Multimeter – Optional Upto You | A multimeter helps verify whether power is reaching the fan; This is useful for determining whether the problem lies with the fan or with another component. | Set it to measure voltage, connect the probes to the fan connector and check if power is being supplied when the engine is hot or the AC is turned on. |
What are The Important Safety Precautions Before Starting to Replace Radiator Fan
1. Allow the Engine to Cool Completely
Before beginning any work on the radiator fan, it is absolutely essential that you allow the engine to cool down completely.
When the car is running, the engine and cooling system can become extremely hot, often reaching temperatures exceeding 90 to 100 degrees Celsius.
The coolant inside the radiator is also under pressure; if you attempt to open or touch its components too soon, hot steam or fluid may escape, posing a risk of severe burns.
Metal components surrounding the engine such as: the radiator and fan assembly, also retain their heat for a considerable time after the engine has been switched off.
Waiting at least 30 to 45 minutes, or until everything feels cool to the touch, ensures that you can work safely and without the risk of injury.
2. Disconnect the Battery
Disconnecting the battery is a simple yet crucial safety measure that is often overlooked.
In modern vehicles, the radiator fan is typically controlled by the electrical system and can switch on automatically, even if the engine is off, provided the engine is still hot.
If you are working in the vicinity of the fan and it suddenly activates, it can result in serious injury.
Removing the negative terminal of the battery cuts off the power supply to the fan and other components.
This step also prevents accidental short circuits while handling wiring, making the entire process safer and more controlled.
3. Work on a Level and Stable Surface
Before commencing any repair work, always ensure that your vehicle is parked on a level and stable surface.
Working on level ground ensures that the vehicle remains stable, thereby eliminating the risk of it rolling or shifting while you are working under the hood.
If the vehicle is parked on uneven terrain, the risk of losing your balance or having your tools slip increases, which could lead to an accident.
Engaging the parking brake significantly enhances safety and guarantees that the vehicle remains stationary in its position.
A stable work environment allows you to focus properly on your task, thereby reducing the likelihood of errors or injuries.
4. Avoid Contact with Hot Coolant or Moving Parts
The cooling system contains hot coolant, which can cause burns if it comes into contact with your skin.
It is absolutely essential to refrain from opening the radiator cap or touching the hoses until the cooling system has completely cooled down.
Furthermore, moving parts such as: belts, pulleys and fans, as it can also pose a hazard, particularly when the engine is running or if the cooling system activates unexpectedly.
For your safety, it is crucial to keep your hands, tools and loose clothing clear of these components.
Remaining aware of your surroundings and working with caution helps prevent accidents, while also ensuring that the repair work is completed without any interruptions.
How to Replace a Radiator Fan – Quick & Easy Repair Method
1. Disconnect the Battery
Before beginning the replacement process, it is absolutely essential, for safety reasons, to disconnect the battery.
Modern radiator fans are integrated into the vehicle’s electrical system and can switch on automatically when the engine temperature rises, even if the engine itself is not running.
Disconnecting the negative terminal of the battery cuts off the power supply, thereby eliminating the risk of the fan suddenly activating and causing injury.
This step also protects the electrical system from short circuits while you are working on the connectors and wiring.
2. Locate the Radiator Fan
The radiator fan is typically situated behind the radiator, near the engine, or, in some cases, in front of it.
It is housed within a plastic casing known as a “fan shroud,” the function of which is to channel airflow through the radiator in the correct direction.
Locating its exact position helps you determine which components may need to be removed in order to access and extract the fan assembly.
In most vehicles, the entire assembly is clearly visible once the hood is opened and the fan blades can be easily identified situated directly adjacent to the radiator.
3. Remove Obstructions
To gain easy access to the radiator fan, you may need to remove certain components that are obstructing your path.
These may include the air intake duct, the engine cover, or the fan shroud itself.
These parts are typically secured in place using screws, clips, or bolts.
Carefully removing these components provides ample working space and ensures that no damage is inflicted upon any surrounding parts.
Properly organizing these removed parts, perhaps in the same sequence in which they were taken off, makes the subsequent reinstallation process significantly easier.
4. Disconnect the Electrical Connector
The radiator fan receives power through an electrical connector that transmits current to the motor.
It is crucial to disconnect this connector before removing the fan.
Gently press the locking tab and detach the connector without applying excessive force.
Damaging the connector can compromise the electrical connection, potentially leading to issues in the future.
Performing this step with care ensures that the new fan receives a proper power supply once installed.
5. Remove the Fan Assembly
The fan assembly is typically secured by bolts, screws, or clips that hold it firmly in place.
Using the appropriate tools, carefully loosen and remove these fasteners.
Once all mounting points have been disengaged, gently lift the fan assembly straight upward and out of its housing.
It is essential to handle it with extreme care to avoid striking the radiator; the radiator fins are very delicate and can bend easily, which would reduce cooling efficiency.
6. Install the New Radiator Fan
Position the new radiator fan assembly in the exact location where the old one sat, ensuring that it aligns correctly with the mounting points.
Proper positioning is critical, as the fan must sit securely and direct airflow through the radiator in the correct direction.
Once aligned, firmly tighten all bolts or clips; however, avoid overtightening, as this can damage the mounting brackets or plastic components.
7. Reconnect the Wiring
After installing the new fan, securely reconnect the electrical wiring harness.
Ensure that the connector clicks firmly into place and does not remain loose, as a loose connection will prevent the fan from functioning correctly.
Proper electrical contact ensures that the fan receives signals from the system and activates at the appropriate time when the engine temperature rises.
8. Reinstall Removed Components
Reinstall all components that were previously removed, such as the fan shroud, air intake duct and engine cover.
Each component must be returned to its original position and securely fastened.
This step is crucial, as these components help direct airflow and protect the engine parts.
A missing component or a loose fit can compromise the overall cooling performance.
9. Reconnect the Battery and Test
Finally, reconnect the battery and start the engine to test the new radiator fan.
Allow the engine to reach its normal operating temperature and observe whether the fan activates at the correct time.
You may also turn on the air conditioning to further verify that the fan is functioning properly.
Monitoring the temperature gauge helps ensure that the cooling system is operating correctly and that the component replacement process was successful.
How to Test the New Radiator Fan
1. Allow the Engine to Reach Operating Temperature
After installing the new radiator fan, the first step is to let the engine run until it reaches its normal operating temperature.
Most car engines are designed to operate within a specific temperature range, where their performance and fuel efficiency are optimized.
As the engine warms up, the coolant temperature gradually rises, triggering the fan to activate.
Allowing the engine to idle for a few minutes generates sufficient heat within the cooling system to enable you to properly test whether the fan is switching on at the correct time.
Monitoring the temperature gauge during this process helps you determine whether the system is functioning normally or if a problem still persists.
2. Check if the Fan Activates Automatically
Once the engine temperature reaches a specific threshold, the radiator fan should switch on automatically without any manual input.
This indicates that the temperature sensor, relay and fan motor are all working together correctly.
If the fan begins to spin at the appropriate moment and then shuts off as the temperature drops, it signifies that the system is functioning exactly as it was designed to.
If the fan fails to switch on at all, it may indicate an issue with the wiring, fuse, relay, or sensor, even if the new fan itself has been installed correctly.
3. Turn on the AC to Confirm Auxiliary Fan Operation
Turning on the air conditioning is another effective method for testing the radiator fan.
In most vehicles, the fan is programmed to run whenever the AC is active, as the AC system generates additional heat that must be dissipated.
When you switch on the AC, the fan should start almost immediately or shortly thereafter.
This confirms that the fan system is capable of responding not only based on the engine temperature but also in response to various other signals.
If the fan fails to react when the AC is turned on, it could indicate an electrical or control-related issue.
4. Check for Any Unusual Sounds or Vibrations
While the fan is running, listen carefully and watch out for any unusual sounds or vibrations.
A properly installed radiator fan should operate smoothly, silently and without any jerking motions.
If you hear sounds such as grinding, rattling, or buzzing, it may indicate that the fan is not mounted correctly, its blades are unbalanced, or an object is making contact with the fan.
Vibrations may also suggest that the mounting bolts are loose or that the alignment is incorrect.
Timely identification of these issues can prevent further damage and ensure that the cooling system operates efficiently and reliably.
Common Mistakes to Avoid During Replacement of Radiator Fan
1. Failing to Disconnect the Battery
One of the most serious mistakes is failing to disconnect the battery before beginning work.
In many modern vehicles, when the engine heats up, the radiator fan may switch on automatically, even if the ignition is turned off.
This can cause the fan to start unexpectedly while your hands are near its blades, posing a risk of injury.
Keeping the battery connected also increases the risk of short circuits while handling electrical connectors.
Disconnecting the negative terminal is a simple step that cuts power to the system and makes the entire process significantly safer.
2. Installing the Wrong Fan Model
Using the wrong radiator fan model is a common issue that can compromise cooling performance and create installation difficulties.
Every vehicle is designed with a specific fan size, motor power and mounting pattern to meet the engine’s unique cooling requirements.
If the fan does not fit correctly or fails to provide adequate airflow, the engine may still overheat even after a new fan has been installed.
To ensure proper operation and long-term reliability, it is essential to match part numbers or verify compatibility with your vehicle’s specific model.
3. Forgetting to Reconnect the Wiring
After installing a new fan, it is easy to forget to reconnect the electrical wiring, a mistake that can lead to confusion during testing.
As the fan relies entirely on electricity, a fully installed fan will not function without proper connections.
Sometimes, a connector may appear to be attached but is not fully locked into place, causing the fan to operate intermittently.
Ensuring that the wiring is securely connected guarantees that the fan receives consistent signals from the system and activates whenever necessary.
4. Damaging the Radiator Fins While Removing the Fan
Radiator fins are extremely thin and delicate; if they are touched or struck while removing the fan assembly, they can bend easily.
These fins function by extracting heat from the coolant and dissipating it into the air; therefore, any damage to them can compromise the system’s cooling efficiency.
Even a slight bend can obstruct airflow and over time, this can have a detrimental effect on overall performance.
Handling the fan with care and avoiding contact with the radiator surface helps ensure that the cooling system continues to operate effectively.
5. Overtightening Bolts
Overtightening bolts is another common mistake that can result in damage to the fan assembly or its mounting points.
Many components surrounding the radiator fan are made of plastic or lightweight metals, which can break or crack under excessive pressure.
Overtightening can also strip the bolt threads, making it difficult to properly secure the fan in the future.
Bolts should be tightened firmly but gently, just enough to ensure the fan remains securely in place without subjecting any of its components to unnecessary stress or damage.
How to Solve Basic Problems: If the Fan Still Does Not Work?
1. Check the Fuse and Relay
If the radiator fan is still not working even after being replaced, the first step should be to check the fuse and relay.
The fuse protects the electrical circuit from overloads; if it has blown, no power will reach the fan at all.
The relay acts like a switch that controls when the fan turns on, based on signals received from the system.
A faulty relay can fail to send power to the fan, even if all other components are functioning correctly.
Checking for and replacing a blown fuse or faulty relay is often a quick and simple solution that can restore the fan’s normal operation.
2. Check the Temperature Sensor
The temperature sensor plays a crucial role in signaling the system when the engine is heating up and when the fan needs to be activated.
If this sensor is not functioning properly, it may send incorrect signals, or no signals at all, preventing the fan from turning on.
In some cases, the fan may never turn on, while in others, it may run at the wrong times.
Checking the sensor and replacing it if it is faulty ensures that the cooling system responds accurately to changes in engine temperature.
3. Check Wiring Connections
Loose, damaged, or corroded wiring connections can prevent power from reaching the radiator fan.
Over time, wires can degrade due to heat, vibration, or moisture within the engine compartment.
Even a small cut in the wiring or a weak connection can interrupt the flow of electricity.
Carefully inspecting all connectors, wires and terminals helps ensure that the electrical circuit is complete and functioning as intended.
Repairing any damaged wiring often resolves the issue without the need for major repairs.
4. Use a Multimeter to Check Voltage
A multimeter is a useful tool for verifying whether power is reaching the radiator fan.
By measuring the voltage at the fan connector, you can confirm whether the system is supplying the correct amount of power when the engine heats up or when the air conditioning is switched on.
If no voltage is detected, the problem likely lies within the fuse, relay, wiring, or control system.
If voltage is present but the fan still fails to operate, it may indicate an issue with the fan motor itself.
This test helps pinpoint the exact cause of the problem.
5. Consider ECU-Related Issues
In modern vehicles, the Engine Control Unit (ECU) regulates the operation of the radiator fan based on inputs received from various sensors.
If a malfunction occurs within the ECU or its signals, the fan may fail to switch on, even if all other components are functioning correctly.
This can be caused by software-related issues, incorrect inputs, or an internal fault within the unit itself.
Although ECU-related problems are relatively rare, they should certainly be considered if other diagnostic checks fail to identify the root cause of the issue.
In such cases, specialized diagnostic equipment may be required to accurately identify and resolve the problem.
Understand About The Cost of Replacing a Radiator Fan
1. Average Cost of Parts
The price of a radiator fan depends primarily on the type of vehicle, the brand of the part and whether you are purchasing the entire fan assembly or just the motor.
In most cases, the complete radiator fan assembly costs more because the fan blades, motor and housing are integrated into a single unit, ensuring a precise fit and optimal performance.
For standard cars, the price is usually quite reasonable; however, for larger vehicles or premium models, the cost can be significantly higher, as they typically feature more robust motors and larger-sized fans.
Choosing a high-quality part is crucial, as a low-quality fan may fail prematurely and compromise the engine’s cooling efficiency once again.
2. Labor Costs (If Performed by a Professional)
If you have a mechanic replace the radiator fan, labor costs will be added to the total expense.
Labor charges depend on how accessible the fan is within your vehicle and the amount of time required to complete the job.
In some cars, the fan is easily accessible and can be replaced quickly; however, in others, accessing the fan requires removing other components, which increases both the time required for the task and the overall cost.
Professional service ensures that the installation and testing are performed correctly, although the total cost will be higher compared to doing the work yourself.
3. DIY vs Mechanic: Cost Comparison
Replacing the fan yourself can result in significant savings, as you only have to pay for the part itself and, if necessary, some basic tools.
This is an excellent option for those with some mechanical knowledge who wish to avoid labor charges.
However, it requires working with caution and strictly adhering to safety protocols to avoid making mistakes.
Hiring a mechanic entails higher costs, but it provides the benefit of professional service and significantly reduces the risk of improper installation.
The best option depends on your level of experience, the tools available to you and your confidence in handling the repair work.
Read More:
- How to Check Coolant Level
- How to Fix AC in Car Blowing Hot Air
- How to Fix a Coolant Leak
- How to Fix Car Overheating
- How to Flush a Radiator
- How to Fix the Heater on My Car
How Long Does It Literally Take?
1. Estimated Time for Beginners vs Professionals
The time required to replace a radiator fan can vary depending on your level of experience and your familiarity with car components.
For those attempting this task for the first time, it typically takes between one and three hours; this is because they require more time to understand the vehicle’s layout, carefully remove parts and ensure that everything is reinstalled correctly.
Beginners may also choose to work at a slower pace to avoid errors, a crucial step for ensuring both safety and accuracy.
Conversely, a professional mechanic with prior experience in similar repairs can often complete the job in approximately thirty minutes to one hour.
Professionals are well-versed in the process, know exactly which tools to use and can quickly access the fan without any unnecessary delays, thereby significantly reducing the total time required.
2. Factors Affecting Replacement Time
Several factors can influence how long the replacement process will take.
The vehicle’s design plays a major role, as the radiator fan is easily accessible in some cars, while others require the removal of additional components such as: the battery, air intake system, or even parts of the front fascia, to gain access.
The condition of the components is also a critical factor, as rusted bolts, cramped spaces, or seized electrical connectors can slow down the process.
The availability of the right tools and a suitable workspace can also impact the pace of the work; working in a comfortable environment with the proper tools makes the task both easier and faster.
Furthermore, unexpected issues such as: faulty wiring or the need to replace related components, as it can extend the total time required.
Understanding these factors enables you to set realistic expectations and plan the repair process more effectively.
How to Maintain Radiator Fan
Not only this, there’s research that shows that the large portion of engine energy is actually converted into the heat, which makes the cooling system one of the most important parts of any vehicle. And, research also shows that nearly one third of the energy must be removed in terms of preventing any possible damage to your vehicle’s engine, that’s where the radiator fan plays a important role: as it literally ensures continuous airflow through the radiator specially when the vehicle is not moving that fast enough to cool down itself naturally.[¹]
1. Keep the Radiator Clean
Keeping the radiator clean is crucial for the proper functioning of the radiator fan and the entire cooling system.
The radiator operates by allowing air to pass through thin metal fins, which dissipate heat from the coolant.
Over time, dust, dirt, insects and debris can clog these fins and obstruct airflow.
When airflow is restricted, the radiator fan has to work harder to cool the engine, which can place excessive strain on the fan motor.
Gently cleaning the radiator with water or compressed air helps maintain airflow and improves cooling efficiency, making the fan’s operation easier and more effective.
2. Regularly Inspect the Wiring
The radiator fan relies on electrical wiring to receive power and signals from the system; therefore, keeping the wiring in good condition is essential.
Due to the heat, vibration and moisture present in the engine compartment, wires can become loose, frayed, or damaged over time.
Even a minor fault in the wiring can prevent the fan from activating when needed.
Regularly inspecting connectors and wires for any signs of wear, tear, or looseness ensures that the system operates reliably.
Promptly addressing minor wiring issues can prevent sudden fan failures and help avoid problems associated with engine overheating.
3. Monitor Coolant Levels
Coolant plays a vital role in working alongside the radiator fan to extract heat from the engine and maintain the correct operating temperature.
If the coolant level drops too low, the system cannot effectively absorb and dissipate heat, placing excessive strain on the radiator fan.
This can lead to a rise in temperature and place undue strain on the entire cooling system.
Regularly checking and maintaining the correct coolant level ensures that heat is managed effectively, thereby reducing the likelihood of the fan running excessively or failing prematurely.
4. Prevent Engine Overheating
Preventing engine overheating is the most effective way to extend the lifespan of the radiator fan.
When the engine overheats repeatedly, the fan is forced to run for longer durations and at higher speeds, which can lead to premature motor failure.
Excessive heat can also damage other components of the cooling system, compelling the fan to work even harder.
Paying attention to the temperature gauge, promptly addressing any cooling-related issues and maintaining the overall health of the engine help alleviate the strain placed on the fan.
A well-maintained engine allows the radiator fan to operate under normal conditions, thereby enhancing its longevity and reliability.
Know, When to Replace and When to Repair The Radiator Fan
1. Situations Where Repair Is Possible
In some instances, a radiator fan issue can be resolved without replacing the entire unit, particularly when the main fan motor and blades remain in good condition.
Minor issues such as: loose electrical connectors, slight wiring faults, or a defective relay or fuse, as it can prevent the fan from operating, even if the fan itself is mechanically sound.
Cleaning away dust or debris lodged in the fan blades or shroud can also restore proper rotational speed and airflow.
Occasionally, electrical conductivity can be improved by repairing worn connectors or slightly corroded terminals.
If the fan spins freely when turned by hand and exhibits no signs of mechanical failure, and if its failure to operate stems from a minor electrical fault, repairing the associated components is often sufficient.
This approach saves both time and money; however, it is crucial to thoroughly inspect all components to ensure the fan continues to operate reliably over the long term.
2. When Complete Replacement Is Necessary
Complete replacement becomes necessary when the radiator fan unit itself has failed or is no longer functioning correctly.
If the fan motor has failed, the fan will not spin even when receiving power; this is a clear indication that repair is not a viable option.
Broken or cracked fan blades can disrupt airflow and create an imbalance, leading to vibrations and compromised cooling performance.
In some cases, internal wear within the motor or overheating can reduce the fan’s power output, preventing it from effectively cooling the engine, even if the motor is technically still running.
Persistent overheating issues, a burning smell emanating from the fan motor, or recurring malfunctions even after minor repairs, these are definitive signs that the entire assembly should be replaced.
In such situations, opting for a replacement ensures reliable performance, protects the engine from heat-related damage and helps avoid recurring expenses on future repairs.
Conclusion – How to Replace a Radiator Fan
Now, it’s been clear to you that how important it is to have working radiator fan, as it literally makes real difference in protecting your engine from overheating damage.
The radiator fan plays a direct role in maintaining the engine temperature at a safe level, particularly when the vehicle is stationary or moving slowly, as natural airflow is significantly reduced under such conditions.
Ignoring early warning signs such as: engine overheating, reduced AC cooling efficiency, or fan malfunction, as it can lead to a host of costly and serious issues, including engine damage or a decline in performance.
By understanding the fan’s operation, promptly recognizing symptoms and adhering to proper replacement procedures, you can effectively resolve this issue and restore optimal cooling efficiency.
Regular maintenance, meticulous installation and thorough testing ensure that the fan continues to operate reliably for the long term.
Whether you choose to undertake the repair yourself or seek professional assistance, taking timely action enhances engine functionality, extends the vehicle’s lifespan and helps prevent sudden mechanical failures.
Now, that’s all from this guide on How to Replace a Radiator Fan, even you can ask questions related to this in comment box.
Frequently Asked Questions
FAQ 1: How can I tell if my radiator fan isn’t working properly?
You can usually detect a faulty radiator fan by observing your engine’s behavior, particularly when the car is not traveling at high speeds. If the temperature gauge rises while the vehicle is idling (stopped), but returns to a normal level as soon as you start driving, it is often an indication that the fan is failing to generate airflow. You may also notice that the air conditioning (AC) does not cool effectively when the car is stationary, or you might not hear the sound of the fan running at all. In some instances, the fan may run continuously or emit unusual noises, signaling a potential issue.
FAQ 2: Can I drive my car with a faulty radiator fan?
It is not safe to drive a car with a faulty radiator fan for an extended period, as this can lead to engine overheating. Although the vehicle may appear to operate normally while driving at higher speeds (due to natural airflow), the engine temperature can rise rapidly in traffic or while idling. Persistent overheating can cause severe damage to critical engine components, such as the head gasket or cylinder head. To avoid costly repairs, it is always best to have this issue fixed as soon as possible.
FAQ 3: Does the radiator fan affect air conditioning performance?
Yes, the radiator fan plays a crucial role in supporting the air conditioning system. It assists in dissipating heat from the AC condenser, which is typically located near the radiator. If the fan is not functioning, the AC system cannot effectively expel heat specially when the car is stationary. Consequently, you may feel warm air blowing from the AC vents while the vehicle is idling. However, as soon as you start driving at higher speeds, you begin to feel the cool breeze.
FAQ 4: Is replacing a radiator fan a difficult task for beginners?
Replacing a radiator fan is generally considered a somewhat challenging task for beginners. While it typically does not require specialized tools, it does necessitate careful handling of parts and strict adherence to safety precautions (such as disconnecting the battery). The level of difficulty depends on how easily accessible the fan is within your specific vehicle. With a clear guide and a little patience, many beginners can successfully replace it themselves.
FAQ 5: How much does it cost to replace a radiator fan?
The cost depends on the type of vehicle and whether you choose to replace it yourself or have a mechanic do it. The most significant expense is the fan assembly itself, the price of which can vary based on its quality and compatibility. If you enlist the help of a professional, the total cost will increase due to labor charges. Doing it yourself can save money, but it requires time and a basic understanding of mechanical procedures.
FAQ 6: How long does it take to replace a radiator fan?
The time required depends on your level of experience and the vehicle’s design. A beginner might take anywhere from one to three hours, as they need to work slowly and carefully. A professional mechanic can often complete the job much faster sometimes in as little as one hour. Factors such as cramped spaces, seized bolts, or the need to remove additional components can also affect the total time required.
FAQ 7: Why do radiator fans fail?
Radiator fans can fail for a variety of reasons, including motor wear and tear, wiring faults, blown fuses, or defective relays. Over time, heat and vibrations can cause electrical components to deteriorate, leading to fan failure. The accumulation of dust and debris on the fan blades or motor can also cause the fan to malfunction. Regular maintenance and inspection of the cooling system can help prevent sudden breakdowns.
FAQ 8: Can a faulty temperature sensor prevent the fan from running?
Yes, the temperature sensor is responsible for signaling the system when to activate the fan. If the sensor provides inaccurate readings or ceases to function, the fan will not turn on, even if the engine has overheated. This can lead to engine overheating issues, even if the fan itself is in good working condition. Replacing a faulty sensor often resolves this problem.
FAQ 9: What happens if I install the wrong radiator fan?
Installing the wrong fan can lead to serious issues regarding cooling performance. If the fan does not match your vehicle’s specifications, it may not fit correctly or provide the necessary airflow. Consequently, engine overheating problems may persist even after the fan has been replaced. It is crucial to select the correct fan model, specifically one designed for your vehicle.
References:
[1] Design and development of automotive radiator for better cooling efficiency
https://www.sciencedirect.com/science/article/abs/pii/S2214785322059697

Hello Folks, Dean Shali here to help you out to solve the problems with your lovely vehicle, as i have lots of experience and knowledge about automotive industry as i woks directly with the customers and repair vehicles and i love to help the people to keep their cars safe and running smoothly.