Written By: Dean Shali
Fact Checked By: Sabré Cook
Reviewed By: Tamara Warren
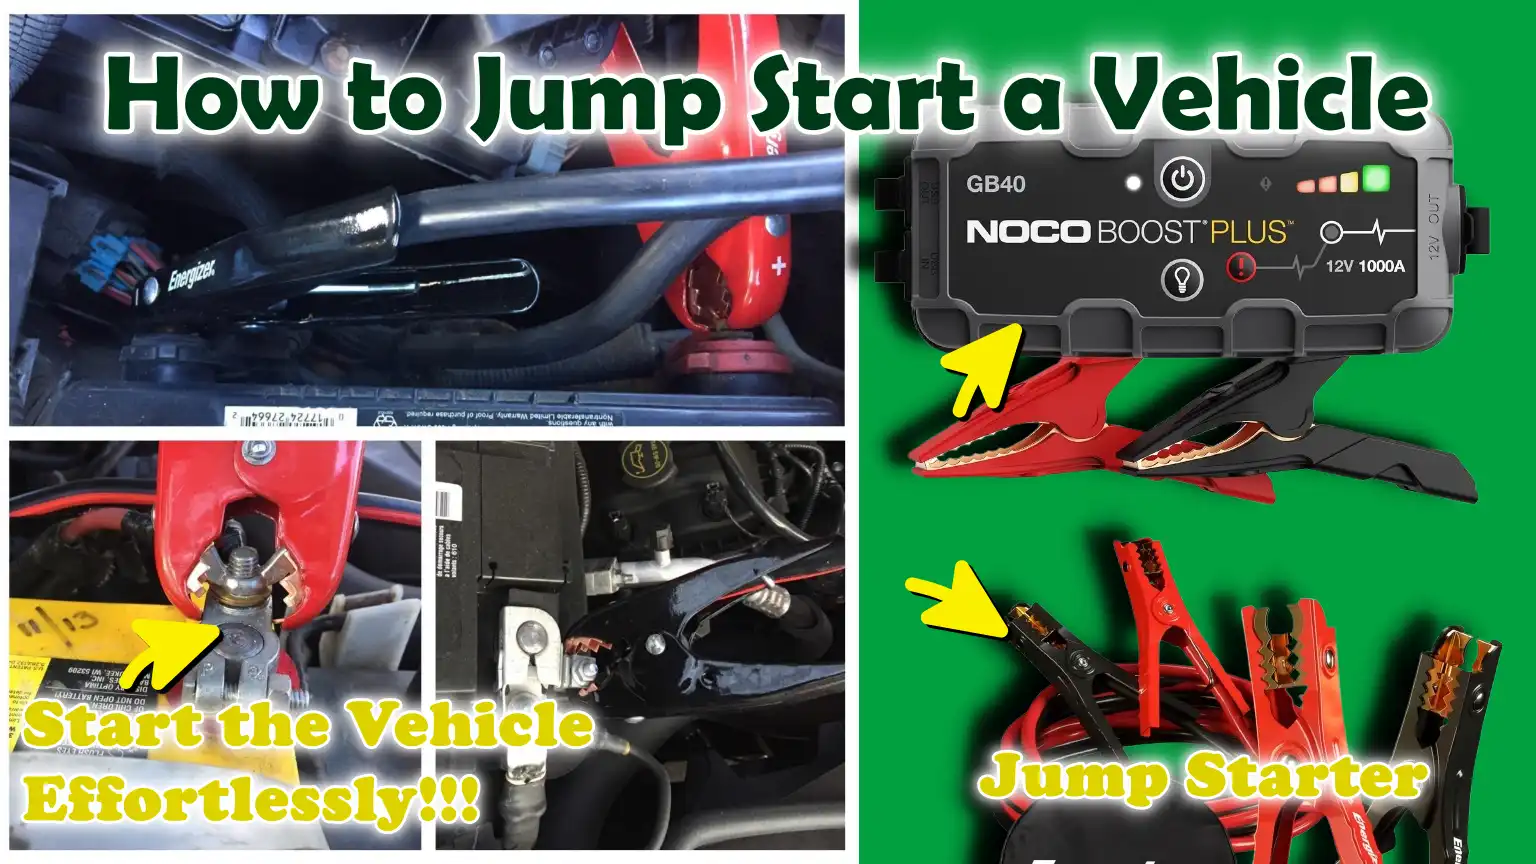
You need to understand that one correct cable connection can literally save hours of waiting for roadside help; and dead car battery is common reasons vehicle that refuse to start and it can happen to anyone.
As well as, jump=starting a vehicle is a temporary but actually reliable method that truly uses power from the another battery or a portable jump starter, that brings the dead battery back to the life long enough to start the engine again.
So, when you done in the correct way, then you can jump-start is safe, quick and does not damage the vehicle’s electronics as well, so this is the guide that shows you How to Jump Start a Vehicle.
However, if you do this in the wrong way such as: connects the cables in the wrong order or ignore the safety checks, then it can literally cause the sparks, battery damage or even lead to the injury as well.
Before Moving On To Jump Starting Your Vehicle, Just Quickly Check If It Is Really Needed of Not
1. What Jump-Starting Actually Does (and Doesn’t)
Jump-starting your car simply provides power to your car’s battery for a short time so the engine can start.
It doesn’t fully recharge the battery and it doesn’t fix a weak, old, or defective battery.
When you connect jumper cables or a jump starter, the depleted battery receives power for a short time to start the engine.
Once the engine starts, the alternator takes over and begins supplying power.
If the battery is healthy, driving the car for a while can recharge it.
If the battery is bad, jump-starting will only work for a short time, or not at all.
Therefore, jump-starting should be viewed as a temporary solution, not a permanent repair.
2. Signs Your Car Can Be Jump-Started vs When It Needs Towing
A car can usually be jump-started if the problem is simply low battery power.
Common signs include the engine cranking slowly, a clicking sound when the key is turned, dim headlights, flickering dashboard lights, or the electrical system not working properly.
These signs mean the battery is still there but lacks sufficient charge.
On the other hand, if the engine won’t crank at all and there are no lights or sounds, if the battery is completely drained and inoperable, or if the car shuts off again immediately after the jump, towing is usually necessary.
Vehicles with serious mechanical problems, a faulty starter motor, or a bad alternator will also not benefit from a jump-start.
3. When You Shouldn’t Jump-Start a Car
If you notice a fuel leak, a strong burning smell, smoke, or visible sparks, you should never attempt to jump-start a car, as these pose serious safety risks.
A cracked or swollen battery case is very dangerous because the battery contains acid and can explode under electrical pressure.
Heavy corrosion on the battery terminals, specially thick white or green deposits, can block power flow and increase the risk of sparks.
In such circumstances, jump-starting could result in injury or damage.
The safest course of action is to stop the vehicle immediately and call roadside assistance or a professional mechanic.
Knowing when not to jump-start is just as important as knowing how to do it.
Tools
| Item | Why It Is Needed | How to Use It Properly |
|---|---|---|
| Jumper Cables | They transfer power from the working battery to the off battery so the engine can start. | Place the clamps on the battery terminals and metal ground in the correct order, making sure they are tight and not touching each other. |
| Portable Jump Starter | This allows you to jump-start your car alone, specially in emergencies or remote locations. | Fully charge it beforehand, connect it to the battery terminals as directed, then start the car and safely disconnect it. |
| Thick Cables | Thick cables conduct electricity faster and dissipate heat, making jump-starting easier and safer. | Use cables that feel solid and heavy, specially for larger cars or cars with very weak batteries. |
| Proper Cable Length | Longer cables maintain a safe distance between vehicles and allow for easier positioning. | Choose cables that are long enough to prevent vehicles from colliding with each other and to allow easy access to the clamps. |
| Strong Clamps | They create a stable connection and prevent power loss or sparks. | Clamp firmly onto clean metal parts of the battery terminal or grounding point. |
| Safety Gloves | These protect your hands from burns, cuts and battery debris. | Wear them before touching cables or battery parts. |
| Eye Protection | These protect the eyes from sparks or battery acid splashes. | Put them on before connecting or removing cables. |
| Safe Vehicle Spacing | Prevents accidental contact, sparks, or damage. | Park vehicles close enough so that the cables can reach each other, but never touch each other. |
Understand, Battery Basics in 60 Seconds
1. Quickly Identify the Positive (+) and Negative (–) Terminals
Every car battery has two terminals that must be correctly identified before anything else.
The positive terminal is usually marked with a plus sign and is often covered with a red cap or red cable, while the negative terminal is marked with a minus sign and is usually connected to a black cable.
The negative side is usually connected to the metal body of the car, which is why it is also called ground.
Correct identification is crucial because connecting the cables incorrectly can cause sparks, damage the electrical system, or blow fuses.
Taking a few seconds to clearly locate and confirm these markings helps avoid serious mistakes and makes the entire jump-starting process safer and easier.
2. Jump Points Under the Hood in Newer Vehicles
Many modern vehicles are designed with special jump-start points under the hood, rather than directly accessing the battery terminals.
These jump points are clearly marked metal posts or covered connectors that are safe and easy to locate.
Manufacturers install them to protect sensitive electronics and reduce the risk of sparks near the battery.
Using these points ensures proper power flow without touching the battery.
Always consult the vehicle’s manual or the label under the hood to locate these locations, as using the correct jump points helps prevent damage and ensure a smooth start.
3. Trouble-Free Battery Locations
Not all car batteries are located under the hood, specially in newer or more expensive vehicles.
Some batteries are placed in the trunk, under the back seat, or under the floor panel to improve weight balance and safety.
When the battery is hidden, the vehicle usually has remote jump terminals under the hood to make jump-starting easier.
Knowing that the battery can be located in different locations saves time and reduces confusion, specially in an emergency situation.
Understanding where batteries or jump points are located helps drivers act quickly and confidently without having to guess or be forced to go to the wrong places.
Now, Set the Vehicle and Tools for a Safe Jump
1. Parking Position and Vehicle Alignment
Before connecting anything, both vehicles should be parked in a stable and safe position.
The cars should be close enough to allow easy access to the jumper cables, but should never touch each other.
Touching the vehicles could create unwanted electrical paths and increase the risk of sparks or damage.
Both vehicles should be in park or neutral and the parking brake should be fully engaged to prevent movement.
Proper alignment keeps the process under control and reduces stress on the cables, making the jump-start more safe and effective.
2. Ignition, Lights and Accessories: What Should Be Turned Off
Before connecting the jumper cables or jump starter, all electrical systems in both vehicles should be turned off.
This includes the ignition, headlights, interior lights, air conditioning, radio and charging ports.
Turning everything off reduces the electrical load and prevents sudden power surges during connection.
Power surges can damage sensitive electronics, specially in modern vehicles with advanced control systems.
Starting from a clean, powered-down state allows electricity to flow smoothly and safely during the jump-start process.
3. Why Metal Contact Points Are Important for Grounding
Grounding is an essential safety measure when jump-starting a vehicle.
The negative connection should be connected to a clean, unpainted metal surface on the engine or frame, not directly to the negative terminal of a dead battery.
Metal contact points allow electricity to safely return to the vehicle body, reducing the risk of sparks near the battery.
This is important because batteries can emit flammable gases.
A solid metal ground also improves power flow, making jump-starts more reliable and reducing the risk of electrical problems.
Know, The Correct Connection Order – Don’t Guess This At All
1. Red Clamp on the Positive Terminal of the Dead Battery
The first connection should always be made to the positive terminal of the dead battery.
This terminal is clearly marked with a plus sign and is usually connected to a red cable.
Making this connection first prepares the dead battery for power without completing the electrical circuit.
This step is important because it reduces the risk of accidental sparks and helps control the flow of electricity from the start.
2. Red Clamp on the Positive Terminal of the Good Battery
The next step is to connect the red clamp to the positive terminal of the working battery.
This creates a direct power path between the two batteries, leaving the circuit incomplete.
At this point, electricity is ready to flow, but it doesn’t yet flow because the negative side is still disconnected.
This controlled setup makes the process safer and more predictable.
3. Black Clamp on the Negative Terminal of the Good Battery
After both positive connections are secured, connect the black clamp to the negative terminal of the good battery.
This step begins to complete the electrical circuit, yet keeps the last connection away from the dead battery.
Connecting the negative clamp to the working battery first reduces the risk of sparks near the weak battery, which is more likely to release ignitable gas.
4. Black Clamp on a Solid Metal Ground on the Dead Car
The final connection should be made to a clean, unpainted metal surface on the dead car’s engine or frame.
This metal ground allows electricity to safely flow back to the car’s body instead of directly to the battery.
Using a solid ground reduces the risk of sparks near the battery and improves electrical stability.
It also protects sensitive electronics by creating a safe return path for the current.
5. Why This Order Prevents Sparks and Damage
This specific connection order is designed to control when and where electricity flows.
By connecting the positive terminals first and ending with a grounded metal connection away from the dead battery, the risk of sparks near battery gases is greatly reduced.
Sparks near the battery can cause harm or injury, so this order keeps the most dangerous moment away from the battery.
Following this order also protects the vehicle’s electrical systems and ensures a smoother and safer jump-start every time.
Now, How to Star the Car – Keep In Mind Timing is Everything
1. How Long to Let the Donor Car Run
After all connections are correctly made, start the donor car and let it run for a while.
Running the engine for about two to five minutes allows the alternator to send power through the cables and gradually increase the dead battery’s charge level.
This waiting time helps stabilize the electrical flow and reduces the strain on both batteries.
Jump-starting the dead car immediately without waiting may be less effective, specially if the battery is very low.
2. RPM Tips for Faster Charging Without Excessive Revving
Running the donor car at a slightly higher engine speed can provide a consistent flow of power, but excessive revving is not necessary.
A slight increase from idle is enough to help the alternator function more efficiently.
Revving the engine too much can cause voltage spikes that can damage sensitive electronic systems.
A smooth and controlled engine speed is safer and more effective for power transfer.
3. What to do if the car doesn’t start on the first try
If the damaged car doesn’t start immediately, turn off the key and wait a minute or two while the donor car continues to run.
This extra time helps the battery build up more charge.
Repeatedly cranking the engine without waiting can overheat the cables and drain the donor battery.
If the car still won’t start after a few careful attempts, the battery may be too weak or there may be another problem, such as a bad starter or alternator.
In this case, the safest option is to stop the process and seek professional help.
How to Disconnect Perfectly
1. Reverse Order Explained and Why It’s Important
When the car with the dead battery starts and runs properly, remove the jumper cables in the reverse order in which they were connected.
This means first removing the ground connection of the dead car, then the negative clamp of the donor battery, then the positive clamp of the donor battery and finally the positive clamp of the restarted car.
Removing the cables in reverse order keeps the electrical circuit under control and reduces the chance of sparks.
This order is important because the batteries are now active and generating power and careless removal could cause a short circuit or electrical damage.
2. Things to Keep in Mind When Removing the Clamps
When removing the clamps, it’s important to ensure they don’t touch each other or any metal parts of the car.
Even slight contact can cause sparks or damage electronic components.
The current flow can cause the clamps to heat up, which is normal but a warning sign to use them with caution.
Driving slowly and carefully prevents accidental contact with belts, fans, or hot engine parts.
Careful disassembly is just as important as assembly.
3. Post-Start Checklist
Before driving, a restarted vehicle should be allowed to idle for a few minutes to ensure the engine is stable and the electrical systems are functioning normally.
Headlights, dashboard lights and basic controls should appear normal, without flickering or warning messages.
The hood should be tightly closed and all tools and cables should be safely stored.
Taking a moment to check everything is in order helps prevent sudden stalls and ensures the battery continues to receive a charge from the alternator while driving.
What to Do After the Jump – Keep It Alive
1. How long should you drive to properly recharge?
After a successful jump-start, the vehicle must be driven continuously to recharge the battery.
A short drive is usually not enough because starting the engine consumes a lot of power.
Driving at normal road speeds for at least twenty to thirty minutes gives the alternator enough time to continuously return power to the battery.
Driving on the highway is more efficient than in stop-and-go traffic because the engine runs smoothly and the alternator works continuously.
This driving time helps restore usable charge, but it may not fully recharge an old or weak battery.
2. Warning Signs of Battery or Alternator Failure
Even after driving, certain signs may indicate deeper problems.
If the car struggles to restart, the headlights appear dim, the dashboard lights flicker, or electrical features behave strangely, the battery may not be holding a charge properly.
A bad alternator can also cause similar symptoms, such as warning lights on the dashboard or the engine shutting off while driving.
Early attention to these signs helps prevent future battery damage and unexpected failures.
3. When to Test or Replace the Battery
If the battery requires frequent jump-starts or is more than a few years old, it should be tested as soon as possible.
Most automotive service centers can quickly check the battery’s health and charging performance.
Replacing a weak battery before it completely fails is safer and easier than waiting for another roadside emergency.
Knowing when to test or replace the battery ensures reliable starting and avoids overstraining the vehicle’s electrical system.
How to Jump-Start with a Portable Booster
1. Know Differences from a Cable Jump
Jump-starting a vehicle with a portable booster is easier than using jumper cables because it doesn’t require a second car.
A portable booster is a self-contained power source that connects directly to the battery or a designated jump point.
Once connected, the booster sends power directly to the battery, starting the engine.
Unlike a cable jump, there’s no need to coordinate two vehicles, manage space between cars, or keep another engine running.
This makes portable boosters specially useful in isolated areas, parking garages, or in bad weather.
While the process is simple, connections must be made carefully to ensure proper power flow.
2. Safety Features to Enable and Why They’re Important
Most modern portable boosters have built-in safety systems to prevent common errors.
Reverse polarity protection prevents the device from operating if the clamps are connected incorrectly, helping to protect the vehicle’s electrical system.
Spark protection reduces the risk of sparks during connection and disconnection, ensuring safety in processes around the battery.
Overload and short-circuit protection help control power flow and prevent damage to both the booster and the vehicle.
Activating these features provides an extra layer of safety, specially for first-time users.
3. Storage and Maintenance Tips for Boosters
Proper storage and maintenance of a portable booster is essential to ensure it functions properly when needed.
The booster should be stored in a cool, dry place and checked regularly to ensure it remains charged.
Leaving the booster’s battery completely discharged for extended periods can shorten its life and make it unreliable.
Recharging it every few months, even when not in use, keeps it ready for emergencies.
Taking care of the booster ensures reliable performance and reduces the chance of being stuck with a device that can’t power up.
Common Mistakes That Damage the Battery
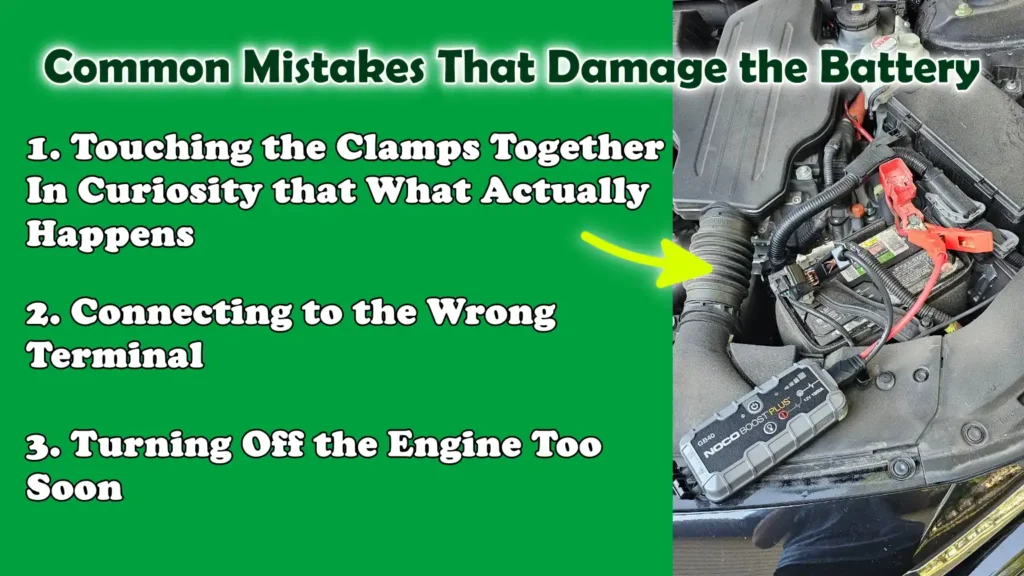
1. Touching the Clamps Together In Curiosity that What Actually Happens
When jumper cable clamps touch each other while connected to a power source, it causes a direct short circuit.
This means electricity tries to flow uncontrollably, causing sparks, heat and sometimes loud popping sounds.
This sudden surge can damage the battery, melt parts of the clamps, blow fuses, or damage the vehicle’s electrical system.
In extreme cases, this can cause battery failure or injury.
It’s crucial to keep the clamps separate at all times, as even a small impact can cause long-term damage.
2. Connecting to the Wrong Terminal
Connecting a cable to the wrong battery terminal reverses the flow of electricity and can cause serious problems.
This mistake can damage sensitive electronics like the control module, sensors and onboard computers.
This can cause the cables to heat up rapidly and spark.
Modern vehicles are particularly vulnerable because they rely on precise voltage levels.
Taking the time to confirm the positive and negative terminals before making any connections can prevent costly repairs and ensure a safe jump-start process.
3. Turning Off the Engine Too Soon
Turning off the engine too soon after a jump-start is a common mistake that often damages the battery.
Starting the engine consumes a lot of power and if the battery is turned off before it has sufficient charge, it may not restart.
This puts more strain on the battery and can shorten its life.
Letting the engine run and driving for extended periods helps restore its charge and keeps the battery in good condition.
Read More:-
Understand, What to do in Special Situations
1. Jump-Starting in Extreme Heat or Cold
Weather conditions significantly impact a car’s battery and jump-starting results.
In extreme cold, battery power decreases because chemical reactions slow down, making it more difficult to start the engine.
This means that a faulty battery may take longer to connect to a donor car or jump starter before starting the engine.
In extreme heat, the water content in batteries may decrease, causing them to deteriorate more quickly, even if they appear to be functioning normally.
Heat can also increase the risk of swelling or leaking batteries.
In both situations, patience is required and greater care must be taken to avoid sparks and overheating during the jump-start process.
2. Hybrid and Start-Stop Systems: What’s the Difference?
Hybrid vehicles and cars with start-stop systems use more complex electrical setups than traditional cars.
Many of these vehicles have multiple batteries or high-voltage systems that should never be touched during a jump-start.
Manufacturers often provide special jump-start terminals for safe use.
Using the wrong connection point can damage expensive parts.
Always follow the vehicle’s instructions and avoid guesswork.
Understanding these differences helps prevent serious electrical damage and ensures a safe jump-start.
3. Diesel Vehicles and Higher Power Requirements
Diesel vehicles require more power to start because they use higher compression and a stronger starter.
This means that jump-starting a diesel engine often requires thicker cables, a more powerful donor vehicle, or a portable booster with a higher capacity.
Smaller jump starters or thinner cables may not provide enough power.
It’s also important to allow more time for charge transfer before starting.
Knowing these higher power requirements can prevent trouble and reduce the risk of draining the donor battery or damaging the equipment.
Let’s Solve The Problem Related to the Jump Start
Basically, jump-starting is the electrical process that literally means that: it simply borrows power from a healthy battery to turn the engine over in a car with insufficient battery charge, so this setup only works if the vehicle’s charging system and starter are working in proper way.[¹]
1. Clicking Sound, But the Engine Won’t Start
When you hear a clicking sound but the engine won’t start, it means the battery has some power, but not enough to fully start the engine.
This clicking occurs when the starter attempts to operate without power.
In many cases, letting the donor car run for a longer period of time or ensuring all cable connections are tight can solve the problem.
If the clicking sound persists even after a proper jump-start, the battery may be too weak to repair, or the starter motor itself may be damaged.
Understanding this sound helps drivers know whether to keep trying or stop and seek help.
2. No Lights at All
If there are no lights on the dashboard, no sound and no response when turning the key, the battery is likely completely drained or disconnected.
This can happen if the battery is very old, has internal defects, or has loose or corroded terminals.
Jump-starting may still work, but the connections must be very strong and power transfer may take longer.
If there’s no response after careful attempts, the problem may not be just the battery and professional help may be needed.
3. Starts, then stalls immediately
When a car starts after a jump but stalls immediately, it often means the battery isn’t charging or the alternator isn’t providing power.
The engine relies on the battery to start and the alternator to keep it running.
If the alternator is faulty, the engine may stall as soon as the jump power is removed.
Letting the car idle for extended periods while connected can sometimes help, but frequent stalling is a sure sign that the battery or charging system needs testing and repair.
Conclusion: How to Jump Start a Vehicle
Now, you have clearly understand that a careful jump=start can save electronics and get the car moving again within the matter of minutes or so.
A dead battery is one of the most common car problems and in many cases, it doesn’t mean the vehicle is faulty, just that it doesn’t have enough power to start for a while.
And, whenever the right steps are followed, jump-starting is safe even for modern vehicles with advanced electronics.
As well as, you need to understand about the battery basics, using the right equipment and observing the correct connection and disconnection order helps prevent sparks, damage and injury.
Even, it’s equally important to know what jump-starting can’t fix, such as a bad battery or alternator.
Treating jump-starting as a short-term solution and following up with proper driving, testing, or battery replacement ensures long-term reliability.
So, that’s it from this guide on How to Jump Start a Vehicle and you can ask questions in the comment box below.
Frequently Asked Questions
Question No. 1 :- What Does It Mean to Jump-Start a Car?
Answer: Jump-starting a car means starting the engine of a car with a dead battery by drawing power from another battery or a portable jump starter. When a battery lacks sufficient charge, it cannot start the engine on its own. A jump-start provides power for a short time to start the engine, after which the car’s alternator takes over. Jump-starting doesn’t repair the battery, but it allows the car to run again so the battery can be recharged or tested.
Question No. 2 :- Why Does a Car Battery Suddenly Drain?
Answer: Car batteries can suddenly drain for a variety of reasons. Common causes include leaving the headlights or interior lights on, extreme cold or heat, an old battery that can no longer hold a charge, or frequent short trips that prevent it from recharging properly. Sometimes the battery is fine, but the alternator can’t charge it properly. A battery may appear normal one day and malfunction the next, potentially ending its life.
Question No. 3 :- Is It Safe to Jump-Start Modern Cars?
Answer: Yes, if done correctly, jump-starting modern cars is safe. Newer vehicles contain sensitive electronics, so the correct connection order and proper grounding are essential. Using the correct terminals or manufacturer-provided jump points helps protect onboard systems. Problems typically occur when cables are connected incorrectly, clamps touch metal parts, or safety steps are ignored.
Question No. 4 :- How Long Should I Let the Donor Car Run Before Starting My Car?
Answer: Before attempting to start a stalled car, let the donor car run for approximately two to five minutes. This time allows the weakened battery to regain power and stabilize its charge. Trying to jump-start immediately may not provide enough power, specially if the battery is very low.
Question No. 5 :- Can Jump-Starting Damage My Battery?
Answer: Jump-starting won’t damage a good battery. However, repeatedly jump-starting an old or failing battery can shorten its life. Damage is usually caused by improper connections, sparks, short circuits, or turning off the engine immediately after starting. Jump-starts should be considered a temporary solution, not a long-term solution.
Question No. 6 :- Why Should the Negative Clamp Be Connected to Metal Instead of the Battery?
Answer: Connecting the negative clamp to a clean metal part of the engine or frame reduces the risk of sparks near the battery. Batteries can emit flammable gases, specially when they are weak. Grounding the battery to metal away from the body ensures that power is safely removed from the vehicle, protecting both the battery and the electrical system.
Question No. 7 :- How Long Should I Drive After a Jump-Start?
Answer: After a jump-start, the vehicle should be driven without stopping for at least twenty to thirty minutes. This gives the alternator enough time to restore power to the battery. Driving for a short time may not replenish the energy used during the jump-start, making it difficult to restart the car.
References:-
[1] Jump start (vehicle)
https://en.wikipedia.org/wiki/Jump_start_(vehicle)

Hello Folks, Dean Shali here to help you out to solve the problems with your lovely vehicle, as i have lots of experience and knowledge about automotive industry as i woks directly with the customers and repair vehicles and i love to help the people to keep their cars safe and running smoothly.