Written By: Dean Shali
Fact Checked By: Sabré Cook
Reviewed By: Tamara Warren
There are lots of reason that leads to the exhaust leaks such as: rusty pipes, worn out gaskets, holes, cracks or loose connections in the exhaust systems as well.
Basically, these leaks can lead to the decreased in fuel efficiency, produces louder engine noise, cause poor acceleration and even exposure to the toxic fumes such as: Carbon Monoxide, which is literally dangerous to drivers and passengers as well.
If we talk about the common causes, then it includes rust from the moisture, any physical damage from the road debris, failing gaskets or totally worn-out clamps and pipes.
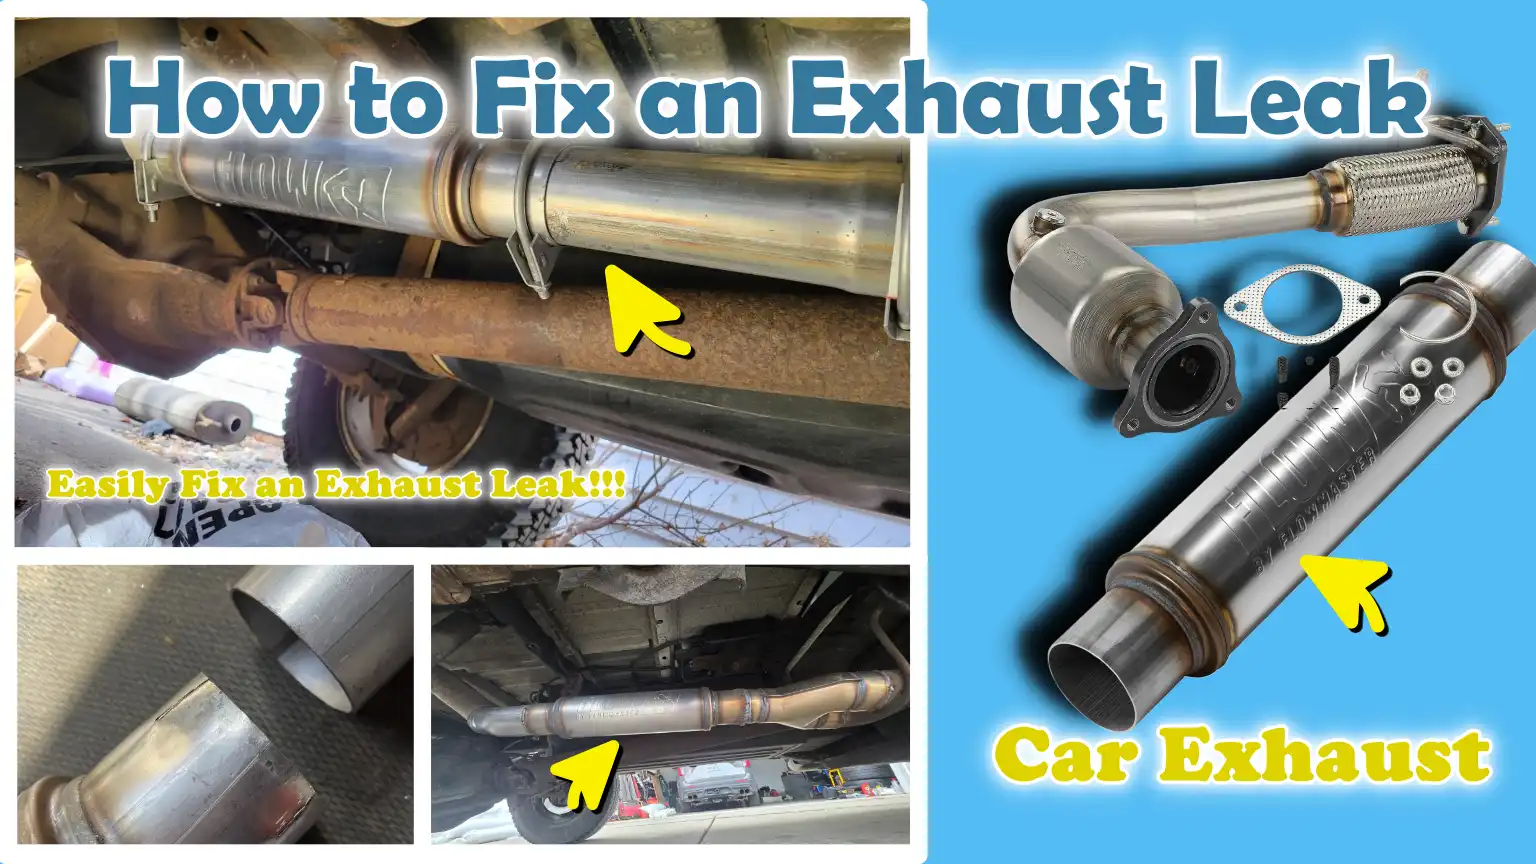
But, you can always detect those exhaust leaks and fix with some simple inspection techniques, which you’ll gonna learn in this guide about How to Fix an Exhaust Leak, so that you can comfortably identify and repair those exhaust leaks effectively and save hell lot of money by doing it yourself.
Firstly, Understand Everything About Exhaust Leaks
An exhaust leak occurs when a hole, crack, or gap develops in any part of the exhaust system, allowing gases to escape before they can safely exit through the tailpipe.
The exhaust system is designed to channel harmful gases such as: carbon monoxide, away from the engine and out of the vehicle; therefore, any leak can compromise both the vehicle’s performance and safety.
1. Symptoms of an Exhaust Leak
One of the most common symptoms is a loud or unusual noise, often described as a “hissing” (like escaping air), “ticking” (like a clock), or “popping” (like firecrackers), particularly when the engine is started or the vehicle accelerates.
Another clear indication is reduced fuel efficiency; when the exhaust flow is obstructed, the engine cannot operate at its full potential.
Many drivers also notice a strong, unpleasant odor of exhaust fumes inside or around the vehicle; this is a serious warning sign that gases are entering the cabin.
Furthermore, engine performance may deteriorate, manifesting as sluggish acceleration, a loss of power, or rough idling, as the engine relies on proper exhaust flow to maintain its balance and operational efficiency.
2. Causes of Exhaust Leaks
Exhaust leaks are typically caused by wear and tear or damage that occurs over time.
One of the most common culprits is rust or corrosion; this happens when factors such as moisture, heat and road salt gradually degrade the metal components, creating small holes, holes that will continue to grow if left unrepaired.
Loose or defective clamps can also cause leaks, as their function is to hold the exhaust pipes tightly together; if these clamps weaken or break, a gap forms between the pipes.
Cracks or damage to components such as the muffler, exhaust pipes, or manifold are another major cause; this often results from the aging of parts, repeated cycles of heating and cooling, or impact with road debris such as: stones, or speed bumps.
Worn-out gaskets are also a common issue, particularly in older vehicles, where the seals situated between various sections of the exhaust system become worn, shrink, or break, allowing gases to leak from the joints.
3. Types of Exhaust Leaks
Exhaust leaks can occur in different parts of the system and each type of leak has a distinct impact on the vehicle.
Manifold leaks occur near the engine, where exhaust gases are at their hottest and under the highest pressure; consequently, these leaks are more severe and often produce a loud noise, sometimes even a distinctive “ticking” sound (reminiscent of a clock).
Leaks in the exhaust pipes located beneath the vehicle are often caused by rust or physical damage, resulting in a “hissing” sound emanating from the pipe, frequently accompanied by clearly visible holes or cracks.
In contrast, muffler leaks occur in the rear section of the exhaust system.
This is typically caused by rust or deterioration over time, leading to increased vehicle noise and making it difficult to effectively dampen the sound.
Understanding the specific type of leak helps in selecting the appropriate repair method, thereby ensuring that the problem is resolved correctly and safely.
What are The Safety Precautions Before Repairing Exhaust Leak
1. Always Work on a Cold Engine
Before beginning any repairs on the exhaust system, it is crucial to allow the engine to cool down completely.
During normal driving, exhaust systems become extremely hot, often reaching temperatures high enough to cause severe burns within just a few seconds of contact.
Touching hot exhaust pipes, manifolds, or mufflers can result in painful injuries and may also damage tools or repair materials.
Allowing the engine to cool for at least 30 to 60 minutes after driving creates a safe working environment and enables you to inspect components more thoroughly without the hindrance of excessive heat.
2. If Lifting the Car, Use Jack Stands
If you need to get underneath the car to inspect or repair the exhaust system, never rely solely on a car jack to support the vehicle.
Jacks are designed for lifting purposes only, not for sustaining weight over extended periods; they can fail or slip without warning.
Sturdy, properly positioned jack stands provide stable support for the vehicle and significantly reduce the risk of the car falling.
This step is vital for safety, as working underneath an unstable vehicle can lead to serious accidents.
Always place jack stands on a level, solid surface and ensure the vehicle is securely balanced before getting underneath it.
3. Wear Gloves, Safety Goggles and a Mask to Avoid Fumes
Wearing appropriate safety gear is essential when working on an exhaust system, as the task involves potential exposure to sharp metal edges, rust particles and potentially harmful gases.
Wearing gloves provides protection against cuts and scrapes, while also shielding your hands from dirt, grease and heat.
Eye protection is equally crucial, as small shards of rust or debris may fall while inspecting or repairing components underneath a vehicle.
Wearing a mask is also beneficial, particularly if you are working in an area where exhaust fumes are still lingering, as inhaling these gases over time can be harmful.
Utilizing the appropriate safety gear allows you to work comfortably and significantly reduces the risk of injury.
4. Ensure Proper Ventilation in the Workspace
Adequate ventilation is absolutely essential when working on or around a vehicle’s exhaust system.
Exhaust fumes contain carbon monoxide, a colorless and odorless gas that can prove fatal if inhaled in high concentrations.
Working in an open environment such as: outdoors or in a garage with its doors fully open, ensures a continuous flow of fresh air, thereby preventing the accumulation of harmful gases.
Even though the engine will likely remain off for most of the time, residual fumes may still be present; in such situations, sufficient airflow ensures that your immediate surroundings remain safe while you are diagnosing and resolving the issue.
How to Detect Exhaust Leaks Easily
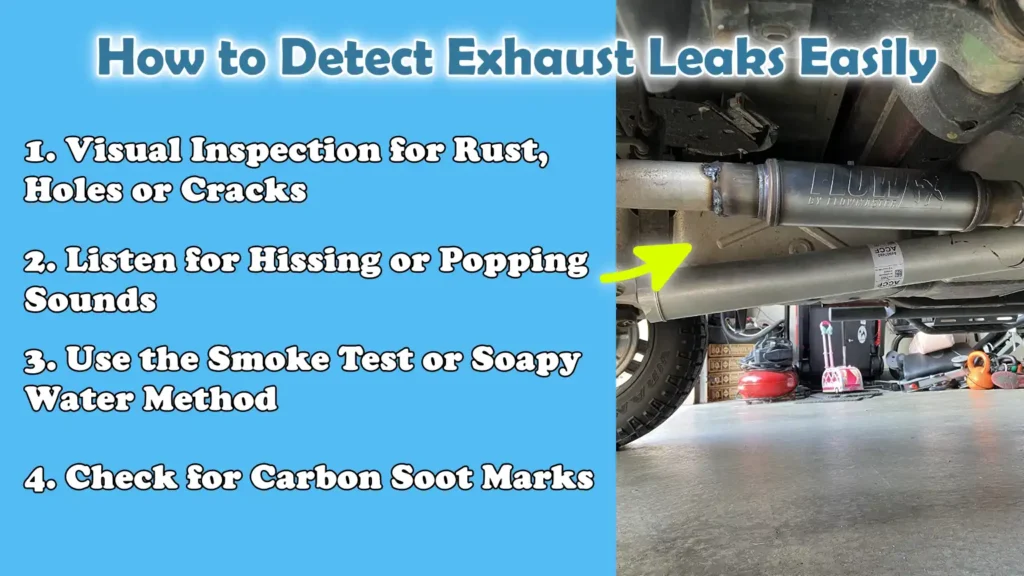
1. Visual Inspection for Rust, Holes or Cracks
The first and most crucial step in detecting an exhaust leak is a careful visual inspection.
Begin by looking underneath the car and in the area surrounding the engine, where the exhaust manifold is located.
Check for visible signs of rust, as corrosion is a primary culprit behind exhaust system damage, particularly in older vehicles or those exposed to moisture and road salt.
Carefully examine the exhaust pipes, muffler and joints for any small holes, cracks, or weak spots.
Even a tiny hole can lead to a significant leak, as exhaust gases are under pressure.
Pay special attention to welded sections and pipe bends, as these areas are more prone to deterioration over time.
A slow, detailed inspection will often help you pinpoint the exact location of the problem before you need to resort to other diagnostic methods.
2. Listen for Hissing or Popping Sounds
Listening for sounds is one of the simplest ways to detect an exhaust leak.
Start the engine and listen carefully for any unusual noises.
A properly functioning exhaust system operates very smoothly and quietly; therefore, any hissing, ticking, or popping sounds could indicate that gases are escaping.
These sounds are typically more audible when the engine is cold or when you press the accelerator, as the internal pressure within the exhaust system increases.
Walk around the vehicle while listening, paying close attention to the engine area and the underside of the car, to accurately locate the source of the sound.
This method helps pinpoint the location of a leak, even if it is not immediately visible to the naked eye.
3. Use the Smoke Test or Soapy Water Method
If detecting a leak through visual inspection or by listening for sounds proves difficult, employing the smoke test or the soapy water method can be highly effective.
In a smoke test, smoke is introduced into the exhaust system; it then escapes through any cracks or holes, making the leak clearly visible.
Although this method is typically performed by professionals, it can also be carried out using simple tools.
The soapy water method offers a simpler alternative, wherein you apply a solution of soap and water to the suspected leak areas while the engine is running.
If a leak is present, you will observe bubbles forming as the exhaust gases attempt to escape through the solution.
Both of these methods are invaluable for detecting small or hidden leaks that might be difficult to locate using other techniques.
4. Check for Carbon Soot Marks
Carbon soot marks are a definitive indicator of an exhaust leak and are often found in the immediate vicinity of the compromised component.
These marks appear as black, powdery stains near cracks, holes, or loose joints, precisely at the points where exhaust gases have been escaping over time.
As exhaust gases contain carbon particles, their leakage leaves behind visible deposits or traces.
Carefully inspect the areas around pipe joints, the manifold and the muffler for the presence of these dark stains.
The discovery of soot not only confirms the existence of a leak but also helps you pinpoint the exact location where repairs are required.
Tools
| Tool | Why It Is Needed | How to Use It |
|---|---|---|
| Flashlight | A flashlight helps you clearly view the exhaust system, which is often located in the dark recesses beneath the car. With its aid, you can spot rust, cracks, holes and soot marks, all of which indicate a leak. If the lighting is insufficient, minor damage can easily go unnoticed. | Switch on the flashlight and slowly inspect the exhaust pipe, muffler and joints. Pay particular attention to areas where rust or dark discoloration is visible. Shine the light from various angles to reveal any hidden cracks or holes. |
| Mechanic’s Stethoscope or Hose | This tool helps you pinpoint the exact location of a leak by allowing you to focus on the sound. Exhaust leaks often produce a distinct “hissing” or “ticking” sound; this tool enables you to hear these noises more clearly without having to place your ear too close to the source. A simple rubber hose can serve the same purpose. | Start the engine and carefully place one end of the stethoscope or hose against your ear. Move the other end along different sections of the exhaust system. The spot where the sound is loudest is typically where the leak is located. |
| Gloves and Protective Gear | These items protect you from injury while you work. The exhaust system may contain sharp edges, hot surfaces and rust particles. Gloves protect your hands, while safety goggles shield your eyes from falling debris or dust. | Put on your gloves before touching any part of the exhaust system. Be sure to wear safety goggles whenever you are working underneath the car. Ensure that your safety equipment fits you properly, so that you can work comfortably, safely and without any interruptions. |
How to Temporarily Fix an Exhaust Leak
1. Exhaust Tape or Muffler Cement
Exhaust tape and muffler cement are commonly used to quickly and temporarily repair minor leaks such as: small holes or hairline cracks, in the exhaust pipe or muffler.
Exhaust tape is typically heat-resistant and wraps tightly around the damaged section, preventing gas from escaping; muffler cement, on the other hand, is a thick paste that hardens upon exposure to heat, effectively sealing small holes.
Before applying either of these materials, the surface must be thoroughly cleaned to remove dust, rust and grease, ensuring proper adhesion.
These methods are useful for short-term use or emergency situations; however, they are not designed as permanent solutions, as the exhaust system constantly expands and contracts due to heat, which can cause the repair to weaken over time.
2. High-Temperature Epoxy
High-temperature epoxy is another temporary repair method that works well for sealing small cracks or pinholes.
This material is specifically formulated to withstand the extreme heat generated by exhaust systems.
It is applied directly to the damaged area and allowed to cure, creating a strong bond that prevents gas leaks.
For best results, the surface should be clean and slightly roughened to ensure the epoxy adheres properly.
Although this method may last longer than tape or cement in some instances, it is still considered a temporary solution, as constant heat and vibration can eventually cause the epoxy to crack or loosen.
How to Permanently Fix an Exhaust Leak
1. Replacing Damaged Sections of the Exhaust Pipe
Replacing a damaged section of the exhaust pipe is one of the most reliable and long-lasting solutions available.
If a pipe is severely rusted, cracked, or riddled with multiple holes, repairing it may not be effective, making replacement necessary.
This process involves cutting out the damaged section and installing a new pipe using clamps or welding.
A new pipe restores proper exhaust flow, improves engine performance and eliminates the risk of recurring leaks at that specific weak point.
Although this method requires more effort, and sometimes specialized tools, it provides a robust and durable repair.
2. Replacing Gaskets or Seals
Gaskets and seals are used between various components of the exhaust system to prevent gas from escaping at connection points.
Over time, due to constant heat and pressure, these gaskets can wear out, crack, or lose their original shape.
When this occurs, a leak may develop, even if the metal components themselves are in good condition.
To replace a faulty gasket, it is necessary to remove the connected components, clean the mating surfaces, install a new gasket and securely tighten the assembly to ensure a tight seal.
This is a highly effective remedy, particularly for leaks occurring near the exhaust manifold or joints, and it helps restore proper system pressure and engine functionality.
3. Welding of Cracks or Holes – Professional Assistance Recommended
Welding is a robust and permanent method used to repair cracks or holes found in metal exhaust components.
In this process, a professional utilizes intense heat to melt and fuse the metal together, thereby completely sealing the damaged section.
Welding is particularly useful for repairing large cracks or structural damage that cannot be fixed using simple patching methods alone.
As this procedure requires specialized skills and equipment, it is generally advisable to have the work performed by a trained technician.
A properly executed welding repair can last just as long as the original component, ensuring a safe and leak-free result.
4. Tightening Loose Clamps or Bolts
Sometimes, the cause of an exhaust leak is not a defect in the component itself, but rather loose clamps or bolts that hold the exhaust system together.
Over time, vibrations generated by the engine and road travel can cause these fasteners to loosen, creating small gaps through which exhaust gases can escape.
Tightening these clamps or bolts to the correct tension can resolve this issue immediately, without the need for any major repairs.
It is crucial to carefully inspect all connections and ensure that they are securely tightened, as even a small gap can lead to significant noise and a reduction in performance.
This is often the simplest and quickest solution, yet it proves highly effective when the problem stems from loose fittings.
How to Fix Commonly Found Exhaust Leaks – Easy Method
1. How to Repair Pipe Leaks
Locating the Leak
The first step in fixing a pipe leak is to pinpoint the exact location of the damage.
This can be accomplished by carefully inspecting the exhaust pipes underneath the vehicle and by listening for specific sounds while the engine is running such as: a “hissing” sound (resembling breathing) or the distinct sound of escaping air.
Traces of black soot may also be visible around the sites of small leaks.
Identifying the precise location is crucial, as repairing the wrong section will not resolve the problem.
Taking the time to accurately locate the leak ensures that the repair will be effective and long-lasting.
Cleaning the Area
Once the leak has been identified, the next step is to thoroughly clean the damaged area.
It is essential to remove dirt, rust, grease and loose particles so that any repair material can adhere firmly to the surface.
This can be done using a wire brush or sandpaper, which simultaneously smooths and slightly roughens the metal surface, a process that facilitates better bonding.
A clean surface is paramount; even the strongest repair materials will fail to work if applied over dirt or rust.
Applying a Muffler Patch or Replacing a Section of Pipe
After cleaning, a muffler patch or sealant can be applied to seal leaks involving small holes or cracks.
These materials harden when exposed to heat, creating a temporary or semi-permanent seal that prevents exhaust gases from escaping.
However, if the pipe is severely damaged, heavily rusted, or contains multiple weak points, replacing that specific section of the pipe constitutes a superior and more permanent solution.
A new piping system restores the structural integrity of the assembly and ensures that leaks do not recur.
2. How to Repair Exhaust Manifold Leaks
Removing the Manifold
Repairing an exhaust manifold leak begins with removing the exhaust manifold from the engine.
This component is mounted near the engine and serves to collect exhaust gases exiting the cylinders.
To remove it, the bolts must be loosened and the manifold carefully detached without damaging surrounding components.
This task requires caution, as the manifold is frequently exposed to extreme heat, which can cause the bolts to seize or become overtightened.
Replacing the Gasket
Once the manifold has been removed, the gasket situated between the manifold and the engine must be inspected; if it is worn, cracked, or damaged, replacing it is essential.
The gasket plays a crucial role in sealing the connection and preventing leaks.
A new gasket ensures a secure seal and helps maintain proper pressure within the exhaust system.
Before installing the new gasket, it is also necessary to clean the mating surfaces to ensure a proper fit and effective performance.
Reinstalling and Tightening the Bolts
After installing the new gasket, the manifold must be carefully reattached.
The bolts should be tightened according to the correct torque specifications, meaning they should be neither too loose nor overtightened.
Proper tightening ensures a uniform seal and prevents future leaks.
Uneven or improper tightening can create gaps or even damage the gasket; Therefore, following the correct procedure is essential for a successful repair.
3. How to Repair Muffler Leak
Check for Holes
To fix a muffler leak, first inspect the muffler for any visible holes, cracks, or defects caused by rust.
Mufflers often fall victim to rust over time due to constant exposure to moisture and heat.
Even small holes can generate loud noises and compromise the functionality of the exhaust system.
A careful inspection helps determine whether the damage is minor or severe.
Use Muffler Sealant or Replace the Muffler If Necessary
If the damage is minor, a muffler sealant or patch can be applied to cover the hole and stop the leak.
These materials are designed to withstand high temperatures and can provide an effective, short-term solution.
However, if the muffler is heavily rusted, contains large holes, or its structural integrity has been compromised, replacing the entire muffler is the best option.
A new muffler not only resolves the leak issue but also restores proper noise control and improves the overall performance of the exhaust system.
What are the Post-Repair Inspection Steps
1. Start the Engine and Listen for Leaks
After completing the repairs, the first step is to start the engine and listen carefully for any unusual sounds.
A properly repaired exhaust system should run smoothly without any hissing, ticking, or popping noises.
These sounds typically indicate that gases are still escaping through a small gap or an incomplete seal.
It is best to listen in two locations, near the engine and underneath the car, as leaks can occur in different parts of the system.
Allow the engine to run for a few minutes and gently press the accelerator to build pressure, as some leaks become more apparent during periods of higher exhaust flow.
This step helps ensure that the repair has successfully resolved the issue.
2. Check for Unusual Smoke or Odors
The next step is to watch for any unusual smoke or strong odors emanating from the exhaust system.
While a small amount of normal exhaust fumes is to be expected, no visible smoke should be escaping from anywhere other than the tailpipe.
If smoke is visible near the joints, pipes, or muffler, it may indicate that the repair did not create a complete seal.
Additionally, pay attention to any strong or unusual exhaust odors inside or around the car.
A properly functioning exhaust system safely expels gases away from the vehicle; therefore, any lingering odors could be a sign of a remaining leak.
Checking for these signs helps ensure both safety and proper functionality.
3. Take a Test Drive to Confirm Normal Performance
Finally, take a short and cautious test drive to evaluate the car’s overall performance.
During the drive, pay close attention to engine power, acceleration and noise levels.
A successful repair should result in smoother performance, normal acceleration and reduced noise compared to before.
If the car still feels sluggish, makes more noise than usual, or exhibits signs of poor fuel efficiency, there may still be an underlying issue requiring further investigation.
Driving the car under normal conditions helps ensure that the exhaust system is functioning correctly and that the repair has successfully restored proper performance and safety.
How to Maintain & Prevent Exhaust From Future Leaks
Moreover, there’s research study on the vehicle exhaust system that clearly shows that the leaks directly increases the fuel consumption and reduces the engine efficiency, as the findings also shows that even small leaks can disturb the balance of exhaust flow, that forces the engine to work even more harder and burn more fuel than normally does. This is why when you detect leaks early and repair that exhaust leaks then it actually enhances the performance and also saves fuel and reduces long-term costs as well.[¹]
1. Regular Inspection and Cleaning
Regular inspection of the exhaust system is one of the most effective ways to prevent future leaks.
Over time, dust, moisture and road debris can accumulate on exhaust components, increasing the risk of rust and damage.
By inspecting the system every few weeks, or during routine servicing, you can identify early warning signs such as: small rust spots, loose joints, or minor cracks, before they escalate into serious leaks.
Cleaning the exhaust components, particularly the pipes and muffler, helps remove harmful deposits that trap moisture and accelerate the rusting process.
Keeping the system clean and inspecting it regularly extends its lifespan and improves its overall performance.
2. Avoiding Road Conditions That Promote Rust
Driving conditions play a crucial role in the health of your exhaust system.
Roads covered in water, mud, or salt can accelerate the rusting process, specially in regions where road salt is used or during the rainy season.
Driving through deep water or over rough terrain can also cause physical damage to the exhaust pipes such as: striking an obstruction, leading to cracks or structural failure.
To mitigate these risks, it is essential to avoid such conditions whenever possible; if avoidance is not possible, drive with caution.
Parking your vehicle in a dry location and allowing the exhaust system to dry after exposure to water can also help slow down the rusting process and extend the lifespan of the components.
3. Using High-Quality Exhaust Components
The quality of exhaust components has a direct impact on their longevity and functional efficiency.
Low-quality materials can deteriorate quickly, develop cracks, or corrode rapidly due to heat and environmental conditions.
Utilizing high-quality exhaust components made from durable materials such as: stainless steel, offers superior protection against both heat and corrosion.
Although the initial cost of these parts may be higher, they minimize the need for frequent repairs and deliver better value in the long run.
Choosing reliable components ensures that the exhaust system remains robust and minimizes the likelihood of leaks.
4. Promptly Repairing Minor Leaks Before They Become Serious Issues
Minor leaks in an exhaust system may not seem harmful at first, but if left unaddressed, they can quickly escalate into major problems.
Due to the constant heat, pressure and vibration within the exhaust system, a small hole or a loose joint can expand in size.
Over time, this can lead to excessive noise, diminished engine performance and increased repair costs.
Addressing minor issues as soon as they are detected prevents further damage and ensures that the system continues to function properly.
Early repairs are generally easier, more affordable and more effective; for this reason, adopting this habit is considered one of the most essential practices for maintaining a healthy exhaust system.
Read More:
- How to Replace an Exhaust System
- How to Fix Grinding Gears
- How to Replace a Clutch
- How to Change Transmission Fluid
When You Should Consult to the Professional Mechanic
1. Severely Rusted or Deteriorated Systems
When an exhaust system becomes heavily rusted or severely deteriorated, repairing it is often difficult and requires professional assistance.
Rust can weaken the metal to such an extent that it becomes thin and brittle, potentially leading to hidden cracks or holes that are not always visible during a routine inspection.
In such cases, temporary fixes such as: sealants or patches, are rarely effective in the long run, as the surrounding metal has already been compromised.
A professional mechanic can accurately assess the overall condition of the system and determine whether a complete replacement is necessary or if minor repairs will suffice.
This ensures that the repair is safe and durable, preventing sudden failures while driving.
2. Cracks Near the Engine Manifold
Cracks near the exhaust manifold are more critical than leaks in other parts of the system, as this component directly withstands the extreme heat and pressure generated by the engine.
Repairing this section requires a high degree of precision and specialized tools, as even a minor error can lead to further damage or create hazardous conditions.
Working around the engine often involves removing tightly seized components and handling heat-damaged bolts, tasks that can be challenging without prior experience.
A professional possesses the necessary skills and tools to execute these repairs correctly, ensuring that the system is properly sealed and functioning as intended.
3. Persistent Leaks Despite DIY Repair Attempts
If the exhaust continues to leak even after attempting simple DIY repair methods, it is a clear indication that the underlying internal issue may be far deeper or more complex than the visible surface problem.
Sometimes, leaks may originate from multiple points, or the damage may be located in areas that are difficult to access.
Repeated DIY repairs may merely address the superficial symptoms without resolving the root cause of the problem.
A professional inspection can uncover hidden damage, allow for a thorough assessment of the entire exhaust system and identify the appropriate solution.
This prevents the waste of time and money on temporary fixes that fail to fully resolve the issue.
4. The Importance of Professional Welding for Safety
Repairing major cracks, broken joints, or structural damage within an exhaust system often requires professional welding.
Welding demands specialized tools and expertise to ensure that the metal is properly bonded and sealed, without causing structural damage to surrounding components.
If welding is not executed correctly, the weld may fail due to heat and vibration; this can lead to leaks or even cause parts to loosen and detach while the vehicle is in motion.
Professionals adhere to the correct techniques and safety standards to ensure a robust and durable repair.
Opting for professional welding not only provides a long-lasting solution but also protects the vehicle and its occupants from the potential hazards associated with exhaust leaks.
Conclusion – How to Fix an Exhaust Leak
Now, it is clear that well-sealed exhaust system is actually gives better performance, lower the costs and ensure safe journey as well, that’s why it is really important to fix if there’s any exhaust leaks are available.
The exhaust system plays a vital role in expelling harmful gases from both the engine and the cabin; therefore, even a minor leak can adversely affect both the vehicle’s performance and your health.
By recognizing symptoms such as hissing sounds, reduced fuel efficiency, foul odors and a loss of engine power, you can identify issues before they escalate into serious problems.
Simple inspection methods and basic repair techniques can resolve many minor issues; however, it is equally important to know when to seek professional assistance for a particular problem.
Regular maintenance, careful driving habits and the use of high-quality parts significantly reduce the likelihood of future leaks.
Minor issues should never be ignored, as the constant heat and pressure within the exhaust system can quickly transform them into major, costly repair problems, or even pose serious safety risks.
Taking timely action not only improves engine performance but also helps conserve fuel and protects you from exposure to harmful gases.
Now, that’s all from this guide about How to Fix an Exhaust Leak, you can also comment down for more related info.
Frequently Asked Questions
FAQ 1: What is an exhaust leak and why is it a problem?
An exhaust leak occurs when there is a crack, hole, or loose connection in the exhaust system, allowing gases to escape before they reach the tailpipe. This is a problem because the exhaust system is designed to safely channel harmful gases such as: carbon monoxide away from the engine and expel them from the vehicle. When a leak occurs, these gases can negatively impact engine performance, reduce fuel efficiency and in some cases, even seep into the cabin, which can be dangerous for passengers.
FAQ 2: What are the most common signs of an exhaust leak?
The most common signs include loud or unusual noises such as: hissing, ticking, or popping sounds specially when you accelerate the vehicle. You may also notice a strong odor of exhaust fumes inside or around the car, reduced fuel efficiency and a decline in engine performance. In some cases, you may also observe black soot around the exhaust pipes or joints, which is a clear indication that gases are escaping from that specific location.
FAQ 3: Is it safe to drive with an exhaust leak?
Driving with an exhaust leak is not recommended, specially if the leak is severe. While a minor leak may not cause immediate harm, it can worsen over time and lead to major problems. More importantly, exhaust gases can contain carbon monoxide, which can be dangerous if it enters the vehicle’s cabin. For safety reasons, it is best to have the leak repaired as soon as possible.
FAQ 4: Can I fix an exhaust leak myself at home?
Yes, provided you have basic tools and follow proper safety protocols, many minor exhaust leaks can be repaired right at home. Simple methods such as: using exhaust tape, muffler cement, or high-temperature epoxy, as it can temporarily seal small holes or cracks. However, if the damage is extensive, the components are severely deteriorated, or the leak is located near the engine manifold, it is best to seek professional assistance to ensure a safe and durable repair.
FAQ 5: How much does it cost to fix an exhaust leak?
The cost depends on the size and location of the leak. Minor leaks that can be repaired using sealants or clamps are generally less expensive. If parts such as pipes, gaskets, or the muffler need to be replaced, the cost will be higher. Repairs near the manifold or those requiring welding, that are typically more expensive, as they demand greater labor and technical expertise.
FAQ 6: What causes exhaust leaks in the first place?
Exhaust leaks are typically caused by rust, corrosion and general wear and tear over time. Moisture, heat and road salt can gradually degrade metal components, leading to the formation of holes or cracks. Other causes include loose clamps, damage to pipes caused by road debris and worn-out gaskets that no longer provide a proper seal. Regular vehicle usage and the aging of the vehicle also contribute to these issues.
FAQ 7: How can I pinpoint the exact location of an exhaust leak?
You can detect exhaust leaks by carefully inspecting the exhaust system and looking for obvious signs of damage, such as rust, holes, or cracks. Listening for unusual noises while the engine is running can also be helpful in this regard. Methods such as using soapy water to check for bubbles or performing a smoke test can make it easier to pinpoint small or hidden leaks. Traces of black soot are also a definitive indicator of the leak’s location.
FAQ 8: Are temporary fixes like exhaust tape reliable?
Temporary fixes such as: exhaust tape or muffler cement, as it can serve as useful stopgap solutions, particularly in emergency situations. They can seal small leaks and reduce noise, but they are not designed to be permanent repairs. The heat and pressure within the exhaust system will eventually degrade these materials; therefore, it is best to regard them merely as temporary measures until a proper repair can be performed.
FAQ 9: When should I replace the exhaust system rather than repairing it?
If the exhaust system is heavily rusted, contains large holes, or has sustained structural damage in multiple areas, replacing it is generally the better option. Attempting to repair severely deteriorated parts often results in only a temporary fix and can lead to recurring issues. Replacing the faulty component provides a more reliable and long-lasting solution.
FAQ 10: How can I prevent exhaust leaks in the future?
You can prevent exhaust leaks by regularly inspecting the exhaust system, keeping it clean and avoiding driving the vehicle in harsh conditions such as: deep water or over rough terrain. Using high-quality replacement parts and promptly addressing minor issues also helps prevent them from escalating into major problems. Proper maintenance and timely repairs can significantly extend the lifespan of your exhaust system.
References:
[1] Effects of Leaked Exhaust System on Fuel Consumption Rate of an Automobile
https://www.researchgate.net/publication/288652879_Effects_of_Leaked_Exhaust_System_on_Fuel_Consumption_Rate_of_an_Automobile

Hello Folks, Dean Shali here to help you out to solve the problems with your lovely vehicle, as i have lots of experience and knowledge about automotive industry as i woks directly with the customers and repair vehicles and i love to help the people to keep their cars safe and running smoothly.