Written By: Dean Shali
Fact Checked By: Sabré Cook
Reviewed By: Tamara Warren
We all knows this thing: a smooth acceleration and precise gear shifting only possible if your clutch is in perfect working condition, so if that is having jerky movements then it is the clearly dangerous signs.
Because, clutch is the component that actually transfers the power from the engine to the transmission, that literally allows smooth gear changes and efficient driving experience as well.
But over the period of time, usage and friction between the clutch disc and the flywheel that causes to wear out situation that’s why it leads to symptoms such as: slipping gears, difficulty in accelerating, having jerky movements, unusual pedal resistance or you can sense burning smell as well.
Just don’t ignore these warning signs, otherwise it can even result in the permanent transmission damage that leads to the expensive repairs and your driving becomes unsafe as well.
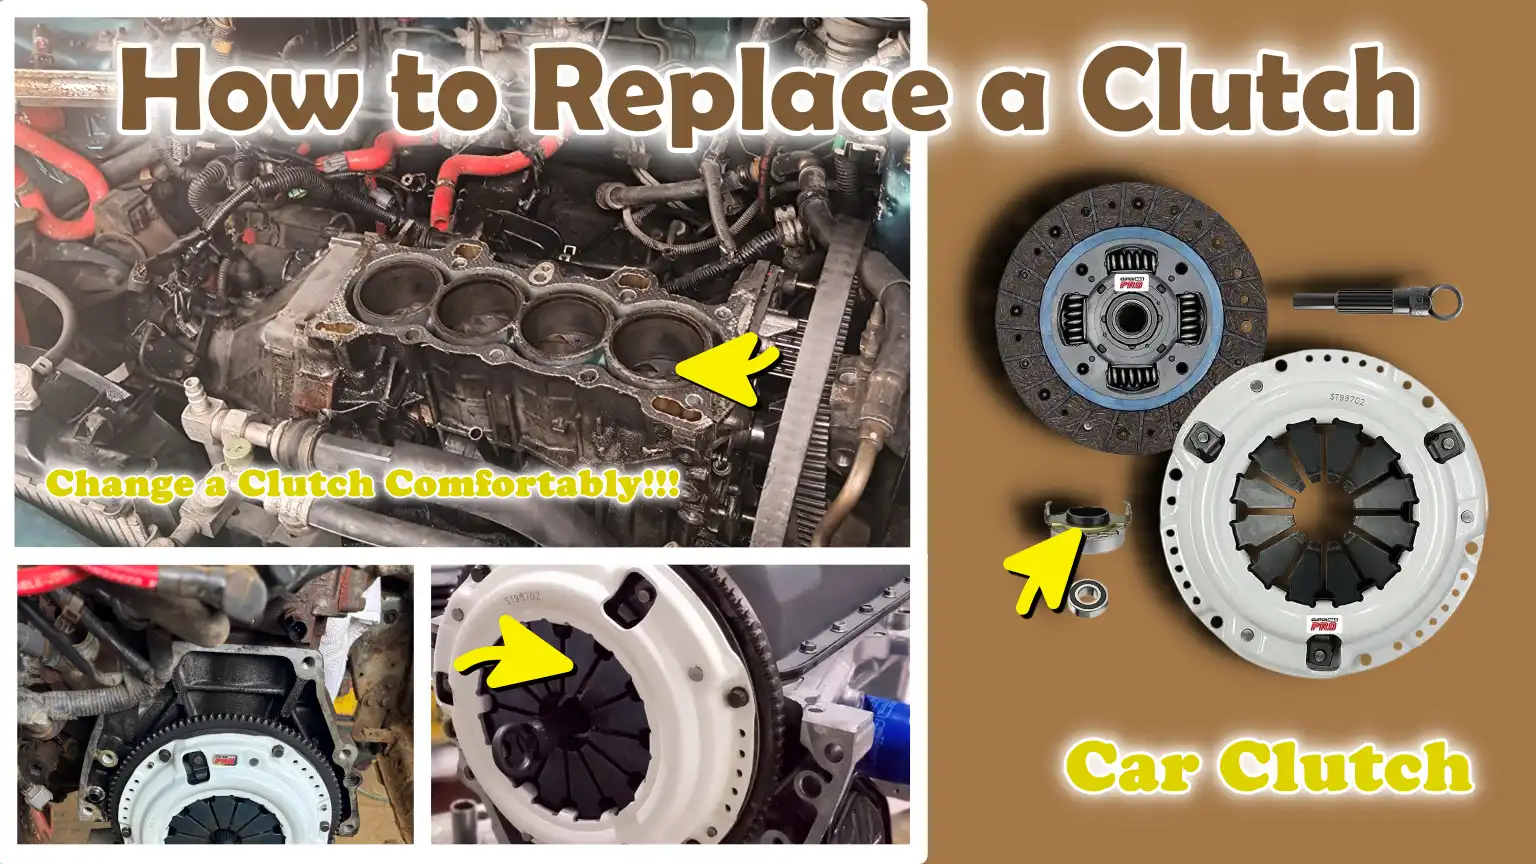
Now, in this guide you’ll learn How to Replace a Clutch, as it provides easy beginner friendly approach for diagnosing clutch issues first, then it teaches you how to remove the old component in safe way and finally installation of a new clutch assembly.
Plus, with the new and properly installed clutch you actually ensures precise gear engagement again that even restores engine power and improves the fuel efficiency as well.
Tools
| Tool / Equipment | Why Needed | How to Use It |
|---|---|---|
| Jack and Jack Stands | To safely lift and support the car while working underneath it. | Use a jack to lift the car, then securely place jack stands beneath the strong points of the car’s frame. Never rely solely on the jack. |
| Wrench Set | To loosen or tighten bolts, specifically those connecting the transmission to the engine. | Select the correct wrench size for each specific bolt. Turn clockwise to tighten and anti-clockwise to loosen. |
| Socket Set | To quickly remove and install bolts, specially in tight spaces. | Attach the correct-sized socket to the ratchet handle. Turn the bolt just as you would with a standard wrench. |
| Screwdrivers – Flat & Phillips | To remove small screws and panels that may obstruct access to the clutch or transmission. | Select the appropriate type of screwdriver (flathead or Phillips). Turn the screws carefully to avoid damaging them. |
| Clutch Alignment Tool | To ensure that the clutch disc remains perfectly centered on the flywheel during installation. | Insert the tool through the clutch disc hub and across the flywheel. This holds the disc in place while you install the pressure plate. |
| Torque Wrench | To ensure that bolts are tightened to the exact torque specification recommended by the manufacturer. | Set the required torque value, position the tool on the bolt and turn until you hear a distinct “click”, indicating that the bolt has been tightened correctly. |
| Transmission Jack – Optional | To safely support and lower the transmission while removing or reinstalling it. | Position the jack beneath the transmission, ensuring it is securely seated and then slowly raise or lower it to prevent it from falling or sustaining damage. |
| Gloves | Protects hands from cuts, burns and grime. | Keep them on throughout the entire repair process. Choose sturdy gloves that provide a good grip. |
| Goggles / Safety Glasses | Protects the eyes from debris, fluids, or metal shards. | Wear them at all times while working underneath the car or using tools. |
| Protective Clothing | Protects skin and clothing from dirt, hot surfaces and sharp edges. | Wear long-sleeved clothing and closed-toe shoes; avoid wearing loose clothing, as it can get caught in car components. |
How to Ensure Safety
1. Disconnect the Battery Before Starting
Before beginning the clutch replacement process, it is absolutely essential to disconnect the car’s battery.
This step protects against sudden electrical shocks and prevents the vehicle from accidentally starting while you are working underneath it.
Disconnecting the battery also safeguards sensitive electronic components such as: sensors and onboard computers, found in modern vehicles from potential damage.
Always remove the negative terminal first and ensure that the terminals do not come into contact with each other during the repair.
This simple precaution minimizes the risk of short circuits and keeps you safe while working on the transmission and clutch components.
2. Ensure the Vehicle is on a Level and Stable Surface
Working on a car that is not situated on a level and stable surface can be extremely dangerous.
Always park the vehicle on level ground and ensure that the parking brake is engaged.
Avoid working on sloped, uneven, or soft ground, as the vehicle may slip or shift while being lifted in such conditions.
Placing “wheel chocks” (blocks designed to prevent wheels from moving) under the wheels that remain in contact with the ground provides an additional layer of safety.
A stable working environment ensures that the vehicle remains secure, making the removal and installation of heavy components such as: the transmission and clutch, both safer and easier.
3. Use Jack Stands Safely
Jack stands are crucial for supporting the vehicle after it has been lifted with a jack.
Never rely solely on a hydraulic jack, as it may fail, causing the vehicle to fall.
Position the jack stands under the vehicle’s frame at the strong points recommended by the manufacturer and slowly lower the vehicle onto the stands to ensure it rests securely.
Before commencing any work underneath a vehicle, give it a gentle nudge to verify its stability.
The proper use of jack stands ensures your safety against serious injuries or potentially fatal accidents while working beneath the vehicle.
4. Avoid Injuries Caused by Heavy Components
Transmission and clutch assemblies are heavy and can be difficult to handle.
Always use a transmission jack or enlist the assistance of a helper when removing or reinstalling these components.
Keep your hands, feet and body clear of pinch points and lift with your legs, rather than your back, to avoid straining your spine.
Wearing gloves improves your grip and protects your hands from sharp edges; additionally, safety goggles shield your eyes from debris.
Understanding the weight and mechanics of these components helps prevent accidents and ensures that the replacement process remains controlled and safe.
Now, Let’s Understand About the Clutch System
1. Components of the Clutch System
The clutch system consists of several essential components that work in unison to engage and disengage the engine from the transmission.
The clutch disc is a flat, friction-based component that presses against the flywheel to transmit the engine’s power to the transmission.
The pressure plate exerts force to firmly clamp the clutch disc against the flywheel, thereby facilitating the smooth transfer of power.
The flywheel is a heavy metal disc attached to the engine’s crankshaft; it provides a surface for the clutch disc to engage against.
The release bearing assists in disengaging the clutch when the clutch pedal is depressed, allowing the driver to shift gears.
Finally, the clutch fork acts as a lever that actuates the release bearing when the clutch pedal is pressed.
Each component is engineered to withstand immense pressure and friction and they operate in perfect synchronization.
2. How These Components Work Together to Transfer Power
When the clutch pedal is released, the pressure plate presses the clutch disc firmly against the flywheel, establishing a strong mechanical link between the engine and the transmission.
This allows the engine’s power to flow uninterrupted to the wheels, propelling the car forward.
When the clutch pedal is depressed, the clutch fork pushes the release bearing toward the pressure plate, causing it to disengage from the clutch disc.
This separates the engine from the transmission, enabling the driver to shift gears without any grinding or stalling of the engine.
The precise interplay of friction, pressure and movement among these components ensures that the car accelerates smoothly, shifts gears accurately and transfers power efficiently.
Understanding how these components interact with one another can aid in diagnosing issues such as clutch slippage, jerky gear shifts, or unusual noises; this makes repairs or part replacements significantly easier and safer.
3. Another Diagram of the Clutch Assembly
A visual diagram of the clutch system can help you understand the location and function of each individual component.
Observing how the clutch disc, pressure plate, flywheel, release bearing and clutch fork connect and operate in unison provides clear insight into why proper installation and maintenance are so crucial.
Furthermore, such a diagram facilitates the identification of worn or damaged parts when inspecting or replacing the clutch assembly.
How to Replace a Clutch – Easy to Understand Method
How to Do Initial Preparation
Park the Car and Engage the Parking Brake
The first step in preparing to replace a clutch is to park the car in a level and stable location.
A level surface ensures that the vehicle remains steady while you are working underneath it, thereby minimizing the risk of accidents.
Engaging the parking brake adds an extra layer of safety by preventing the wheels from moving.
If possible, use “wheel chocks” (blocks placed against the tires) on the wheels resting on the ground to further stabilize the vehicle.
Taking the time to carefully park and secure the car is crucial for safety and makes the task of working on heavy components such as: the transmission, much easier.
Disconnect the Battery
Before beginning any work on the clutch or transmission, it is absolutely essential to disconnect the car’s battery.
Disconnecting the battery prevents accidental electric shocks and ensures that the car does not start unexpectedly while you are working, an occurrence that could result in serious injury.
It also protects sensitive electronic components such as: sensors, the onboard computer and wiring, from potential damage.
Always disconnect the negative terminal first and ensure that the two terminals do not come into contact with each other.
This simple step serves as a vital safety precaution, preventing accidents and keeping both the vehicle and the mechanic safe.
Remove Obstructing Components
To gain access to the clutch and transmission, it is often necessary to remove certain components that are obstructing the path.
These may include the exhaust system, the driveshaft, or other parts attached to the underside of the vehicle.
Carefully removing these components clears the way to access the transmission, allowing you to work safely and efficiently.
Labeling bolts and other components while removing parts, and keeping them organized, saves you time when reassembling them later.
Proper preparation at this stage prevents damage to surrounding parts and makes the clutch replacement process even easier.
How to Remove the Transmission
Support the Engine and Transmission
Before attempting to remove the transmission, it is essential to properly support both the engine and the transmission.
The transmission is heavy; removing it without proper support could cause it to drop suddenly, potentially damaging the vehicle or resulting in serious injury.
Mechanics often use a transmission jack or an engine support bar to safely hold the weight in place.
Supporting the engine ensures that excessive strain is not placed on the engine mounts while the transmission is being detached.
Taking the time to secure these components makes the process safer, helps prevent sudden accidents and facilitates easier reinstallation later on.
Remove the Bolts Connecting the Transmission to the Engine
Once the engine and transmission are properly supported, the next step is to remove the bolts that fasten the transmission to the engine.
These bolts are typically located around the bell housing, which encloses the clutch and flywheel.
It is crucial to use the correct size wrench or socket to avoid stripping or damaging the bolts.
Working in a systematic manner and keeping track of each bolt ensures that reassembly will be easier later and that no bolts are misplaced.
Carefully loosening these bolts allows the transmission to be separated without causing damage to the engine or the transmission components themselves.
Carefully Lower the Transmission Using a Jack
Once all the connecting bolts have been removed, the transmission can be slowly lowered using a transmission jack or other appropriate lifting equipment.
It is important to lower the transmission at a steady pace and avoid tilting it suddenly to one side, as this could damage the clutch, flywheel, or surrounding components.
The presence of an assistant makes this process significantly safer, particularly when handling a heavy transmission.
Carefully lowering the transmission helps prevent injuries and ensures that no components are subjected to excessive strain or become misaligned during removal.
Tips for Easier Reassembly
It is highly beneficial to mark the specific locations of any bolts, wiring, or components removed during this process.
Labeling parts as they are detached, or taking photographs of their original positions, as it can save a considerable amount of time when reassembling everything later.
Organizing bolts and small parts into bins or trays helps avoid confusion.
Taking these extra steps simplifies the reinstallation process, minimizes errors and ensures proper alignment between the clutch and the transmission.
How to Remove the Old Clutch
Remove the clutch pressure plate bolts one by one, evenly
The first step in removing the old clutch is to carefully loosen and extract the pressure plate bolts.
Rather than simply removing these bolts sequentially, it is crucial to remove them evenly and in a criss-cross pattern.
Doing so prevents the pressure plate from warping, thereby protecting the flywheel from damage and facilitating the installation of the new clutch.
Using the correct size wrench or socket ensures that the bolts are loosened securely without stripping their heads.
Working methodically and removing the bolts evenly safeguards surrounding components and preserves the structural integrity of the clutch assembly.
Remove the clutch disc and inspect the flywheel.
Once the pressure plate has been removed, the clutch disc can be carefully lifted out.
Inspecting the clutch disc, flywheel and pressure plate is a critical step.
Look for signs of excessive wear, glazing, cracks, or heat damage.
The flywheel should be checked for scratches, warping, or an uneven surface.
Identifying these issues early helps determine whether the flywheel surface needs to be resurfaced or replaced, thereby preventing future clutch-related problems and ensuring smooth clutch engagement.
A worn or damaged flywheel can lead to slipping, vibration, or noise even after a new clutch has been installed.
Optional: Clean or resurface the flywheel.
Cleaning the flywheel surface is a beneficial step that removes dust, grease, or minor particles of rust, which can adversely affect clutch performance.
In some cases, it may be necessary to resurface the flywheel to ensure a perfectly smooth contact surface for the new clutch disc.
Flywheel resurfacing is typically performed by a professional using a lathe machine, ensuring that pressure is distributed evenly once the pressure plate is installed.
A clean and smooth flywheel enhances friction between the clutch disc and the flywheel, thereby extending the clutch’s lifespan, facilitating smoother gear shifting and optimizing the transfer of power from the engine to the transmission.
How to Install the New Clutch
Use a clutch alignment tool to position the clutch disc correctly.
The first step in installing a new clutch is to correctly position the clutch disc using a clutch alignment tool.
The alignment tool ensures that the clutch disc is perfectly centered on the flywheel, which is crucial for smooth clutch engagement and the proper transmission of engine power.
Installing the clutch disc without properly centering it can make reinstalling the transmission extremely difficult and may lead to issues such as improper clutch engagement, resulting in vibration or premature wear.
This tool acts as a guide, holding the disc steady while the pressure plate is being installed, thereby making the installation process much easier and more precise.
Tighten the pressure plate and torque bolts according to the manufacturer’s instructions.
Once the clutch disc is aligned, the pressure plate can be placed over it and secured with bolts.
It is essential to tighten these bolts gradually and evenly, using a criss-cross pattern, to prevent the pressure plate from warping or shifting out of position.
Using a torque wrench to tighten the bolts to the torque specifications recommended by the manufacturer ensures that they are neither too loose nor overtightened.
Correct torque is critical; overtightening can damage clutch components, while undertightening may cause the clutch to slip or fail to engage properly.
Strictly adhering to the prescribed procedures ensures that the new clutch functions correctly and provides long-term durability.
Install the new release bearing and apply lubricant to moving parts as required.
The release bearing is a critical component that facilitates the smooth disengagement of the clutch when the clutch pedal is depressed.
Installing a new release bearing ensures consistent performance and prevents issues such as unusual noises or improper clutch engagement.
In certain clutch systems, it may be necessary to apply a small amount of lubricant to moving contact points such as: input shaft splines or bearing surfaces.
Using the appropriate type of high-temperature grease or lubricant prevents premature wear and ensures that these components move freely.
Proper installation and lubrication of these parts facilitate smooth clutch engagement and disengagement, resulting in a comfortable driving experience, reduced pedal effort and an extended service life for the clutch assembly.
How to Reinstall the Transmission
Lift and Position the Transmission
After installing the new clutch, it is essential to carefully lift the transmission and align it correctly with the engine.
This step requires patience, as even a slight misalignment can make it difficult to bolt the transmission into place, or could potentially damage the input shaft and clutch assembly.
The use of a transmission jack is highly recommended, as it provides precise control when lifting the heavy transmission unit.
Before attempting to tighten any bolts, ensure that the transmission is level and perfectly aligned with the engine bell housing.
Proper alignment facilitates smooth engagement with the clutch, prevents excessive wear on the input shaft and minimizes the risk of damage to the flywheel or pressure plate.
Reinstall All Bolts and Components in Reverse Order
Once the transmission is correctly aligned, all bolts and previously removed components must be reinstalled in the exact reverse order in which they were removed.
This includes engine mount bolts, the cross member, the driveshaft and any other brackets or connectors that were disconnected.
It is crucial to tighten all bolts gradually and evenly; if torque specifications are provided, follow the manufacturer’s instructions.
Proper reinstallation ensures that bolts do not loosen during vehicle operation, minimizes vibration and guarantees that the transmission and clutch systems function together efficiently.
Organizing and labeling components during the disassembly process can make this step significantly easier and help prevent errors during reassembly.
Reconnect the Battery and Check All Connections
Once the transmission and all components are securely in place, the vehicle’s battery should be reconnected.
This restores the electrical supply to the vehicle, allowing for the inspection of all systems.
Before starting the engine, double-check all bolts, wiring, hoses and connectors to ensure that everything is securely tightened.
It is crucial to verify that the clutch pedal operates smoothly and that all transmission linkages are properly connected.
Performing these checks helps prevent electrical issues, ensures that the vehicle is safe to drive and confirms that the clutch and transmission are functioning exactly as they should.
How to Test New Clutch After Installation
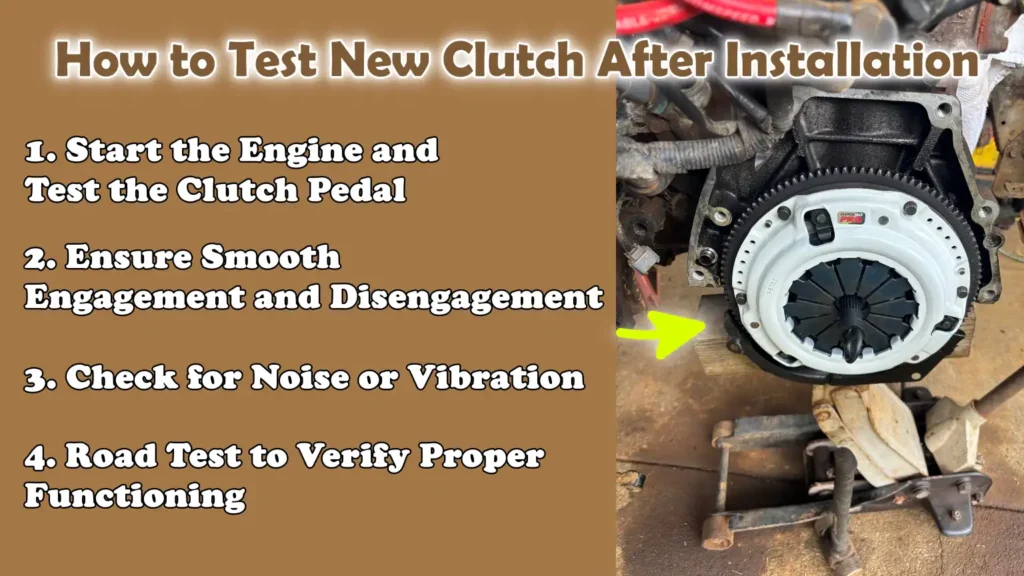
1. Start the Engine and Test the Clutch Pedal
After reinstalling the transmission and reconnecting the battery, the first step in testing the clutch is to start the engine and carefully depress the clutch pedal.
Observe how the pedal feels as it moves through its full range of motion.
In a properly functioning clutch, the pedal movement should be consistent and smooth, without any excessive resistance or looseness.
Checking the pedal immediately after installation helps identify potential issues, such as misalignment, improper installation of the release bearing, or insufficient torque on the pressure plate bolts.
This initial test ensures that the clutch is ready for further operational checks and prevents damage that could result from operating a faulty clutch.
2. Ensure Smooth Engagement and Disengagement
A crucial part of clutch testing is ensuring that it engages and disengages smoothly.
When the clutch pedal is released, engine power should be transmitted to the transmission uniformly, allowing the vehicle to move forward without any jerking or hesitation.
When the clutch pedal is depressed, the engine should completely disengage from the transmission, allowing gears to be shifted easily without any grinding or resistance.
Smooth engagement and disengagement indicate that the clutch disc, pressure plate and release bearing have been installed correctly and that all components are working in harmony.
3. Check for Noise or Vibration
While operating the clutch pedal, listen carefully for any unusual noises such as: squeaking, rattling, or grinding sounds.
Additionally, pay close attention to any vibrations felt through the pedal or the transmission.
Noise or vibration can be indicative of issues such as misalignment, loose bolts, worn release bearings, or contamination on the flywheel or clutch disc.
Detecting and rectifying these problems early on can prevent further damage to the clutch and transmission, thereby ensuring a safer and more reliable driving experience.
4. Road Test to Verify Proper Functioning
Once the clutch has passed the basic tests while the vehicle is in neutral, it is advisable to conduct a controlled road test to verify its full operational capability.
During the road test, pay close attention to the pedal feel, gear engagement and acceleration while shifting through all gears.
The vehicle should accelerate smoothly, without slipping, jerking, or exhibiting any unusual hesitation.
This real-world test confirms that the clutch installation was successful and that all components are performing as intended under normal driving conditions.
A thorough road test helps identify any minor adjustments required before regular use, thereby ensuring long-term reliability and safe driving.
Read More:
- How to Diagnose Clutch Problems
- How to Change Transmission Fluid
- How to Fix a Slipping Transmission
- How to Check Transmission Fluid
Know, Common Mistakes to Avoid Them During Replacement of Clutch
1. Failure to Use a Clutch Alignment Tool
One of the most common mistakes made during a clutch replacement is failing to use a clutch alignment tool.
The alignment tool ensures that the clutch disc is perfectly centered on the flywheel.
Without it, the transmission input shaft may not slide in easily during reinstallation, or the clutch may fail to engage properly.
An improperly installed clutch can lead to vibration, difficulty shifting gears and premature wear of the clutch disc or pressure plate.
The correct use of an alignment tool simplifies the installation process, minimizes complications and ensures that the new clutch functions correctly right from the start.
2. Failure to Tighten Pressure Plate Bolts Uniformly
Another common error is failing to tighten the pressure plate bolts uniformly, or tightening them too quickly.
The pressure plate should be tightened gradually, using a cross-pattern sequence, to prevent it from becoming warped.
If the bolts are not tightened evenly, the pressure plate can warp, potentially causing the clutch to slip, generate noise, or fail to engage properly.
Overtightening the bolts can cause the pressure plate to crack or become damaged, while undertightening may result in the bolts coming loose during operation.
Adhering to the manufacturer-specified torque values and tightening sequence ensures that both the clutch and the flywheel are securely and correctly fitted, thereby ensuring long-term reliability.
3. Neglecting the Condition of the Flywheel
Many people replace the clutch without inspecting the condition of the flywheel, which can lead to serious problems down the road.
The flywheel serves as the surface against which the clutch disc exerts pressure; if it contains any cracks, scratches, or warping, the performance of the clutch can be severely compromised.
A defective flywheel can cause clutch slippage, vibration, noise, or lead to the premature failure of a new clutch.
Often, simply cleaning away minor debris or resurfacing the flywheel is sufficient; however, if the flywheel is severely worn, it should be replaced.
Taking a moment to inspect the flywheel safeguards your investment in the new clutch and ensures the smooth transfer of power from the engine to the transmission.
4. Rushing the Reassembly Process
Finally, rushing the reassembly process is a mistake that can jeopardize the entire clutch replacement job.
Skipping steps, failing to mark bolts, or ignoring specific torque specifications can lead to misalignment, fluid leaks, or improper pedal operation.
Working too quickly increases the risk of dropping heavy components such as: the transmission, damaging wiring, or overlooking the installation of small parts.
Adopting a systematic approach, double-checking every connection and carefully following all instructions ensures that the clutch and transmission operate safely and efficiently.
Exercising patience during reassembly saves both time and money in the long run, while also minimizing frustration and errors.
How to Maintain a Clutch
Not only this, there’s scientific evaluations of clutch friction materials that shows that the heat buildup, stress distribution and wear patterns actually influences torque transmission and overall clutch efficiency, that’s why you need to choose the appropriate materials and replace the worn out friction surfaces that can increase the clutch life and prevent from sudden failures as well, so this research actually shows that why it is really important to have clean surface and inspect the flywheel and clutch disc surfaces before any replacement to ensure reliable power transfer and less wear on the transmission parts as well.[¹]
1. Regularly Check the Clutch Fluid – If Hydraulic
If your vehicle is equipped with a hydraulic clutch system, regularly checking the clutch fluid is crucial to ensure its smooth operation.
Low fluid levels or impurities in the clutch fluid can cause the pedal to feel spongy (soft) when depressed, make shifting gears difficult, or even result in the clutch failing to disengage completely.
Most hydraulic clutch systems utilize brake fluid, which absorbs moisture over time; this can lead to corrosion inside the master or slave cylinders.
Periodically checking the fluid level and condition, and topping it up with the correct type of fluid, helps maintain a consistent pedal feel, prevents leaks and ensures the clutch functions correctly.
Proper fluid maintenance is the simplest way to avoid premature clutch failure.
2. Avoid “Riding” the Clutch
“Riding the clutch” refers to resting your foot lightly on the pedal while driving, which keeps the clutch disc partially engaged.
This generates excessive heat and friction, resulting in accelerated wear on the clutch disc, pressure plate and flywheel.
Constantly riding the clutch can cause the clutch to slip, degrade vehicle performance and significantly reduce the lifespan of the clutch components.
Keeping your foot off the pedal when you are not shifting gears, and using the clutch only when necessary, protects the clutch and prevents unnecessary wear.
Adopting this simple driving habit can significantly extend the lifespan of the clutch and make gear shifting much smoother.
3. Periodically check for leaks or abnormal wear.
Regular inspection of the clutch system is crucial for detecting potential issues in a timely manner.
Keep an eye out for leaks from the hydraulic lines, master cylinder, or slave cylinder and check for any signs of abnormal wear on the clutch pedal, linkages, or cables.
Any unusual noises, vibrations, or changes in pedal feel could indicate incipient problems, issues that can be rectified before they lead to serious damage.
Periodic inspections help maintain the clutch in good condition, minimize the risk of vehicle breakdown and enable drivers to address minor issues before they escalate into major, costly repairs.
A combination of regular maintenance and careful driving habits ensures that your clutch continues to function reliably and without interruption for many years to come.
Conclusion – How to Replace a Clutch
If your vehicle have well maintained and properly working clutch system, only then every gear shift becomes smooth and safe, that’s why it is always recommended to replace the old or worn-out clutch for ensuring efficiency for years to come.
Just follow every step: from preparation and the safe removal of the transmission to the installation of the new clutch and a comprehensive final inspection, you ensure smooth gear engagement, consistent vehicle acceleration and the efficient transfer of power from the engine to the wheels.
Paying close attention to minute details such as: proper alignment, precise torque specifications and the careful handling of heavy components, prevents transmission damage and extends the lifespan of the new clutch.
Routine maintenance, including monitoring hydraulic fluid levels, avoiding unnecessary clutch usage and checking for signs of abnormal wear or leaks, further ensures that your clutch system continues to operate at peak efficiency for years to come.
Taking the time to understand how the clutch system functions, executing the replacement process correctly and avoiding common pitfalls not only saves on repair costs but also enhances driving comfort, safety and confidence.
Now, that’s it from this guide on How to Replace a Clutch, so if you still have confusion just comment down below.
Frequently Asked Questions
FAQ 1: What is a clutch and why is it important?
A clutch is a device installed in a car that connects and disconnects the engine from the transmission. It allows the driver to shift gears smoothly while keeping the engine running. The clutch is crucial because it transmits power from the engine to the wheels, enabling the car to move forward. If the clutch malfunctions, you may experience issues such as slipping gears, jerking, or difficulty accelerating. Repairing or replacing a faulty clutch ensures safe driving, smooth gear shifting and improved vehicle performance.
FAQ 2: How do I know if my clutch needs to be replaced?
There are several signs indicating that your clutch may need to be replaced. Common symptoms include the clutch pedal feeling soft or spongy, difficulty shifting gears, gear slippage (where the engine RPM increases but the vehicle’s speed does not), strange grinding or rattling noises and a burning smell coming from the vicinity of the engine. If you notice any of these issues, it is essential to have the clutch inspected and replaced if necessary to prevent further damage to the transmission and other components.
FAQ 3: Can I replace the clutch myself, or should I hire a mechanic?
Replacing a clutch is a complex task that requires knowledge of the vehicle’s transmission system and specialized tools. If you have some mechanical aptitude and carefully follow the provided instructions, you can replace the clutch yourself. For this job, you will need tools such as a jack, jack stands, a socket set, a clutch alignment tool and a torque wrench. However, if you lack confidence in your abilities or do not possess the proper tools, it is safer to call a professional mechanic, as errors made during clutch installation can result in damage to the clutch, flywheel, or transmission.
FAQ 4: How long does a clutch last?
The lifespan of a clutch depends on your driving habits, the type of vehicle and driving conditions. On average, a clutch can last anywhere from 50,000 to 100,000 miles. Factors such as “riding” the clutch (driving with your foot resting on the pedal), aggressive driving, towing heavy loads, or driving in stop-and-go traffic can significantly reduce its lifespan. Regular maintenance such as: checking hydraulic fluid levels and avoiding unnecessary clutch usage, as it helps extend the clutch’s life and ensures safe driving for the long term.
FAQ 5: What is a clutch alignment tool and why is it important?
A clutch alignment tool is a simple device that helps center the clutch disc relative to the flywheel during installation. Proper alignment is crucial because it ensures that the transmission input shaft slides smoothly into the clutch assembly and that pressure is applied evenly when the clutch engages. Without an alignment tool, the clutch may not be centered correctly; this makes reinstalling the transmission difficult and can lead to issues such as vibration, improper clutch engagement, or premature wear of clutch components.
FAQ 6: What is the difference between a hydraulic clutch and a cable clutch?
A hydraulic clutch uses fluid to transmit pressure from the clutch pedal to the clutch mechanism, whereas a cable clutch uses a cable to pull the clutch fork. With a hydraulic clutch, depressing the pedal is effortless, requiring minimal physical exertion to operate. Conversely, cable clutches feature a simpler design and are easier to adjust, although depressing the pedal may require greater physical effort. Both systems perform the same fundamental function that engages and disengages the clutch, yet their maintenance requirements vary depending on their specific type. Hydraulic clutches necessitate periodic checks of the fluid level, whereas cable clutches may require adjustment over time if the cable stretches.
FAQ 7: How should I maintain my new clutch to ensure its longevity?
Proper clutch maintenance involves adopting a few simple yet essential habits. Avoid “riding” the clutch that is, do not rest your foot lightly on the pedal when it is not required. If your vehicle is equipped with a hydraulic clutch, regularly check the hydraulic fluid level. Inspect the clutch pedal and linkage for signs of wear and check the system for any fluid leaks. Driving gently, shifting gears carefully and avoiding sudden, rapid acceleration all help to minimize the stress placed on the clutch. With proper care, the clutch will operate smoothly, resist premature wear and enjoy an extended overall lifespan.
FAQ 8: Is it normal to feel a slight vibration after replacing the clutch?
It is not unusual to feel a slight vibration in the clutch pedal immediately following a replacement; this often occurs as the clutch disc, flywheel, or pressure plate settle into their proper seating positions. However, if this vibration persists or becomes excessive, it could indicate a misalignment, that the pressure plate bolts are not properly tightened, or that the flywheel is warped. If the vibration persists, it is crucial to have the clutch thoroughly inspected.
References:
[1] Investigation of structural and thermal analysis of clutch facings with different friction materials
https://www.sciencedirect.com/science/article/abs/pii/S2214785323018291

Hello Folks, Dean Shali here to help you out to solve the problems with your lovely vehicle, as i have lots of experience and knowledge about automotive industry as i woks directly with the customers and repair vehicles and i love to help the people to keep their cars safe and running smoothly.